The Registration Section includes a list of providers from which ExtremeControl can gather registration information. Configure registration using these providers or configure other OpenID Connect providers using the Provider 1 Registration and Provider 2 Registration options.
| NOTE: | Guest OAuth (for example, Google, Yahoo) may not support native mobile browsers and display a “user agent” error. To access the network, use a standard browser application (e.g. Google Chrome). |
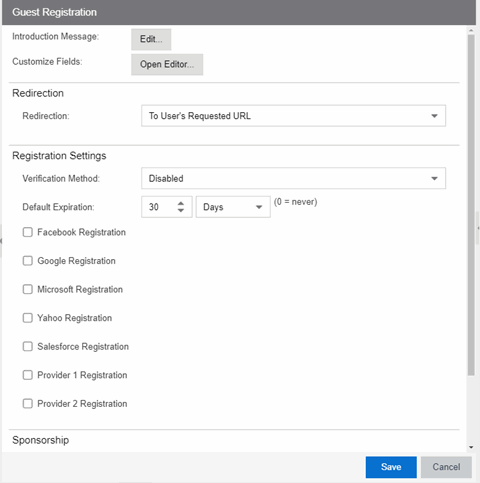
Facebook Registration
- Select the Facebook Registration checkbox if you are implementing guest registration using Facebook as a way to obtain end user information. In this scenario, the Guest Registration portal provides the end user with an option to log into Facebook in order to complete the registration process.
- Enter the Facebook App ID – When you create an application you are given a Facebook App ID to enter here.
- Enter the Facebook App Secret – When you create an application you are given a Facebook App Secret to enter here.
- Enter the Facebook Redirect URI – This information allows you to configure the provider as
fb_oauth. - Press OK to save your changes.
Google Registration
- Select the Google Registration checkbox if you are implementing guest registration using Google as a way to obtain end user information. In this scenario, the Guest Registration portal provides the end user with an option to log into Google in order to complete the registration process.
- Enter the Google Discovery URI – (a benefit of Open ID Connect) - This url gives you access to all the end-points you need to complete authorizations of user data.
- Enter the Google App ID – When you create an application you are given a Google App ID to enter here.
- Enter the Google App Secret – When you create an application you are given a Google App Secret to enter here.
- Enter the Google Redirect URI – This information allows you to configure the provider as
google_oauth. - Press OK to save your changes.
Microsoft Registration
- Select the Microsoft Registration checkbox if you are implementing guest registration using Microsoft as a way to obtain end user information. In this scenario, the Guest Registration portal provides the end user with an option to log into Microsoft in order to complete the registration process.
- Enter the Microsoft Discovery URI – (a benefit of Open ID Connect) - This url gives you access to all the end-points you need to complete authorizations of user data.
- Enter the Microsoft App ID – When you create an application you are given a Microsoft App ID to enter here.
- Enter the Microsoft App Secret – When you create an application you are given a Microsoft App Secret to enter here.
- Enter the Microsoft Redirect URI – This information allows you to configure the provider as ms_oauth.
- Press OK to save your changes.
Yahoo Registration
- Select the Yahoo Registration checkbox if you are implementing guest registration using Yahoo as a way to obtain end user information. In this scenario, the Guest Registration portal provides the end user with an option to log into Yahoo in order to complete the registration process.
- Enter the Yahoo Discovery URI – (a benefit of Open ID Connect) - This url gives you access to all the end-points you need to complete authorizations of user data.
- Enter the Yahoo App ID – When you create an application you are given a Yahoo App ID to enter here.
- Enter the Yahoo App Secret – When you create an application you are given a Yahoo App Secret to enter here.
- Enter the Yahoo Redirect URI – This information allows you to configure the provider as
yahoo_oauth. - Press OK to save your changes.
Salesforce Registration
- Select the Salesforce Registration checkbox if you are implementing guest registration using Salesforce as a way to obtain end user information. In this scenario, the Guest Registration portal provides the end user with an option to log into Salesforce in order to complete the registration process.
- Enter the Salesforce Discovery URI – (a benefit of Open ID Connect) - This url gives you access to all the end-points you need to complete authorizations of user data.
- Enter the Salesforce App ID – When you create an application you are given a Salesforce App ID to enter here.
- Enter the Salesforce App Secret – When you create an application you are given a Salesforce App Secret to enter here.
- Enter the Salesforce Redirect URI – This information allows you to configure the provider as
salesforce_oauth. - Press OK to save your changes.
Provider Registration (Generic)
- To add a provider not already considered by Access Control, but uses Open ID Connect, select the box near Provider 1 (generic).
- Provider 1 Discovery URI – (a benefit of Open ID Connect) – You can use the company’s own discovery URI. This feature gives you access to all the end-points that you need to complete authorizations of user data
- Provider 1 App ID – This information is given by the provider.
- Provider 1 App Secret – This information is given by the provider.
- Provider 1 Image – You can add an image or a logo by selecting New from the drop-down list. Drag and drop a file or select a file using the browser to add an image for this provider.
- Provider 1 Text – Press the Text button to open the Localized Message String Editor window. Use the box to add text. Press OK to save your changes.
- Provider 1 Redirect URI - This information allows you to configure the provider as
genprovider_oauth.
The Enterprise Registration Center will include logos buttons for providers in Register as Guest panel. Select each logo to be redirected to the provider's website for user authentication. You will then be redirected back to complete Open ID access authorization.
For information on related help topics:
![]()