Guest and IoT Manager Configuration in ExtremeCloud IQ Site Engine and Access Control (Legacy)
Guest & IoT Manager (GIM) is an application that allows you to access and manage guest user and end-system (device) activity information. Through ExtremeCloud IQ Site Engine and ExtremeControl, GIM provides non-IT personnel with the tools to configure limited system access for guest users and/or devices based on authorization constraints you define.
| NOTE: | Beginning in ExtremeCloud IQ Site Engine 25.05.12, GIM performs a version compatibility check as it connects to ExtremeCloud IQ Site Engine. If you are attempting to connect to an incompatible version of ExtremeCloud IQ Site Engine, GIM displays an error message. |
Non-IT personnel who are designated as provisioners can provide limited access to other guest users for a specified amount of time for specific purposes. For example, your company is conducting product training for customers at one of your offices. You provide the front desk employee at the site provisioner access so he or she can provide participating customers limited guest user access to your system for that day only. Refer to Extreme Control Guest and IoT Manager Configuration for more information about provisioner and guest user access.
Connecting GIM to ExtremeControl
GIM uses a REST API to communicate with ExtremeCloud IQ Site Engine through an Access Control engine. In order for GIM to access the REST API, it must be authorized to do so by configuring the appropriate GIM capability in the Authorization Group configuration in ExtremeCloud IQ Site Engine. The REST API allows GIM to store its configuration data in the ExtremeCloud IQ Site Engine database.
Use the following steps to create an Authorization Group and add users to that Authorization Group:
- Open the Administration > Users tab in ExtremeCloud IQ Site Engine.
- Create a new Authorization Group for users with access to the GIM REST API.
- Select Save.
- Create users and add them to the new Authorization Group.
- Select Save.
- Access the Administrator Application of GIM.
- Open the Administration > Access Control Engine tab in GIM.
- Open the Engine Details tab.
- Enter the information for the Access Control engine you are using for GIM. For additional information, see Configuring Engine Details on page 49 of the Extreme Control Guest and IoT Manager Configuration document.
| NOTE: | Enter the credentials of the user or users added to the GIM REST API Authorization Group in the Admin Username and Admin Password fields. |
Configuring the RADIUS Protocol for GIM Authentication
After adding users to the GIM Authorization Group, enter the IP address and RADIUS shared secret in ExtremeCloud IQ Site Engine and in GIM to allow the Access Control engine to authenticate provisioners in GIM.
- Open the Control > Access Control tab in ExtremeCloud IQ Site Engine.
- Expand the Engines folder in the left panel.
- Select the Engine Group through which provisioners are authenticating.
- Open the Guest and IoT Managers tab in the right panel.
- Select Add.
The Add Guest and IoT Manager window opens. - Enter the GIM IP address.
- Enter a Shared Secret and copy it to a safe location.
- Access the Administrator Application of GIM.
- Open the Administration > Access Control Engine tab in GIM.
- Open the RADIUS tab.
- Enter the RADIUS information on the tab. For additional information, see Configuring RADIUS Settings on page 50 of the Extreme Control Guest and IoT Manager Configuration document.
| NOTE: | The shared secret functions as a password, allowing GIM and the RADIUS server (the Access Control engine) to communicate. Use a strong shared secret difficult for others to guess. |
The Access Control engine is configured as the RADIUS server for GIM. Configure each GIM application with an IP Address and Shared Secret in ExtremeCloud IQ Site Engine.
Creating and Configuring a GIM Domain
A GIM domain contains all of the configuration information. GIM domains are created in ExtremeCloud IQ Site Engine and the configuration within that domain is configured in GIM.
To create a GIM domain in ExtremeCloud IQ Site Engine:
- Open the Control > Access Control tab in ExtremeCloud IQ Site Engine.
- Expand the Engines folder in the left panel.
- Select the Engine Group through which provisioners are authenticating.
- Open the Details tab in the right panel.
- Select Edit in the Guest and IoT Configuration section of the tab. The Edit Guest and IoT Manager Configuration window opens.
- Select New from the drop-down list to create a new domain. The Create Guest and IoT Management Domain window opens.
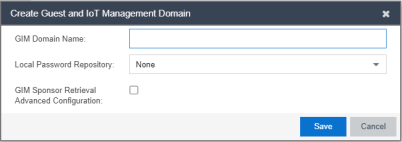
- Enter the name of your GIM domain and select New in the Local Password Repository drop-down list to create a new password repository for GIM. The Create Repository window opens.
- Enter a name for the local password repository you are using for your GIM provisioners and users.
- Select Create.The Edit Local Password Repository window opens.
- Select Add. The Edit User window opens.
- Enter the information for at least one user.
- Select OK.
- Select the local password repository you created in the Local Password Repository drop-down list in the Create Guest and IoT Management Domain window.
- To customize the sponsor retrieval in your GIM Domain, select the GIM Sponsor Retrieval Advanced Configuration check box and choose a different LDAP configuration and Search Root specifically for sponsor look-ups.
NOTE: Not enabling the GIM Sponsor Retrieval Advanced Configuration defaults sponsor retrieval to use an LDAP configuration based solely on the Sponsor Group configured in GIM. - The Sponsor Retrieval panel displays.

- Select, create, or modify the LDAP Configuration from the drop-down list.
- Enter the Search Root.
- Optionally, you can select the check box to enable the GIM Sponsor LDAP Group filter, which further filters the search for a sponsor using the GIM-configured Sponsor LDAP Group.
NOTE: Not selecting the GIM Sponsor LDAP Group filter ignores yours Sponsor Group setting in GIM and uses the LDAP configuration and Search Root you define in the Create Guest and IoT Management Domain window for sponsor look-ups.
- The Sponsor Retrieval panel displays.
- Select Save.
The templates, users, devices, and other information configured in the GIM application are stored in the GIM domain.
| NOTE: | While the domain is stored in ExtremeCloud IQ Site Engine, the only part of the GIM domain configured in ExtremeCloud IQ Site Engine is the authentication method used by GIM provisioners and users. |
Configuring GIM Authentication
In GIM, the Administrator creates provisioners via the Administration login. Provisioners then provide network access to users or devices using the Provisioner login.
Local Password Repository
When you create a provisioner while logged into GIM as an Administrator, ExtremeCloud IQ Site Engine saves the provisioner credentials in the default local password repository associated with the GIM Domain.
When you provide network access to users or devices in GIM, those credentials are also saved in the local password repository associated with the GIM Domain.
LDAP
Provisioners can also authenticate via Active Directory associated with an LDAP Configuration in ExtremeCloud IQ Site Engine. For provisioners for which both LDAP and a local password repository are available as authentication methods, the methods can be independent or work in conjunction with each other (for example, if LDAP authentication fails, ExtremeCloud IQ Site Engine checks the local password repository for valid credentials).
To configure LDAP as an authentication method:
- Access GIM as the Administrator.
- Open the Onboarding Template tab and select Add.
- Open the Advanced tab.
- Enter the Active Directory field against which authentication is verified (for example,
cn=gimGroup1,dc=extremenetworks,dc=com). The entire path must match for authentication to be successful.
Some common Active Directory objects used include:- cn=common name
- dn=distinguished name
- dc=domain controller
- ou=organizational unit
- Access ExtremeCloud IQ Site Engine.
- Open the Control tab.
- Select the Access Control tab.
- Select the Configuration > Configurations tab in the left-panel tree.
- Expand the Access Control Configuration associated with the Access Control Engine Group to which GIM is associated.
- Select AAA.
- Configure the LDAP configuration to provide authentication and authorization for network end users and host machines via Active Directory.
- Save the LDAP configuration.
- Expand the Access Control Configuration associated with the Access Control Engine Group to which GIM is associated.
- Select AAA.
- Configure the Authentication Rules table to authenticate via your LDAP configuration, your local repository, or both by adding both to the table. If using both authentication methods, ensure the authentication method you want to take precedence is listed first in the table.
- Select Save.
The Access Control Engine now authenticates GIM users based on the Access Control Configuration.
| IMPORTANT: | Via the legacy NAC Manager java application, ensure Manual Set (Accurate) is listed first in the Device Type Detection Source Precedence Order in the Edit Appliance Settings window on the Device Type Detection tab. This is the default precedence, and is required for GIM-assigned device types to affect authentication. |
Once GIM is fully connected to ExtremeCloud IQ Site Engine and Access Control, follow the steps outline in the Extreme Control Guest and IoT Manager Configuration document.
For information on related help topics:
Extreme Control Guest and IoT Manager Configuration
![]()