ExtremeAnalytics uses fingerprints to identify to which application a network traffic flow belongs. A fingerprint is a description of a pattern of network traffic which can be used to identify an application. ExtremeCloud IQ Site Engine provides thousands of system fingerprints with the ExtremeAnalytics feature. In addition, you can modify these fingerprints and create new custom fingerprints.
In order to add and modify fingerprints, you must be a member of an authorization group assigned the ExtremeCloud IQ Site Engine ExtremeAnalytics Read/Write Access capability.
Updating Fingerprints
New and updated fingerprints are provided via a fingerprint update website. Perform a one-time manual update of the fingerprint database or configure a scheduled update to be performed automatically from the Configuration tab. Custom fingerprints are not overwritten when an update is performed.
When a fingerprint update is performed, the fingerprint update server is checked for newer fingerprints than what is available on the ExtremeCloud IQ Site Engine server. If there are newer fingerprints, they are downloaded, and the fingerprint definitions are updated with any new fingerprint definition files. You need to enforce your engines following an update to push the updated fingerprints to the engines.
Perform a Fingerprint Update
Perform a manual one-time update of the fingerprint database. To access the update website, you need to create an Extranet account at ExtremeNetworks.com and define a username and password for the account. You need the username and password in order to perform updates.
- Select the Analytics tab in ExtremeCloud IQ Site Engine and then select the Configurations view.
- In the left-panel tree, expand the System folder and select Fingerprints.
- Select the Menu icon (
 ) and select Update Fingerprints. If you have already configured your Fingerprint Update settings, the update is performed immediately.
If you have not configured your settings, the Fingerprint Update window opens.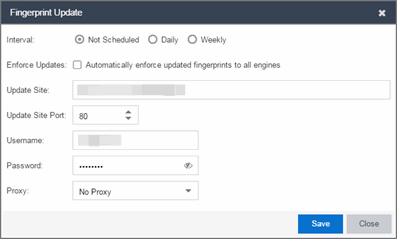
- Leave the Interval selection as Not Scheduled.
- Select the Enforce Updates checkbox to automatically update fingerprints on all engines. Not selecting this checkbox requires you to update each engine manually.
- The Update Site field displays the default path to the official fingerprint update site. Typically, this field does change unless for security reasons the system does not have access to the internet and an internal update site must be used.
- The Update Site Port is the port on the update site to which the update connects. The port cannot be changed unless you are using a custom update site.
- Enter the credentials used to access the fingerprint update website. These are the username and password credentials you defined when you created an Extranet account at ExtremeNetworks.com.
- If your network is protected by a firewall, you need to configure proxy server settings to use when accessing the website. In the Proxy field, select Use Proxy or Use Proxy with Credentials and enter your proxy server address and port ID. (Consult your network administrator for this information.) If your proxy server requires authentication, enter the proxy username and password credentials. The credentials you add here must match the credentials configured on the proxy server.
- Select Save. The Fingerprint Update is performed immediately.
- If you did not select the Enforce Updates checkbox, enforce to push the changes to your engines when the update is complete.
Schedule Fingerprint Updates
You can schedule fingerprint updates performed automatically on a daily or weekly basis.
To access the update website, you need to create an Extranet account at ExtremeNetworks.com and define a username and password for the account. You need the username and password in order to schedule updates.
- Select the Analytics tab in ExtremeCloud IQ Site Engine and then select the Configuration view.
- In the left-panel tree, expand the System folder and select Fingerprints.
- Select the Menu icon () and select Fingerprint Update Settings. The Fingerprint Update window opens.
- Select the update interval which defines how frequently the update is performed: Daily or Weekly.
- If you have selected Weekly, select the day of the week you would like the update performed.
- Enter the scheduled time you would like the update performed.
- Select the Enforce Updates checkbox to automatically update fingerprints on all engines. Not selecting this checkbox requires you to update each engine manually.
- The Update Site field displays the default path to the official fingerprint update site. Typically, this field does not change unless for security reasons the system does not have access to the internet and an internal update site must be used.
- The Update Site Port is the port on the update site to which the update connects. The port cannot be changed unless you are using a custom update site.
- Enter the credentials used to access the fingerprint update website. These are the username and password credentials you defined when you created an Extranet account at ExtremeNetworks.com.
- If your network is protected by a firewall, configure proxy server settings to use when accessing the website. In the Proxy field, select Use Proxy or Use Proxy with Credentials and enter your proxy server address and port ID. (Consult your network administrator for this information.) If your proxy server requires authentication, enter the proxy username and password credentials. The credentials you add here must match the credentials configured on the proxy server.
- Select Save.
- If you did not select the Enforce Updates checkbox, enforce to push the changes to your engines when the update is complete.
For information on related help topics: