Manage Custom Fields
This window lets you manage the fields displayed in the web pages presented to the end user when they access the network. It is configured as part of your portal configuration, and is accessed from the Customize Fields Open Fields button in Edit Portal Configuration. You can manage custom fields for both guest and authenticated access types:
- Guest Access Types — By default, the guest login/registration web page displays the First Name, Last Name, and Email Address fields. You can use this window to specify other fields you would like to be displayed (visible) and required. These settings are shared by Guest Web Access, Guest Registration, and Secure Guest Access. Modifying settings for one access type also changes them for the others.
- Authenticated Access Types — By default, the authenticated login/registration web page displays only the Acceptable Use Policy. You can use this window to specify other fields you would like to be displayed (visible) and required. These settings are shared by the Authenticated Web Access and Authenticated Registration access types. Modifying settings for one access type also changes them for the other.
Sample Manage Custom Fields Window
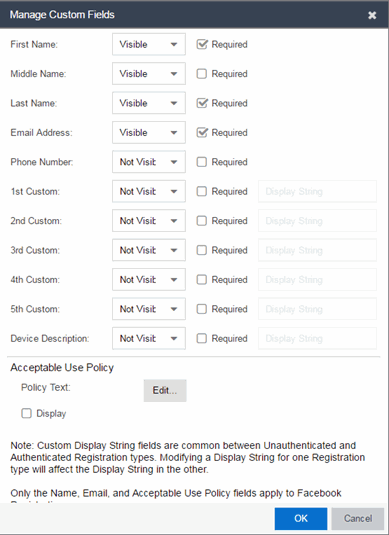
For each field, use the drop-down list to select whether the field is:
- Visible - the field is displayed in the login/registration web page for the end user. If you want the field information to be required (the end user must enter the information), select the "Required" checkbox.
- Not Visible - the field is not displayed in the login/registration web page for the end user.
- Admin Only - the field is visible to network administrators only, in the Add/Edit User web page accessed from the Registration System Administration web page. The end user is not able to see or edit the field.
| NOTES: | For Guest Registration and Guest Web Access: If you are configuring a Verification Method, the Email Address field and/or the Phone Number field are required (depending on the verification method you have selected) and must be set to Visible/Required. For more information, see How to Configure Verification for Guest Access Registration. For Secure Guest Access: The Credential Delivery method requires the Email Address field and/or the Phone Number field (depending on the delivery method you have selected) to be set to Visible/Required. For more information, see Credential Delivery Method in the Edit Portal Configuration panel. For Facebook Registration: Only the First Name, Last Name, and Email Address fields are filled using Facebook data. These fields and the Acceptable Use Policy (AUP) option are the only fields that apply to Facebook registration. If the display AUP option is selected, the captive portal verifies that the AUP is acknowledged before redirecting the user to Facebook. |
Use the Custom fields to add additional fields to the login/registration web page. Set the field to Visible, and then add the text to display by adding a display string. Here are some examples of how to use custom fields:
- In a higher education environment, you can set a custom field display string to "Student ID Number" or "Dorm Room Number" to record additional information about students registering to the network.
- In a corporate environment, you can set a custom field display string to "Company Name" to obtain information about organization to which a partner or guest belongs. Or, you might want the end user to enter a device description, such as an asset tag number.
- In a convention deployment, you can set a custom field display string to "Booth Number" to record the booth to which a registering end-system is associated.
Select the Acceptable Use Policy checkbox if you would like the web page to display your organization's Acceptable Use Policy (AUP) and select the Edit button to open a window where you can add the AUP text.
| NOTE: | The Pre-Registration web page always displays the First Name and Last Name fields even if they are not selected as visible/required in the Manage Custom Fields window. If they are selected as required, they are displayed as required on the Pre-Registration web page, otherwise they are displayed as optional. This is because it is important to prompt for a first and last name to be included on the pre-registration voucher printed out. |
For information on related help topics:
![]()