Guest registration requires end users to enter their name and contact information on a Registration web page in order to gain access to the network. However, in many cases, end users provide false names and contact information because they don't want their personal information to be used for other purposes. In those cases, network administrators do not have a way to contact the user in the event of an Acceptable Use Policy (AUP) violation or in the case of an emergency.
With verification, guest end users registering to the network are required to enter a verification code that is sent to their email address or mobile phone (via SMS text) before gaining network access. This ensures that network administrators have at least one way to contact the end user.
Configuration Steps
The verification feature is supported for both Guest Registration and Guest Web Access, and is configured using the Verification Method options in your portal configuration. Depending on the verification method you specify, the appropriate custom fields must be configured for display on the Registration web page, so that end users can enter the required information.
The following table provides a description of each verification method and lists their custom field requirements.
| User Verification Method | Description | Custom Field Requirement |
|---|---|---|
| The end user must enter a valid email address on the Registration web page or Guest Web Access login page. | The Email Address Custom Field must be set to Required. | |
| SMS Gateway | The SMS Gateway provider must support SMTP API. The SMS Gateway provider converts the email to an SMS text message. The end user must enter a mobile phone number on the Registration web page or Guest Web Access login page. | The Phone Number Custom Field must be set to Required. |
| SMS Gateway or Email | The SMS Gateway provider must support SMTP API. The SMS Gateway provider converts the email to an SMS text message. The end user must enter a mobile phone number or email address on the Registration web page or Guest Web Access login page. | The Phone Number and Email Address Custom Fields must be set to Visible. |
| SMS Text Message | The mobile provider converts the email to an SMS test message. The end user must enter a valid mobile phone number on the Registration web page or Guest Web Access login page. | The Phone Number Custom Field must be set to Required. |
| SMS Text or Email | The mobile provider converts the email to an SMS test message. The end user must enter a valid mobile phone number or email address on the Registration web page or Guest Web Access login page. | The Phone Number and Email Address Custom Fields must be set to Visible. |
Use the following steps to configure verification in your portal configuration.
- In ExtremeCloud IQ Site Engine, access the Portal Configuration. Select the Guest Registration or Guest Web Access selection in the Portal tree, depending on what access type your network is using. (If you don't see these selections, select Website Configuration in the tree and enable the appropriate feature.)
- In the Guest Registration or Guest Web Access panel, use the drop-down list to select the desired Verification Method (refer to the table above). The Guest Registration panel is shown below.
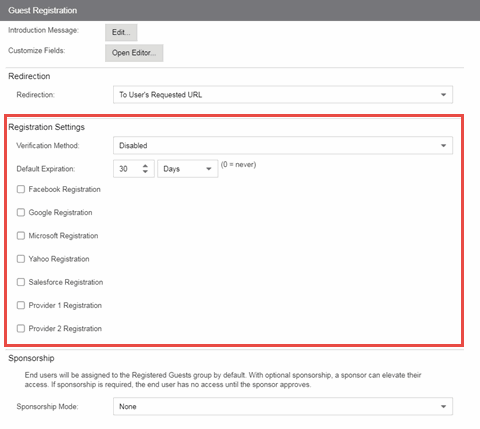
- If you selected the SMS Text Message or the SMS Text or Email User Verification method, select the Service Providers link to configure the list of mobile service providers from which end users can select the Registration web page or Guest Web Access login page. The Mobile Service Provider List provides a default list of providers that can be edited to include the appropriate service providers for your geographic location.
You can comment out entries by preceding each line with either a # or // to enable temporary editing of the file without removing the text.
The list requires one service provider entry per line, using the following format: <Provider>:phonenumber@<specificdomain>.
When the end user registers, they will see only the <Provider> portion in the drop-down list of providers on the Registration web page.
Select OK to close the window. - If you have selected the SMS Gateway or SMS Gateway or Email method, enter the SMS Gateway Email address provided by the SMS Gateway provider.
-
For all methods, select the Message Strings link to open the Message Strings Editor where you can customize the text displayed on the Registration web page or Guest Web Access login page, and the messages sent to the end user.
You need to modify different message strings sent to the end user, depending on the verification method or methods you selected. Double-click on the message to open a window where you can edit the message text.
- Email - This method uses the following strings:
registrationVerificationEmailMsgBody - the default message shouldn't need to be changed.
registrationVerificationEmailSentFromAddress - you need to change the default message to the appropriate email address for your company.
registrationVerificationEmailSentFromName - the default message shouldn't need to be changed.
registrationVerificationEmailSubject - the default message shouldn't need to be changed.
- SMS Gateway - Depending on your SMS Gateway provider and their required format, modify the following message strings using appropriate variables to customize the dynamic data such as phone number.
registrationVerificationSMSMsgBody
registrationVerificationSMSSubject
- SMS Text Message - This method uses the following strings. The default messages shouldn't need to be changed.
registrationVerificationSMSMsgBody
registrationVerificationSMSSubject
Select OK to close the window.
- Email - This method uses the following strings:
- In the Web Page Customizations (Shared) section, select the Customize Fields link to open the Manage Custom Fields window.
- Set the appropriate custom fields to display on the Registration web page or Guest Web Access login page, depending on the verification method you selected (refer to the table above). When you save your portal changes, the correct configuration of the custom fields are verified. These settings are shared by Guest Web Access, Guest Registration, and Secure Guest Access. Changing them for one access type also changes them for the others. For more information, see the Manage Custom Fields Window.
Select OK to close the window. - Back in the Portal Configuration, select Save to save your changes. Close the Portal Configuration window. Enforce the new portal configuration to your engine(s). Verification is now configured for your guest registration.
How User Verification Works
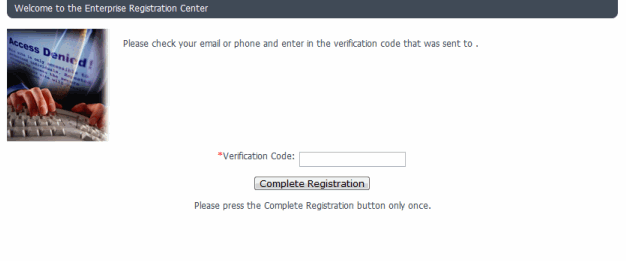
When a guest attempts to access the network, the Registration web page or Guest Web Access login page asks for their email address and/or phone number and mobile service provider, along with their normal contact information.
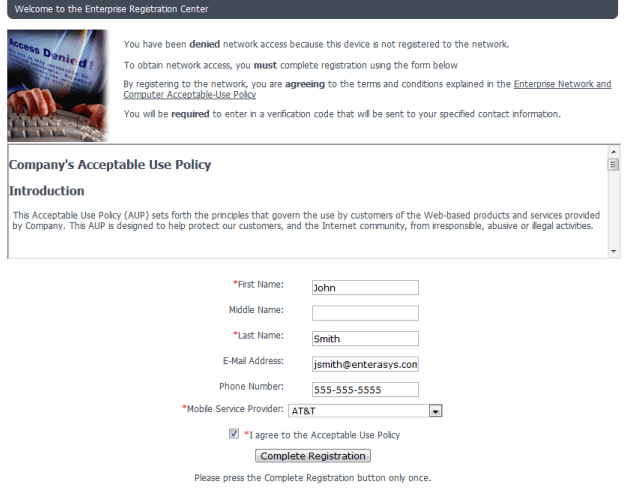
When they select the Complete Registration button, they are sent a verification code via an email or a phone text message.
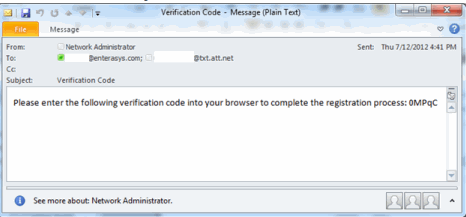
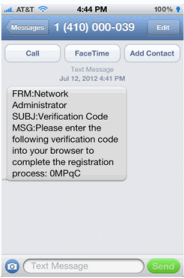
The web page then prompts them for the code. When they enter the correct code that was generated for them and select the Complete Registration button, they are permitted access to the network. The verification code is valid for 15 minutes and cannot be reused after it is validated.
For information on related help topics:
![]()