Use this panel to configure settings for the Assessment/Remediation portal web page. Also, the Network Settings and Look and Feel panels provide you access to common settings that are shared by the Assessment/Remediation portal web page.
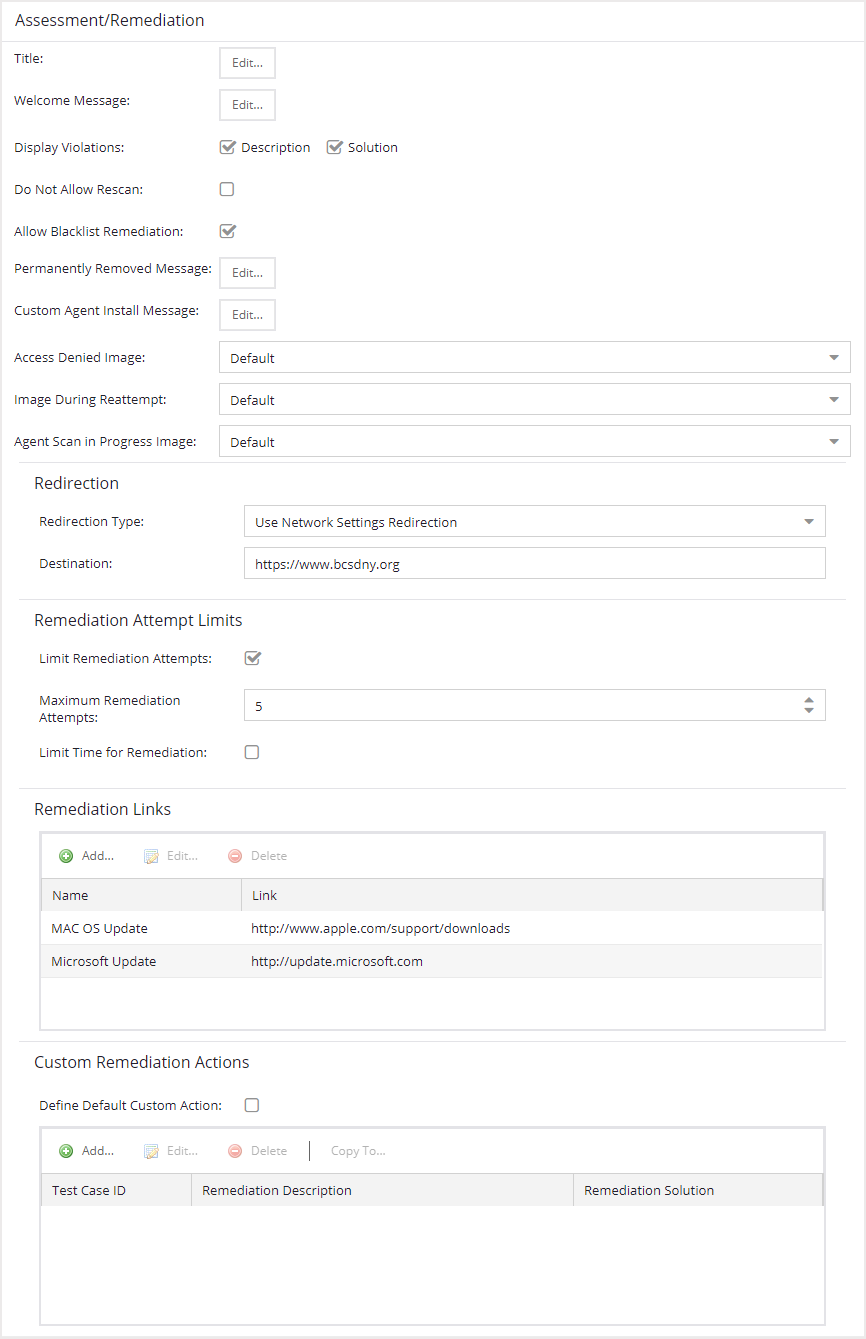
Web Page Settings
- Title
- Select the Edit button to open a window where you can modify the message displayed in the title bar of the Assessment/Remediation web pages. The default page title is "Enterprise Remediation."
- Welcome Message
- Select the Edit button to open a window where you can modify the message displayed in the banner at the top of the Assessment/Remediation web page. The default welcome message is "Welcome to the Enterprise Remediation Center."
- Display Violations
- Use the checkboxes to select the assessment
violation
information that displays to the end user:
- None — No violations are displayed to the web page. This option might be used for an ExtremeControlengine that is serving web pages to guest users, when you do not want the guest users to attempt to remediate their end-system.
- Description — Only the description is displayed for violations. This provides the end user with information concerning what violation was found, but no information concerning how it can be fixed. Use this configuration in scenarios where the user population of the network does not possess technical IT knowledge and is not expected to self-remediate. It provides the Helpdesk personnel with technical information about the violation when the end user places a call to the Helpdesk.
- Solution — Only the solution is displayed for violations, enabling the end user to perform self-service remediation without knowing what the violation is. Use this configuration in scenarios where the user population on the network does not possess technical IT knowledge but is expected to self-remediate.
- Description and Solution — Both the description and solution are displayed for violations. This provides the end user with information concerning what violation was found and how to fix it. Providing complete information concerning the violation gives the end user the best chance of self-remediation, however, the technical details of the violation can result in end user confusion. Therefore, use this configuration in scenarios where the user population of the network possesses more technical IT knowledge.
- Do Not Allow Rescan
- Select this checkbox if you do not want the end-user to have the ability to initiate a rescan of their end-system when quarantined. When selected, the Reattempt Network Access button is removed from the Assessment/Remediation web page, and the user is not provided with any way to initiate a rescan on-demand for network access. The end user is forced to contact the Help Desk for assistance. You can edit the "Permanently Removed Message" which, by default, advises the end user to contact the Helpdesk to obtain access to the network. Note that the default configuration of the "Permanently Removed Message" references the "HELPDESK_INFO" variable which represents the Helpdesk Information that is defined in the Look and Feel Settings.
- Allow Blacklist Remediation
- Select this checkbox if you want black-listed end users to have the ability to remediate their problem and attempt to reconnect to the network. When selected, a "Reattempt Network Access" button is added to the blocked list web page, enabling end users to remove themselves from the blocked list and reauthenticate to the network.
- Permanently Removed Message
- Select the Edit button to open a window where you can modify the message displayed when users can no longer self-remediate and must contact the Help Desk for assistance. Note that the default message references the "HELPDESK_INFO" variable which represents the Helpdesk Information that is defined in the Look and Feel Settings.
- Custom Agent Install Message
- Select the Edit button to open a window where you can create a message containing additional agent install information to add to the default text on the Install Agent portal web page.
- Access Denied Image
- Select the image you want displayed when the end user is quarantined and denied access to the network. The drop-down list displays all the images defined in the Images window for your selection.
- Image During Reattempt
- Select the image you want displayed when the end-user is reattempting network access after they repair their system. The drop-down list displays all the images defined in the Images window for your selection.
- Agent Scan in Progress Image
- Select the progress bar image you want displayed while the end-user is being scanned. The drop-down list displays all the images defined in the Images window for your selection.
- Redirection
- There are four Redirection options that specify where the end-user is
redirected following successful remediation, when the end-user
is allowed on the network. The option selected here overrides the Redirection option specified in the Network Settings for Remediation only.
- Use Network Settings Redirection — Use the Redirection option specified in the Network Settings.
- Disabled — This option disables redirection. The end-user stays on the same web page where they were accepted onto the network.
- To User's Requested URL — This option redirects the end user to the web page they originally requested when they connected to the network.
- To URL — This option lets you specify the URL of the web page to which the end-user is redirected. This is typically the home page for the enterprise website, for example, "http://www.ExtremeNetworks.com."
Remediation Attempt Limits
- Limit Remediation Attempts
- Select this checkbox to limit the maximum number of times an end-user is allowed to initiate a rescan of their end-system after initially being quarantined, in an attempt to remediate their violations. If selected, enter the number of attempts allowed.
- Limit Time for Remediation
- Select this checkbox to limit the total interval of time an end user is allowed to initiate a rescan of their end-system after initially being quarantined, in an attempt to remediate their violations. If selected, enter the amount of time in minutes.
Remediation Links
This table lists the links displayed on the Assessment/Remediation web page for the end users to use to remediate their end-system violations. There are two default remediation links: Microsoft Support and MAC OS Support. Use this tab to add additional links such as an internal website for patches. Links must contain a valid protocol prefix (http://, https://, ftp://).
Select Add to open a window where you can define a new link's name and URL. Select a link and select Edit to edit the link's information. Select Delete to remove a URL from the table.
Custom Remediation Actions
Use this table to create your own custom remediation action for a particular violation to use in place of the remediation action provided by the assessment server.
Use the following steps to add a custom remediation action:
- Select the Add button to open the Add Custom Remediation Action window.
- Enter the Test Case ID for the particular violation being remediated by the custom action. Test Case ID is found in the Health Results Details subtab in the End-Systems tab.
- Add a custom description of the violation (required) and an optional custom solution.
- If you have multiple portal configurations and you want to use this custom remediation action in all of your configurations, select the Add to All Portal Configurations option. This option overwrites any existing custom actions defined for the test case ID.
- Select OK. Whenever the test case ID is listed as a violation on the web page, the custom violation description and solution you define is displayed instead of the remediation actions provided by the assessment server.
Select the Define Default Custom Action checkbox to advise end-users to contact the Helpdesk regarding additional security violations not explicitly listed with custom remediation actions. If this checkbox is selected, only the violations and associated custom remediation actions listed in the table would be presented to the user, along with a message advising them to contact the Helpdesk for any other security violations not explicitly configured with a custom remediation action. Select the Edit button to edit this message.
To copy a custom action to another portal configuration, select the action in the table and select the Copy To button. A window opens where you can select the portal configurations where you want to copy the action, and whether you want it to overwrite any existing custom remediation actions already defined for that test case ID.
Portal Web Page URLs
The following table provides a list of URLs for accessing commonly used portal web pages. You can also access these web pages using the Engine Portal Pages button at the bottom of the Portal Configuration window.
| Web Page | URL |
|---|---|
| Preview Web Page
Enables you to preview the web pages an end-user can access during the assessment/remediation and registration process. |
https://ExtremeControlengineIP/screen_preview |
| Registration Administration Page
Lets administrators view registered devices and users, and manually add, delete, and modify users. |
https://ExtremeControlengineIP/administration |
| Registration Sponsor Page
Lets sponsors view registered devices and users, and manually add, delete, and modify users. |
https://ExtremeControlengineIP/sponsor |
| Pre-Registration Page
The pre-registration web page lets selected personnel easily register guest users in advance of an event, and print out a registration voucher that provides the guest user with their appropriate registration credentials. |
https://ExtremeControlengineIP/pre_registration |
| Self-Registration Page
Enables an authenticated and registered user to self-register additional devices that might not have a web browser (for example, game systems). |
https://ExtremeControlengineIP/self_registration |
For information on related help topics:
![]()