When enabled, the ExtremeControl engine detects the device type of end-systems connecting to your network. One of the methods the ExtremeControl engine uses to detect a device type is to fingerprint the operating system by snooping DHCP packets. A fingerprint is a description of a pattern of network traffic which can be used to identify a device type. You can define new DHCP fingerprints for additional device types using XML in ExtremeCloud IQ Site Engine.
Adding a Fingerprint
Use the following steps to add a new DHCP fingerprint:
- In ExtremeCloud IQ Site Engine, access the Control > Access Control tab.
- Expand the Engines menu in the left panel.
- Select an ExtremeControl engine from the All Engines folder in the left panel select the Details tab in the right panel.
- Select the Engine Settings icon.
- Select Device Type Detection in the left panel.
- Select the Device Type Detection tab.
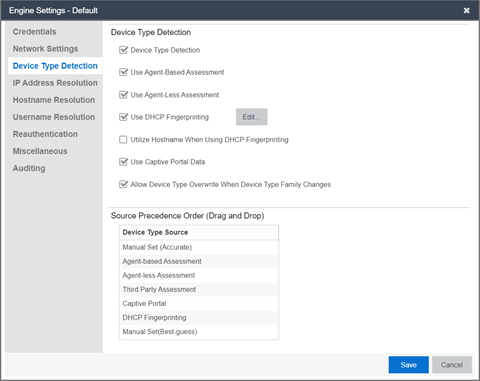
- Select Device Type Detection.
- Select Use DHCP Fingerprinting.
- Select the Edit button.
The DHCP Fingerprint Definition Overrides window opens. - Select the View Sample button to view a sample DHCP fingerprint in a separate window.
NOTE: The information in this window is for informational purposes and cannot be edited. - Select the DHCP Fingerprint Definition Overrides sample text and press [CTRL] + [C] to copy it to the clipboard.
- Close the window.
- Press [CTRL] + [V] to paste the sample DHCP fingerprint into the DHCP Fingerprint Definition Overrides window.
- Type the operating system for which you are creating a fingerprint as the
fingerprint os=definition in the DHCP Fingerprint Definition Overrides window. - Type the operating system family as the
os_class=definition (e.g. Windows, Linux). - Type the url of the operating system as the
os_url=definition. - Use a network protocol analyzer (e.g. Wireshark) to analyze the PCAP file with the network traffic for which you want to add a fingerprint.
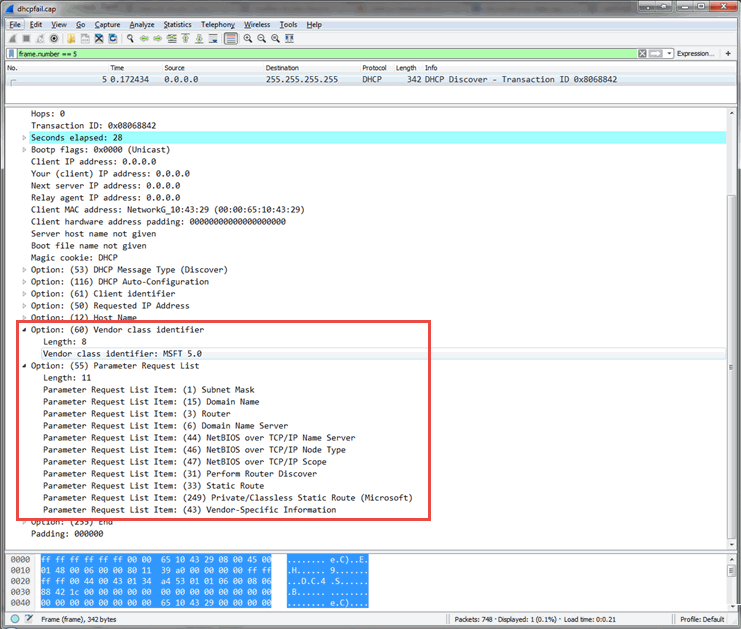
- Type the information presented in the Option: (55) Parameter Request List section of the PCAP file following
dhcpoption55in your new fingerprint in the DHCP Fingerprint Definition Overrides window in ExtremeCloud IQ Site Engine. - Type the information presented in the Option: (60) Vendor class identifier section of the PCAP file in a new line of your fingerprint in the DHCP Fingerprint Definition Overrides window in ExtremeCloud IQ Site Engine, if the device type cannot be determined using the information in Option (55).
NOTE: Format the line with the Option: (60) Vendor class identifier data in your new fingerprint the using dchpoptionvendorcodeas the line definition. - Enter Discover, Inform, Request, or Any for the dhcptype.
The fingerprint you enter to detect the network traffic shown in the screenshot in Step 17 looks like the following:<fingerprint os="Windows" os_class="Windows" os_url="http://www.microsoft.com/windows" comments="" author="customer@example.com" lastmodified="2016-11-30">
<tests>
<test weight="5" matchtype="exact" dhcptype="Discover" dhcpoption55="1,15,3,6,44,46,47,31,33,249,43" dhcpvendorcode="MSFT 5.0"/>
</tests>
</fingerprint> - Select OK.
The new fingerprint is created on the ExtremeCloud IQ Site Engine server. - Enforce the ExtremeControl engine to push the new fingerprint to your engine.
Deleting a Fingerprint
Use the following steps to delete an existing DHCP fingerprint:
- In ExtremeCloud IQ Site Engine, access the Control > Access Control tab..
- Expand the Engines menu in the left panel.
- Select an ExtremeControl engine from the All Engines folder in the left panel select the Details tab in the right panel.
- Select the Engine Settings icon.
- Select Device Type Detection in the left panel.
- Select the Device Type Detection tab.
- Select the Edit button in the DHCP Fingerprint Definition Overrides field.
The DHCP Fingerprint Definition Overrides window displays. - Remove the fingerprint by deleting the text from
<fingerprint>to</fingerprint>. - Select OK.
The fingerprint is deleted from the ExtremeCloud IQ Site Engine server. - Enforce the ExtremeControl engine to remove the fingerprint from your engine.