This Help topic describes the steps to integrate and configure the Intune Compliance Module with 802.1X EAP-TLS authentication with Microsoft Intune.
A common use case for this configuration is to apply different network authorizations to devices reported as non-compliant by Microsoft Intune.
This topic includes information and instructions on:
- Solution Overview
- Requirements for Intune Compliance Module
- Creating an Entra ID Application
- Intune Compliance Module Configuration
- End-System 802.1X Configuration
- Example of an End-System's Certificate
Solution Overview
-
The device connects to the network and authenticates through 802.1X EAP-TLS.
-
The Access Control Engine extracts Intune ID from the user/computer certificate.
-
ExtremeCloud IQ Site Engine periodically downloads the list of non-compliant devices from Microsoft and compares Intune IDs.
-
MAC addresses of all non-compliant devices are added to the defined end-system group.
-
MAC addresses of devices that are not reported as non-compliant are removed from the defined end-system group.
-
Change of the compliance status triggers a reauthentication and the network access authorization is updated based on NAC rules.
Requirements
These are the configuration requirements for the Intune Compliance Module.
- The ExtremeCloud IQ Site Engine must have Internet access in order to retrieve compliance information from Microsoft.
- The Intune ID must be part of 802.1X EAP-TLS authentication in Subject Alternative Name (SAN) URI attribute.
- Create a unique Microsoft Entra ID application on the Microsoft Entra ID page (see instructions below).
- The Intune Compliance Module must be enabled and configured (see instructions below).
| NOTE: |
You must copy and paste some text values between applications during the registration and configuration. |
Creating an Entra ID Application
When configuring the compliance check by Intune Compliance Module, you must first create an Entra ID application. This generates an Application ID and Application Secret that are required as part of the ExtremeCloud IQ Site Engine. Use the following steps to create and register an Entra ID application.
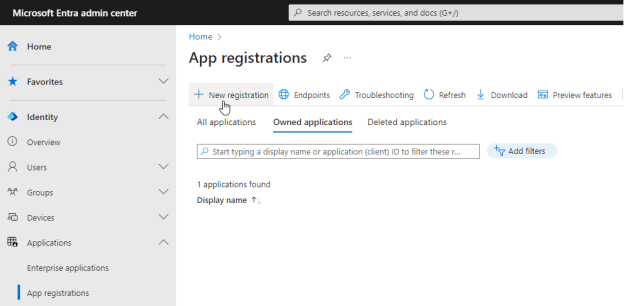
- Access the Microsoft Entra ID page with your Admin credentials at https://portal.azure.com or https://entra.microsoft.com.
- Select Manage Microsoft Entra ID > View.
- Select App registrations > New registration
.
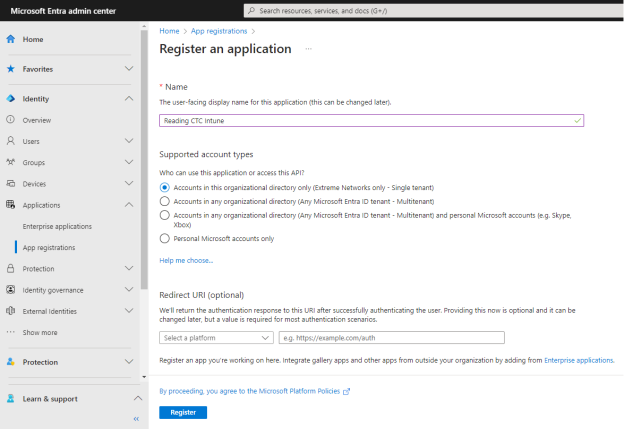
- Enter the following information into the required fields:
- Name - Enter a name for the Entra ID registered application
- Supported account types - Select Accounts in this organization directory only - (Single tenant)
- Name - Enter a name for the Entra ID registered application
- Select Register.
- Select Add a certificate or secret, OR you can navigate to Certificates & secrets in the left menu.
- Select New client secret.
- Enter the following information into the required fields:
- Description - your description of the new credentials
- Expires - define how long the client secret is valid, when the client secret expires the non-compliant list cannot be received.
NOTE: The expiration of the client secret cannot be modified in Entra ID.
The best practice is to create a new client secret before the existing one expires and update the value in ExtremeControl settings.
- Select Add.
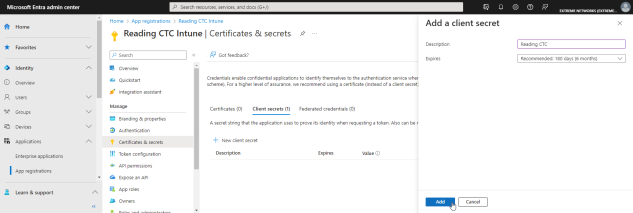
- Copy the secret value to the clipboard. This is the only time the client secret is displayed. Save the secret value for your Client Secret.
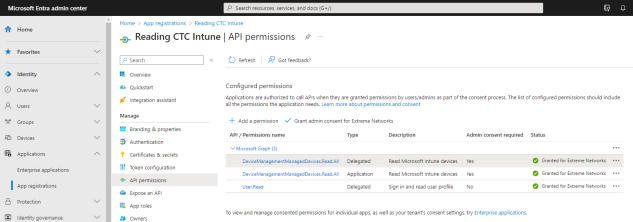
- Select API permissions > Add a permission.
- Select Microsoft Graph > Delegated permissions
- Select the following delegated permissions:
- In the DeviceManagementManagedDevices select:
- DeviceManagementManagedDevices.Read.All
- In the DeviceManagementManagedDevices select:
-
Select Application permissions and add the following additional application permissions:
-
In the DeviceManagementManagedDevices select:
-
DeviceManagementManagedDevices.Read.All
-
-
- Select Add permissions.
- Select Grant admin consent for <your company domain>, and select Yes to confirm.
- Select Overview.
- Copy the displayed Application (client) ID value. Save this value for your Client ID.
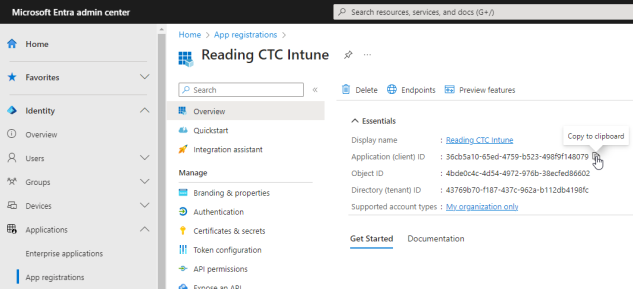
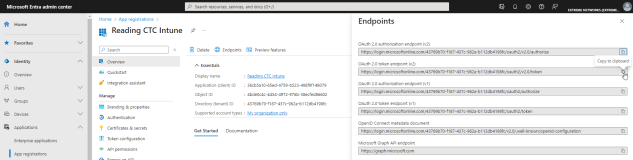
- Select Endpoints.
- Copy the displayed OAuth 2.0 token endpoint (v2) value. Save this value for your Token Endpoint.
Intune Compliance Module Configuration
You must provide the values you saved during the creation and registration of the Entra ID application in the Administration > Options > Access Control > Intune Compliance Check.
Use the following steps to configure the Intune Compliance Check behavior:
- From ExtremeCloud IQ Site Engine, open Adminstration > Options.
- In the left-panel tree, navigate to Access Control > Intune Compliance Check.
- Enter the following information into the required fields:
Enable Compliance Check - select to check
Check Interval - defines how often ExtremeCloud IQ Site Engine downloads the list of non-compliant Intune IDs from Microsoft. If the number of non-compliant devices is high, do not configure a short check interval.
Client ID - enter the value copied as "Application (client) ID"
Client Secret - enter the value copied as "Client Secret"
Token Endpoint - enter the value copied as "OAuth 2.0 token endpoint (v2)"
- Select Save.
End-System 802.1X Configuration
You must configure the end-system to use IEEE 802.1X authenticated network access. The following is an example using a Windows 11 client.
After you have configured the AAA rules, the User Groups configuration, and the Access Control Rule configuration using the steps above, you must configure 802.1X on the end-system:
- From Windows 11 search, type view network connections, then select Open.
- Right-click on the network connection you need to configure, and select Properties.
- Select the Authentication tab.
- Ensure Enable IEEE 802.1X authentication is checked.
- In the Choose a network authentication method, select Microsoft: Smart Card or other certificate (EAP TLS).
- Select Settings.
- In the Trusted Root Certification Authorities area, select the CA issued certificate for your Access Control Engines.
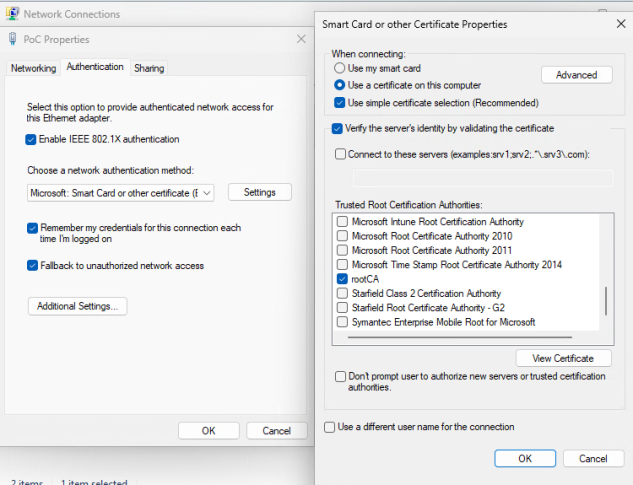
- Select OK, then select OK again.
Example of an End-System's Certificate
You must ensure that the Intune ID is part of the Subject Alternative Name URI in the certificate. Example of the industry standard format is: URL=IntuneDeviceId:Microsoft Endpoint Manager:GUID:xxxxxxxx-xxxx-xxxx-xxxx-xxxxxxxxxxxx. If Microsoft SCEP is used, see Use SCEP certificate profiles with Microsoft Intune.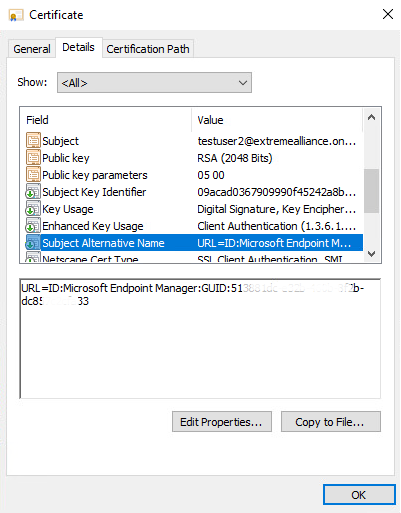
For information on related help topics: