Access policies define the appropriate level of access to network resources allocated to a connecting end-system based on the end-system's authentication and/or assessment results. There are four access policies defined in an ExtremeControl profile: Accept policy, Quarantine policy, Failsafe policy, and Assessment policy. When an end-system connects to the network, it is assigned one of these access policies, as determined by the ExtremeControl profile assigned to the matching ExtremeControl rule and the end-system state.
In your ExtremeControl profiles, each access policy is associated to a policy mapping that defines exactly how an end-system's traffic is handled when the access policy is applied.
A policy mapping specifies the policy role (created in the Policy tab) and other RADIUS attributes included as part of a RADIUS response to a switch. The RADIUS attributes required by the switch are defined in the Gateway RADIUS Attributes to Send field configured in the Edit Switch window. Policy mappings are configured in the Edit Policy Mapping Configuration window.
How you set up your access policies depends on whether your network utilizes ExtremeControl Controller engines and/or ExtremeControl Gateway engines. In addition, if your network utilizes ExtremeControl Gateway engines, your setup depends on whether your network contains EOS switches that support Policy, third-party switches that support RFC 3580, or switches that support RADIUS attributes that are defined manually.
For ExtremeControl Controllers:
If your network utilizes ExtremeControl L2/L3 controller engines, the access policies specified in ExtremeControl profiles are mapped to policy roles that are defined in a default policy configuration already configured on the controller. It is recommended that you review this default policy configuration using the Policy tab. To do this, you must create a policy domain in the Policy tab specifically for the ExtremeControl Controller, assign the ExtremeControl Controller to the domain, then import the policy configuration from the device into Policy tab. Review the policy roles and make any rule changes required for your environment. When you have finished modifying the policy configuration, you must enforce it back to the ExtremeControl Controller.
For ExtremeControl Gateway Appliances:
If your network utilizes ExtremeControl Gateway engines, the access policies specified in ExtremeControl profiles are mapped to policy roles that must be created and defined in the Policy tab and enforced to the policy-enabled switches in your network. If you have RFC 3580-enabled switches in your network, ExtremeCloud IQ Site Engine lets you associate your policy roles to a VLAN ID or VLAN Name using the Policy Mappings panel. This allows your ExtremeControl Gateway engines to send the appropriate VLAN attribute instead of a policy role to those switches that are RFC 3580-enabled.
Policy mappings have a Location option that allows different VLAN IDs to be returned for a policy based on the location the authentication request originated from. This is useful in networks that have a VoIP/voice VLAN that is defined on multiple switches, but that VLAN maps to a unique VLAN ID on each switch. (For more information, see the section on Location in the Edit Policy Mapping Configuration Window Help topic.)
| NOTE: | If you have RFC 3580-enabled switches in your network, be sure to verify
that the DHCP Resolution Delay Time option is set correctly in your Appliance
Settings (Tools > Manage Advanced Configurations> Global and Appliance Settings). This option specifies the number of seconds an ExtremeControl engine waits after an authentication completes before attempting to resolve the end-system's IP address. When modifying this delay, keep in mind that for RFC 3580 devices, the engine links down/up a port to force the end-system to get a new IP address when ExtremeCloud IQ Site Engine determines that the VLAN has changed. If the delay time specified is less than the amount of time the end-system needs to renew its IP address, then the ExtremeControl engine can resolve the end-system's IP address incorrectly (to the previously held IP), or additional delay can be introduced as the resolution process attempts to resolve the address based on the configured retry interval. This is a problem when either registration or assessment is enabled: the registration process never completes or takes an unacceptable amount of time to complete, or the ExtremeControl engine could attempt to scan the incorrect IP address. Be sure to take into account the amount of time required for an end-system to get a new IP address when setting the delay time value. |
|---|
Setting Up Your Access Policies
Before you begin working with the Access Control tab, use these steps to define the policy mapping criteria (policy roles, corresponding VLAN IDs, etc.) available for selection for each access policy.
- For each ExtremeControl profile, create a worksheet listing the four ExtremeControl policies. For each access policy, associate a policy role (created in the Policy tab), and the policy role's corresponding VLAN ID, if you are using RFC 3580-enabled switches
in your network. For a description of each access
policy, and some guidelines for creating corresponding policy roles, see the section on Access Policies in the Concepts file.
NOTE: If your network uses ExtremeControl Gateway engines with only RFC 3580-enabled switches, instead of listing policy roles, simply create a list of policy names that correspond to the VLANs you are using in your network. One tip is to use policy names that identify the corresponding VLAN name for ease of selection when you are creating your ExtremeControl profiles.
Here's an example of a worksheet for an ExtremeControl profile that contains both policy-enabled and RFC 3580 switches:Access Policy Policy Role VLAN ID Accept Policy Enterprise User [2] Enterprise User VLAN Quarantine Policy Quarantine [4] Quarantine VLAN Failsafe Policy Failsafe [5] Failsafe VLAN Assessment Policy Assessing - Strict [6] Assessing - Strict VLAN - For ExtremeControl Controllers, use the Policy tab to verify that the policy configuration contains the required policy roles, and that the configuration has been enforced to the ExtremeControl Controller. See the instructions above.
- For ExtremeControl Gateways, verify each policy role listed on your worksheet is created in ExtremeCloud IQ Site Engine's Policy tab and enforced to the policy-enabled switches in your network. If you have RFC 3580-enabled switches in your network, verify that your VLANs have been created on the switches in your network.
- Define the policy mappings that map each access policy to the appropriate policy role as specified in your worksheet.
- Select a policy mapping configuration from the ExtremeControl Configurations > ExtremeControl Profiles > Policy Mappings left-panel option.
- In your ExtremeControl profile, your policy mappings are available for selection when you define your Accept, Quarantine, Failsafe, or Assessment access policy.
The Policy Mapping Configuration right-panel opens.

Select between a Basic policy mapping and an Advanced policy mapping, depending on your network needs by selecting Switch to Advanced or Switch to Basic at the top of the panel.Typically, the Basic policy mapping configuration is used unless your devices require customization or when using locations in your mappings. If Basic Policy Mapping is used, then the Add new policy mapping, as well as Edit policy mapping, gives the option to show the advanced options.
ExtremeControl provides a list of default policy mappings you can use. Be aware if you use one of the default mappings, you still need to verify that the policy role specified in the mapping is part of your ExtremeControl Controller policy configuration and/or is created and enforced to the policy-enabled switches in your network via the Policy tab.To add a new policy mapping, select the Add button to open the Add Policy Mapping window.
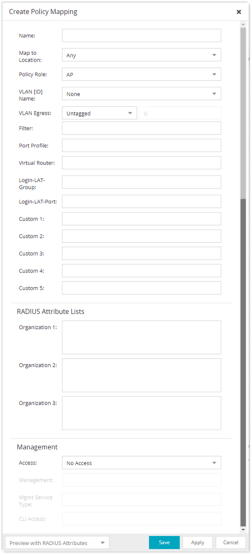
For the new policy mapping, enter a mapping name and specify a policy role (created in the Policy tab) and other required RADIUS attributes included in the RADIUS response to a switch. Select OK to add the mapping. Note that the required RADIUS attributes for your switches are defined in the Gateway RADIUS Attributes to Send field configured in the Edit Switch window, as shown below.
Select OK to close the Edit Policy Mapping Configuration window.
For information on related help topics: