Multiple options exist for implementing IEEE 802.1X with Microsoft Entra ID (formerly Azure AD) integration. This help topic describes the steps for implementing an 802.1X EAP-TLS authentication and OAuth 2.0 authorization with Entra ID.
A common use case for this configuration is to apply different network authorizations to different users or computers based on the security group membership in the Entra ID.
This topic includes information and instructions on:
- Requirements for Entra ID Registration
- Generating a RADIUS Certificate for each Access Control Engine
- Uploading Certificates
- Creating an Entra ID Application
- AAA Rule Configuration
- User Group Configuration
- Access Control Rule Configuration
- End-System 802.1X Configuration
Requirements
These are the configuration requirements for Entra ID Registration.
- The Access Control Engine must have Internet access in order to retrieve user information from Microsoft.
- Create a unique Microsoft Entra ID application on the Microsoft Entra ID page (see instructions below).
-
The client must trust the Radius Certificate used by the Access Control Engine. Standard Windows clients reject the default self-signed certificate, and the authentication fails with the message "Authentication became stale".
| NOTE: |
You must copy and paste some text values between applications during the registration and configuration. |
Generating a RADIUS Certificate for each Access Control Engine
Use the following steps to generate server private key and a server certificates, and submit to the certificate authority.
-
Submit the request to a Certificate Authority.
-
Replace the Certificate or define certificate usage conditions.
Uploading Certificates
Use the following steps to upload certificates to Trusted Authorities.
For more information, see AAA Configurations, go to Trusted Authorities section.
-
Upload the root CA certificate to Trusted Authorities.
-
Upload all intermediate CA certificates to Trusted Authorities.
Creating an Entra ID Application
When implementing an 802.1X authentication using Entra ID and OAuth 2.0, you must first create an Entra ID application. This generates an Application ID and Application Secret that are required as part of the ExtremeCloud IQ Site Engine. Use the following steps to create and register an Entra ID application.
- Access the Microsoft Entra ID page with your Admin credentials at https://portal.azure.com or https://entra.microsoft.com.
- Select Manage Microsoft Entra ID > View.
- Select App registrations > New registration.

- Enter the following information into the required fields:
- Name - Enter a name for the Entra ID registered application
- Supported account types - Select Accounts in this organization directory only - (Single tenant)
- Name - Enter a name for the Entra ID registered application
- Select Register.

- Select Add a certificate or secret, OR you can navigate to Certificates & secrets in the left menu.
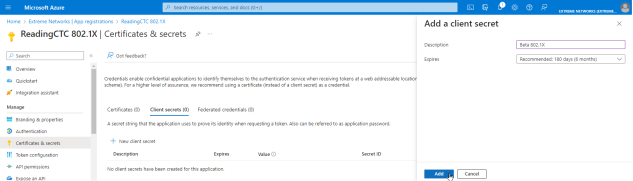
- Select New client secret.
- Enter the following information into the required fields:
- Description - your description of the new credentials
- Expires - define how long the client secret is valid, when the client secret expires the user cannot authenticate
NOTE: The expiration of the client secret cannot be modified in Entra ID.
The best practice is to create a new client secret before the existing one expires and update the value in ExtremeControl settings.
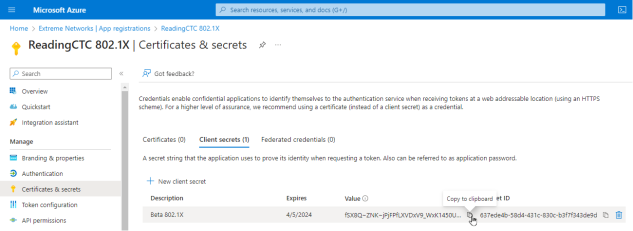
- Select Add.
- Copy the secret value to the clipboard. This is the only time the client secret is displayed. Save the secret value for your App Secret.
- Select API permissions > Add a permission.
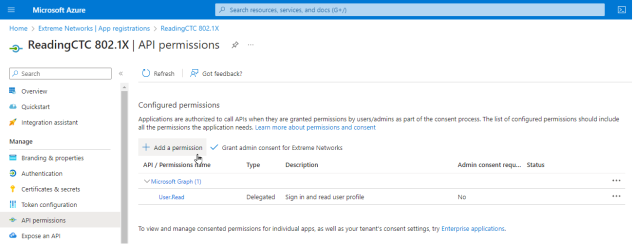
- Select Microsoft Graph > Delegated permissions
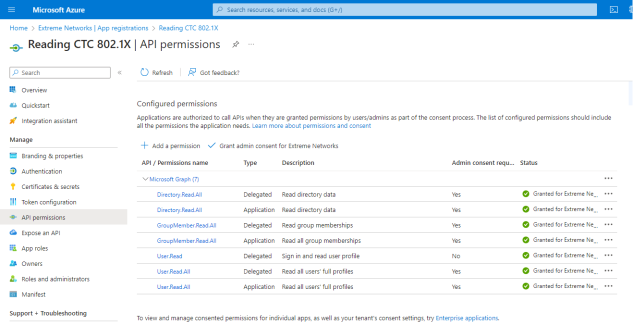
- If you require a different authorization to apply for different users based on security group membership, select the following additional delegated permissions:
- In the DirectoryRecommendations group select:
- DirectoryRecommendations.Read.All
In the GroupMember group select:
GroupMember.Read.All
In the User group select:
User.Read.All
In the Device group select:
Device.Read.All
To check the values of Custom Security Attributes, select CustomSecAttributeAssignment:
CustomSecAttributeAssignment.Read.All
- In the DirectoryRecommendations group select:
-
If you performed the previous step, select Application permissions and add the following additional permissions:
-
In the DirectoryRecommendations group select:
-
DirectoryRecommendations.Read.All
-
-
In the GroupMember group select:
-
GroupMember.Read.All
-
-
In the User group select:
-
User.Read.All
-
-
In the Device group select:
-
Device.Read.All
-
-
To check the values of Custom Security Attributes, select CustomSecAttributeAssignment:
-
CustomSecAttributeAssignment.Read.All
-
-
- Select Add permissions.
- Select Grant admin consent for <your company domain>, and select Yes to confirm.
- Select Overview.
- Copy the displayed Application (client) ID value. Save this value for your App ID.
- Select Endpoints.
- Copy the displayed OAuth 2.0 token endpoint (v2) value. Save this value for your Token Endpoint.
AAA Rule Configuration
You must provide the values you saved during the creation and registration of the Entra ID application in the AAA Configuration.
Use the following steps to configure an 802.1X authentication with Entra ID:
- From ExtremeCloud IQ Site Engine, open the Control > Access Control tab.
- In the left-panel tree, navigate to Configuration > AAA > select the advanced configuration to use .
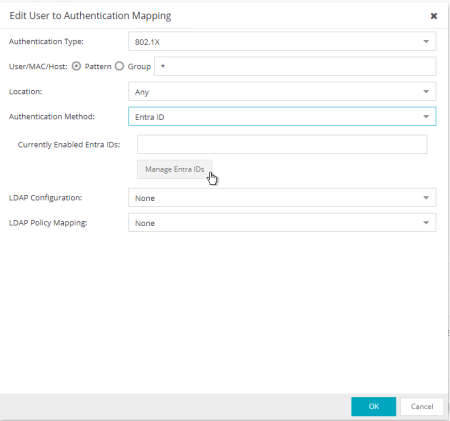
- In the Authentication Rules area, select Add.
- In the Authentication Type field, select 802.1X.
- In the User/MAC/Host field, select Pattern of usernames to use the AAA rule.
- In the Authentication Method field, select Entra ID.
- Select Manage Entra IDs
.
- Select Add.
- Enter the following information into the required fields:
Enable - select to check
Entra ID Name - enter the name of this Entra ID. The name has local meaning only.
Realm - specifies the Entra ID configuration to use based on the username. Realm is usually the part after the @ in the login username.
App ID - enter the value copied as "Application (client) ID"
App Secret - enter the value copied as "Client Secret"
Token Endpoint - enter the value copied as "OAuth 2.0 token endpoint (v2)"
- Select Test Credentials... to verify the connectivity, App ID, App Secret, and Token Endpoint.
- Select OK.
- Select Save.
- Enforce the new configuration to your engines.
User Group Configuration
User Group can validate User group membership and Computer group membership.
After you have configured the AAA rules for 802.1X using the steps above, use the following steps to configure a User Group:
- From ExtremeCloud IQ Site Engine, open the Control > Access Control > Group Editor > User Groups.
- Select Add.
- In the Name field, enter a name for the user group.
- In the Description field, optionally enter a description for the user group.
- Select a Mode to Match Any or Match All of the attributes required to add a user to the group.
- In the Create Group area, click Add.
- In the Attribute Name enter memberOf to check the Entra ID security group membership.
- In the Attribute Value, enter the name of the security group. You can match the exact name or value or use a wild card *.
- Select Save.
| NOTE: |
The CN in the certificate must be in email format for user membership lookup against the Entra ID. The CN in the certificate must be in FQDN format for computer membership lookup against the Entra ID. |
Access Control Rule Configuration
After you have configured the AAA rules for 802.1X and the User Groups configuration using the steps above, use the following steps to configure an Access Control Rule:
- From ExtremeCloud IQ Site Engine, open the Control > Access Control > Configuration > select your configuration > Rules.
- Select Add.
- In the Name field, enter a name for the rule.
- Select the Rule Enabled checkbox.
- In the Description field, enter a description for the rule.
- In the User Group field, select the user group you created during the User Group Configuration.
- In the Authentication Method field, select 802.1X (TLS).
- Select Save.
- Enforce the new configuration to your engines.
End-System 802.1X Configuration
You must configure the end-system to use IEEE 802.1X authenticated network access. The following is an example using a Windows 11 client.
After you have configured the AAA rules, the User Groups configuration, and the Access Control Rule configuration using the steps above, you must configure 802.1X on the end-system:
- From Windows 11 search, type view network connections, then select Open.
- Right-click on the network connection you need to configure, and select Properties.
- Select the Authentication tab.
- Ensure Enable IEEE 802.1X authentication is checked.
- In the Choose a network authentication method, select Microsoft: Smart Card or other certificate (EAP TLS).
- Select Settings.
- In the Trusted Root Certification Authorities area, select the CA issued certificate for your Access ControlEngines.
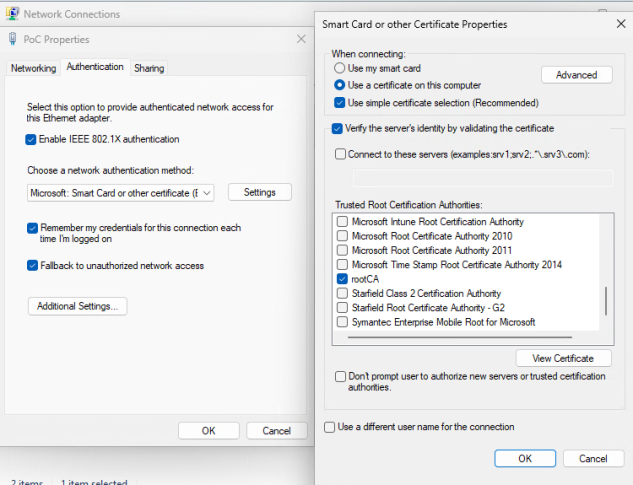
- Select OK, then select OK again.
For information on related help topics: