The device Authentication tab enables you to configure and change the authentication settings on the selected device. Authentication must be configured and enabled on the device in order for individual port authentication settings to take effect (see How to Configure Ports).
To access this tab, select a device in the left panel under Devices > Devices, then select the Authentication tab in the right panel.
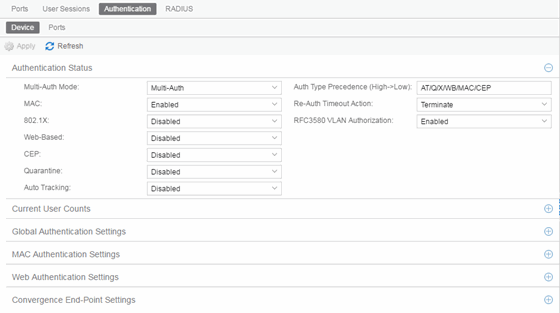
Authentication Status
Use this section to select the authentication mode and types used on the device.
- Use the fields on the left side of this section to select the appropriate single- or multi-user authentication types. Only options supported by the
selected device are available
for selection. Some devices support multiple authentication types and
multiple users (Multi-User Authentication) per port, while others are
restricted to only one or two authentication types and single users per
port. Refer
to the Firmware Support matrix for information on the
authentication types supported by each device type.
WARNING: Switching Authentication Types, or changing the Authentication Status from Enabled to Disabled, logs off any currently authenticated users.
- Auth Type Precedence (High->Low)
- This displays the order in which the
authentication types are attempted on the device, with the
authentication type on the left having the highest precedence (attempted first). You can edit the precedence order by selecting the field. In the Edit Precedence window, select the authentication type you want to position,
and use the Up and Down buttons to arrange the types in the desired
order of precedence.
WARNING: Leave the default precedence, if possible. Changing the Quarantine precedence to be lower than any other type or changing the Auto Track precedence to be higher than any other type can cause problems.
- Re-Auth Timeout Action
- This setting defines the action for sessions that need to be re-authenticated if the RADIUS server re-authentication request times out. Select the Terminate option to terminate the session or the None option to enable the current session to continue without disruption.
- Maximum Number of Users
- This setting applies to devices with Multi-User as their configured authentication type. The maximum number of users that can be actively authenticated or have authentications in progress at one time on this device. You can specify the maximum number of users per port on the port's Port Properties Authentication Configuration tab.
- RFC3580 VLAN Authorization
- This enables you to enable and disable RFC 3580 VLAN Authorization for the
selected device. RFC 3580 VLAN Authorization must be enabled on devices in networks where the
RADIUS server is configured to return a VLAN ID when a user authenticates.
When RFC 3580 VLAN Authorization is enabled:- devices that do not support policy tag packets with the VLAN ID.
- devices that support both policy and Authentication-Based VLAN to Role Mapping classify packets according to the role to which the VLAN ID maps.
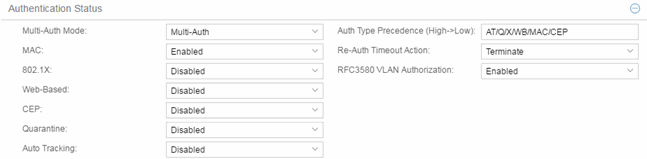
Current User Counts
This section enables you to specify the maximum number of users on the device and per authentication type.
- Current Number of Users
- For devices with Multi-User as their configured authentication type. The current number of users that are actively authenticated or have authentications in progress, or that the device is keeping authentication termination information for. Any unauthenticated traffic on the port is not included in this count.
| NOTE: | On E1 and E6/E7 devices, if both 802.1X and MAC authentication
are enabled, it is possible for the device to receive a start or response 802.1X
packet while a MAC authentication is in progress. If this happens, the device
immediately terminates the MAC authentication, and the 802.1X authentication
proceeds to completion. Regardless of the success of the 802.1X login attempt,
no new MAC authentication logins can occur on the port until 1) the link is
toggled; 2) the user executes an 802.1X logout; or 3) the 802.1X session is
terminated administratively. |
|---|
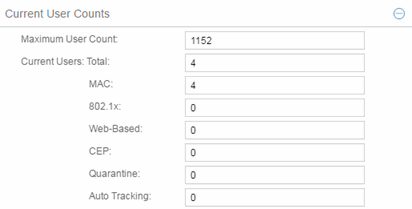
Global Authentication Settings
This section lets you set session timeout and session idle timeout values for each authentication type.
- Session Timeout
- This setting represents the maximum number of seconds an authenticated session can last before automatic termination of the session. A value of zero indicates that no session timeout applies. This value can be superseded by a session timeout value provided by the authenticating server. For example, if a session is authenticated by a RADIUS server, that server can send a session timeout value in its authentication response.
| NOTE: | Non-zero values are rounded to the nearest non-zero multiple of 10 by the
device. |
|---|
- Session Idle Timeout
- This displays the maximum number of consecutive seconds an authenticated session can be idle before ExtremeCloud IQ Site Engine automatically terminates the session. A value of zero indicates that no idle timeout applies. This value can be superseded by an idle timeout value provided by the authenticating server. For example, if a session is authenticated by a RADIUS server, that server can send an idle timeout value in its authentication response.
MAC Authentication Settings
This section enables you to set up the MAC password for MAC authentication. In order for MAC authentication to work, you must also configure the RADIUS server with the MAC password as well as the MAC addresses which are permitted to authenticate.

- MAC Mask
- You can select a mask to provide a way to authenticate end-systems based on a portion of their MAC address. For example, you could specify a mask that would base authentication on the manufacturers ID portion of the MAC address. The MAC Mask is passed to the RADIUS server for authentication after the primary attempt to authenticate using the full MAC address fails.
- MAC Address Delimiter
- The character used between octets in a MAC address:
- None — No delimiter is used in the MAC address (e.g. xxxxxxxxxxxx).
- Hyphen — A hyphen is used as a delimiter in the MAC address (e.g. xx-xx-xx-xx-xx-xx).
Web Authentication Settings
For users of web-based authentication, this tab lets you specify web authentication parameters using three sections:
General
The General section lets you specify the URL of the authentication web page and the IP address of the system where it resides. It also lets you enable certain web authentication features, such as Enhanced Login Mode, on devices that support those features.
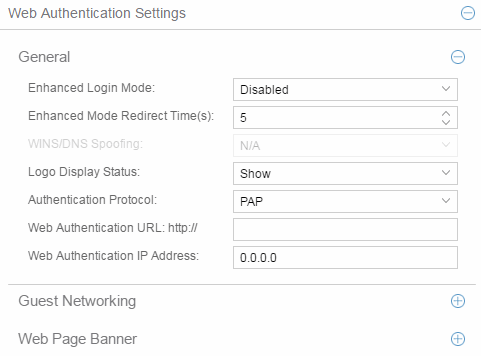
- Enhanced Login Mode
- Enabling the Enhanced Login Mode causes the authentication web page to be displayed regardless of whether the URL or IP address entered into the browser by the end user is the designated Web Authentication URL or IP address. This option is grayed out if the device does not support the mode.
- Enhanced Mode Redirect Time(s)
- This setting applies for devices with Enhanced Login Mode
enabled. It specifies the amount of time (in seconds) before the end-user
is redirected from the authentication web page to their requested URL.
An end-system using DHCP requires time to transition from the temporary IP address issued by the authentication process to the official IP address issued by the network. Enhanced Mode Redirect Time specifies the amount of time permitted for the end-system to complete this process and begin using its official IP address.
For example, if an end-user (in Enhanced Login Mode and a Redirect Time of 30 seconds) enters the URL of "http://ExtremeNetworks.com", the user is presented the authentication web page. When the user successfully authenticates into the network, the user sees a login success page that displays "Welcome to the Network. Completing network connections. You will be redirected to http://ExtremeNetworks.com in approximately 30 seconds."
- WINS/DNS Spoofing
- This setting enables you to enable and disable WINS/DNS spoofing for the selected device. Spoofing enables the end-user to resolve the Web Authentication URL name to the IP address using WINS/DNS. The default is Disabled. This option is grayed out if not supported by the device.
- Logo Display Status
- Specifies whether the Extreme Networks logo is displayed or hidden on the authentication web page window. This option is grayed out if not supported by the device.
- Authentication Protocol
- This setting is the authentication protocol being used (PAP or CHAP). PAP (Password Authentication Protocol) provides an automated way for a PPP (Point-to Point Protocol) server to request the identity of user, and confirm it via a password. CHAP (Challenge Handshake Authentication Protocol), the more secure of the two protocols, provides a similar function, except that the confirmation is accomplished using a challenge and response authentication dialog.
- Web Authentication URL
- This is the URL for your authentication web page. Users wishing to receive network services access the web page from a browser using this URL. The http:// is supplied. Alphabetical characters, numerical characters and dashes are permitted as part of the URL, but dots are not. The URL needs to be mapped to the Web Authentication IP address in DNS or in the hosts file of each client. It must be resolvable via DNS/WINS, either on the device or at corporate, assuming the Web Authentication mapping has been set up on the corporate DNS/WINS service. This option is grayed out if not supported by the device.
- Web Authentication IP Address
- This is the IP address of your authentication web page server. If you have specified a Web Authentication URL, the IP address needs to be mapped to the URL in DNS or in the host file of each client.
Guest Networking
The Guest Networking section lets you configure guest networking, a feature that enables any user to access the network and obtain a guest policy without having to know a username or password. The user accesses the authentication web page, where the username and password fields are automatically filled in, enabling them to log access as a guest. If the user does not want to log in as a guest, they can type in their valid username and password to log in.
| NOTE: | Guest networking is designed for networks using web-based authentication,
with port mode set to Active/Discard. |
|---|
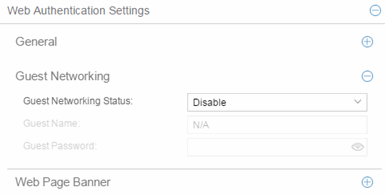
- Guest Networking Status
- Use the drop-down list to specify guest networking status:
- Disable — Guest networking is unavailable.
- Local Auth — Guest Networking is enabled. The user accesses the authentication web page where the username field is automatically filled in with the specified Guest Name. When the user submits the web page using this guest name, the default policy of that port becomes the active policy. The port mode must be set to Active/Discard mode.
- RADIUS Auth — Guest Networking is enabled. The user accesses the authentication web page, where the username field is automatically filled in with the specified Guest Name, and the password field is masked out with asterisks. When the user submits the web page using these credentials, the value of the Guest Password is used for authentication. Following successful authentication from the RADIUS server, the port applies the policy (role) returned from the RADIUS server. The port mode must be set to Active/Discard mode.
- Guest Name
- The username that Guest Networking uses to authenticate users. The guest name is displayed automatically on the authentication web page. If the user does not want to log in as a guest, they can type in their valid username to override the guest username.
- Guest Password
- The password that Guest Networking uses to authenticate users when RADIUS Auth is selected.
Web Page Banner
The Web Page Banner section enables you to customize the banner end users see at the top of the authentication web page and set a Redirect Time, if applicable.
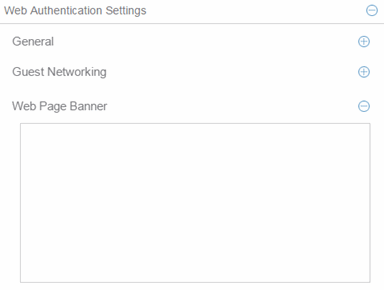
- Web Page Banner
- Use this area to create a banner end users see at the top of the
authentication web page. For example, you might include your company name and information
on what to do if the user has questions or problems. Because this banner also
appears in messages that occur during successful login and failed
authentication, as well as on the "Radius Busy" screen, it is not appropriate to include "Welcome to [Your Company]" in the banner.
The Default button enables you to reset the banner to default text provided in a text file (pwa_banner.txt). Initially, the default banner text is the Extreme Networks contact information. However, you can customize the text for your network by editing the pwa_banner.txt file, located in the top level of the Policy Manager install directory. Then, when you select the Default button, the new text will be displayed in the Web Page Banner area.
Convergence End-Point Settings
This section provides a way to identify Convergence End-Points (IP phones) connecting to the device, and apply a role to the end-point based on the type of end-point detected. The CEP Detection section lets you create detection rules for identifying the end-points, and the CEP Role Mappings section lets you map a role to each CEP product type.
In addition to configuring CEP on the device, you must also enable CEP protocols on each port using the CEP Access section in the Port Authentication Tab. After you have configured CEP on the device and each port, you can monitor CEP usage on the Port Usage Tab (Port) or Port Usage Tab (Device).
CEP Role Mappings
This section lets you select the CEP product types supported on the device, and map a role for each type. Then, when a convergence end-point (such as an IP phone) connects to the network, the device identifies the type of end-point (using CEP detection rules) and applies the assigned role.
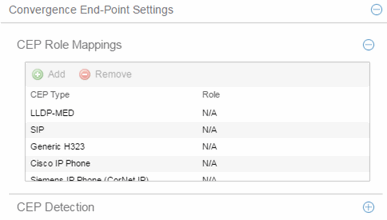
- Add
- Select a CEP Type and select the Add button to open the Add Role Mapping window, where you can select a role for the selected CEP Type. Your selections are added to the CEP Role Mappings list.
CEP Detection Tab
Use this section to create CEP detection rules used to determine if a connecting end-system is a CEP device and the type of CEP device. This enables ExtremeCloud IQ Site Engine to assign the appropriate role to the port based on the type of CEP device detected.
| NOTE: | CEP detection rules apply only to Siemens, H.323, and SIP (Session Initiation
Protocol) phone detection. Cisco
detection uses CiscoDP as its detection method. |
|---|
CEP detection rules are based on two detection methods:
- TCP/UDP Port Number detection — Many CEP vendors use specific TCP/UDP port numbers for call setup on their IP phones. You can create detection rules that identify CEP devices based on specific TCP/UDP port numbers. By default, Siemens Hi-Path phones are detected on TCP/UDP port 4060.
- IP Address detection — H.323 phones use a reserved IP multicast address and UDP port number for call setup. You can create detection rules to detect an IP phone based on its IP address in combination with an IP address mask. By default, H.323 phones are detected using the multicast address 224.0.1.41 and the TCP/UDP ports 1718, 1719, and 1720. SIP phones are detected using the multicast address 224.0.1.75 and the TCP/UDP port 5060. H.323 and SIP phones are also detected using only their respective multicast addresses without the TCP/UDP ports.
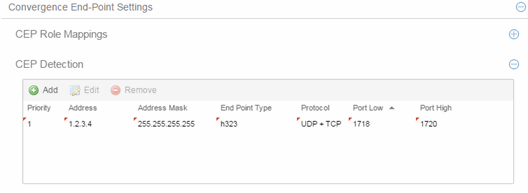
- Priority
- The rule priority with one (1) being the highest priority. The rule with the highest priority is used first, so it is recommended the highest priority be given to the predominate protocol in the network to provide for greater efficiency.
- Address
- If the rule is based on IP address detection, this field displays the IP address that incoming packets matched against. By default, H.323 uses 224.0.1.41 as its IP address, SIP uses 224.0.1.75 as its IP address, and Siemens has no IP address configured.
- Address Mask
- If the rule is based on IP address detection, this field displays the IP address mask against which incoming packets are matched.
- End Point Type
- Specifies the end-point type assigned (H.323, Siemens, or SIP) if incoming packets match this rule.
- Protocol
- If the rule is based on TCP/UDP port detection, this field displays the
protocol type used for matching, using a port range defined with the Port
Low and Port High values:
- UDP + TCP — Match the port number for both UDP and TCP frames.
- TCP — Match the port number only for TCP frames.
- UDP — Match the port number only for UDP frames.
- Add
- Opens the Add/Edit CEP Detection Rule window where you can create CEP detection rules.
- Edit
- To edit a CEP detection rule, select the rule and select Edit. The Add/Edit CEP Detection Rule window opens where you edit the rule's parameters. You can also double-click an entry in the table to open the edit window.
For information on related help topics:
![]()