Adding Devices/APs from ExtremeCloud IQ Site Engine Devices and Wireless
Using the ExtremeCloud IQ Site Engine Maps feature, you can quickly add devices and wireless access points (APs) to your maps directly from the Devices list or from the navigation tree on the ExtremeCloud IQ Site Engine Network and Wireless tabs. You can add them to a specific map, or create new maps based on device or AP system location.
In order to edit maps, you must be a member of an authorization group assigned the OneView > Maps > Maps Read/Write Access capability.
Add to a Specific Map
Use these steps to add devices or APs to a map you created. For example, use these steps to search for all your S-Series devices on the Network tab and add them to a map.
- On the Network > Devices tab, select All Devices in the drop-down list in the left-panel.
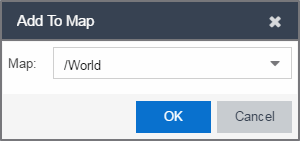
- Right-click on one or more devices and select Maps > Add to Map (as shown below). On the Wireless tab, select on the Access Points report, right-click on one or more APs, and select Add to Map.
- In the Add to Map window, use the drop-down list to select the desired map. Select OK to add the devices or APs to the map.
- Open the Maps page and select the map to which you added the devices. Right-click on the map and select Edit Map. You can now position the devices as desired.
- Select the Save button to save the device to the map.
Add to New Maps Based on Location
Use these steps to add devices or APs to new maps based on well-named system locations that reflect the desired map structure. For example, if your devices are assigned system locations according to the following structure: US/Boston/Third Floor/Closet One/Rack One/Shelf One, typically, a map would be created to the Third Floor level, and then you manually position the devices in the correct location on the map.
- On the Network > Devices tab, right-click on one or more devices and select Maps > Create Maps for Locations.
On the Wireless tab, select the Access Points report, right-click on one or more APs, and select Maps > Create Maps for Locations. - The Create Maps Based on Location window opens. The window contains a preview panel displaying the number of maps and the map titles that result, based on the system locations of your selected devices or APs.
For example, as shown in the following screen shot, you are adding 9 APs to a map. This creates eight new maps based on the access points' system location structure: NORA, Salem, Salem building, and Salem Warehouse and Shipping.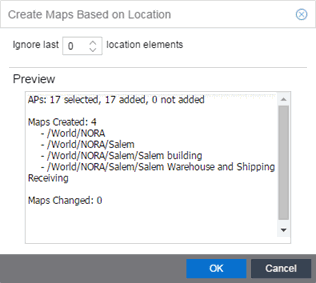
If you want all the devices on one map, set the Location Option to ignore the last 1 location elements, which is the Salem building location. If you do that, then only two maps are created: NORA and Salem.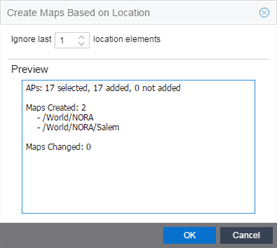
- Select OK to create the maps and add the APs.
- Open the World Site navigation tree in the left-panel and locate the new maps.
- Right-click on the map and select Maps > Edit Map. You can now position the APs as desired.
- Select the Save button to save the devices/APs to the map.
For information on related help topics: