ExtremeCloud IQ Site Engine tables include several features and functions that enable you to customize the table data. The table features vary, depending on the type of table you are viewing.
Columns
To perform
an ascending or descending sort of the column data, select the column heading. An up arrow (![]() ) indicates the column has been sorted in an ascending order, and a down arrow (
) indicates the column has been sorted in an ascending order, and a down arrow (![]() ) indicates a descending sort. You can also select options from the column heading drop-down list to hide or display different
columns in the table.
) indicates a descending sort. You can also select options from the column heading drop-down list to hide or display different
columns in the table.
Filter
Use the Filter function to view, modify, apply, or remove filters from a table column. You can filter multiple columns in a table. The filtered data is specific to the type of data presented in the column. ExtremeCloud IQ Site Engine tables may include a Filter Button, which is located at the top right corner of the table, or a Column Filter, which is located in the column heading drop-down list.

Use the Filter button to perform several filter functions:
- To open the Column Filters window, select the Filter button, which displays the Add Filter field and all columns on which a filter is currently applied.
If no filters are currently active, a message states there are no active filters.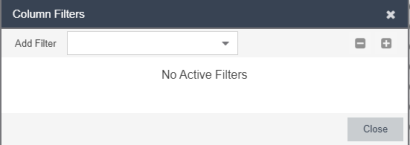
- To add filters to the table, expand the Add Filter field.
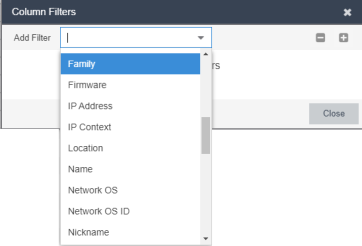
- Select a column label on which you want to add a filter.
Note: The filter function is not available for some table columns. If a column cannot be filtered, the column label will not be included in the Add Filter drop-down list. - Enter the filter value in the filter value field.
The type of filter available depends on the data displayed in the column.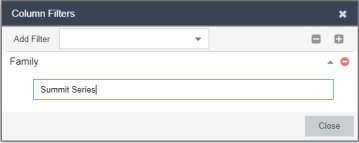
- To collapse the filter value field, select up arrow (
 ). To expand the filter value field, select down arrow (
 ).
). - To remove a filter, select delete (
 ) .
) . - To save your filter value and apply the filter to the column, select Close.
The column to which you have applied the filter is no longer included in the Add Filter drop-down list.Note: After a filter is applied to a column, the column label displays (depending on your browser) as italicized, or as underlined and italicized. 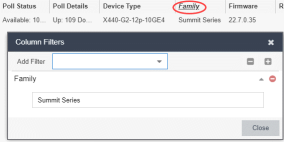
- Select a column label on which you want to add a filter.
- To expand or collapse the list of active filters, use plus and minus buttons (
 ) to the right of the Add Filter field.
 - To modify an active filter, change the filter value in the Filter definition field.
- To remove an active filter, select delete () to the right of the filter.
The column from which you have removed the filter is again included in the Add Filter drop-down list.Note: After a filter is removed from a column, the column label no longer displays (depending on your browser) as italicized, or as underlined and italicized.
You can filter the data in a specific column using the column heading drop-down list.
- To display the drop-down arrow at the right of the heading, place the cursor over a column heading.
- To display the drop-down list, select the down arrow.
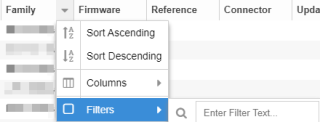
- Select Filters.
- To apply a filter to the column, select the check box to the left of the Filters item.
Note: The filter function is not available for some table columns. If a column cannot be filtered, the check box will not display when you select the column heading drop-down list. - Enter the filter value for that column in the field to the right of the Filters item.
Notes: After a filter is applied to a column, the column label displays (depending on your browser) as italicized, or as underlined and italicized.

If you select the check box to the left of the Filters item, but do not add filter value, the column label is displayed (depending on your browser) as italicized, or as underlined and italicized, but no filter is applied.
- To modify a filter, change the filter value in the field to the right of the Filters item.
- To remove a filter, clear the check box to the left of the Filters item.
Note: After a filter is removed from a column, the column label no longer displays (depending on your browser) as italicized, or as underlined and italicized.
String Filter
Enter a text string in the filter field and select Close. Only data including that text string will display in the table.
For data that includes a site path or other kind of path:
- Enter the site value starting with a backslash (/) to display table entries with the exact match of the site name.
Partial site names and site names with upper- or lower-case characters that do not match the site name are not displayed. - Enter the site value without starting with a backslash (/) to display exact matches to the Filter value site name, as well as site names that are partial matches to the Filter value site name, and site names with upper- or lower-case characters that may not match the Filter value site name.
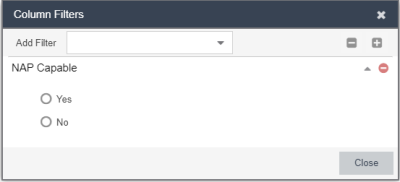
Select from choices provided (for example, yes or no; true or false) and select Close. An example of a Boolean filter is the NAP Capable column in the Control > End-Systems tab table.
Enter a date range, using the After and Before date options, or select a specific date using the On date option. You can also select the calendar icon at the right of the field to select the date. Select Close. An example of the date filter is the First Seen column in the Network > Discovered tab table:
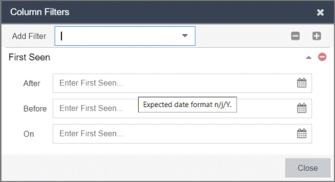
The date format you need to use for the date filter is determined by what was configured in the Administration > Options tab. A tooltip in the Column Filters window provides the format required for that date column filter.
| Note: | For some date columns, the tooltip indicates that the date format may include m, d, or M. The letters in this field signify the following:
|
|---|
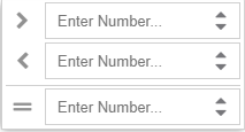
Select a numeric range, using the < and > options, or a specific number using =. You can also select a number from the drop-down list in each field. An example of a numeric filter is the Times Seen column in the Network > Discovered tab table.
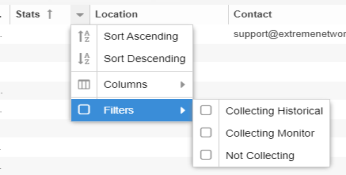
List Filter
Select one or more entries to filter the column. An example of a list filter is the Stats Column in the Device List table on the Network > Devices > Devices tab.
Search 
Select the magnifying glass icon to open the Search bar. Enter the full
or partial value you are searching for and select Search.
Matching items are displayed in the table. Select the Reset button to
clear the Search results and refresh the table.
| NOTE: | Not all fields in a data table are searchable. Place your cursor in the Search bar to display a tooltip which will indicate which fields in the table are searchable. |
|---|
Paging Tool
Use the paging toolbar to navigate through the table pages. The paging toolbar provides four buttons that let you easily page through the table: first, previous, next, and last page. It also displays an indicator of the current and total number of pages. Enter a page number in the Page field and press Enter to quickly move to that page.
Refresh 
Select the Refresh button to update the data in the table.
Reset 
Select the Reset button to clear the search field and search results, clear all filters, and refresh the table.
Bookmark 
Use the Bookmark button to save the search, sort, and filtering options you have currently set. It opens a new window for the current report with a link that can be bookmarked in your browser. You can then use the bookmark whenever you want the same search, sort, and filtering options.
CSV Export 
Select the CSV Export button to save table data to a CSV file.
PDF Export 
Select the PDF Export button to save table data to a PDF file.
For information on related help topics: