This Help topic provides information on the following operations available from the Network > Devices tab:
Buttons
Menu Options
- Device View
- Terminal
- WebView
- FlexViews
- More Views
- Configure
- Compass Search
- Rediscover
- Clear Alarms
- Upgrade Firmware
- Add to Device Group
- More Actions
- Restart Device
- Set Device Profile
- Set/Clear Frozen Ports
- Import to Site
- Import to Service Definition
- View Available Firmware Releases
- Run Site's Add Actions
- Contact Device Using Group's Profile
- Ping Device (ICMP/TCP Echo)
- Authentication Configuration
- RADIUS Configuration
- Delete Device
- Overwrite Local Changes
- Register Trap Receiver
- Unregister Trap Receiver
- Register SysLog Receiver
- Unregister SysLog Receiver
- Collect Device Statistics
- Export Serial Numbers
- Change Management Status
- Archives
- Tasks
- Device Groups
- Maps
- Network
- Policy
- Fabric
- Working in the Devices Table
- Buttons, Search Field, and Paging Toolbar
- Local Settings
To view the Devices sub-tab on the Network tab, you must be a member of an authorization group assigned the OneView > Access OneView and the OneView > Events and Alarms > OneView Event Log Access capabilities.
Add Device
To add a new device to the Devices list, select the Add Device icon at the top of the tab. The Add Device window appears. Enter the information in the window and select OK.
AFter the device is added to the Devices list, it can be used in ExtremeCloud IQ Site Engine.
Check for Firmware Updates
To check for available firmware updates for the devices included in the Devices list, select the Check for Firmware Updates icon at the top of the Devices tab. Enter your ExtremeNetworks.com credentials to view available firmware updates.
To update the credentials used to access ExtremeNetworks.com, open the Administration > Options > ExtremeNetworks.com Updates tab and edit the values in the Update Credentials section.
Export to CSV
To export information from the Devices list, select the Export to CSV icon at the top of the tab. The Devices tab provides two methods of exporting the data in the table:
- Export all rows
- Select to export all of the data in the table to a .CSV file. The exported data displays with any sorting, filtering, and searching applied.
- Export selected rows
- Select to export the data in the currently selected row(s) in the table to a .CSV file. The exported data includes all columns in the table (including those not currently displayed).
Menu Options
Device View
Select the Menu icon ( ) or right-click in the Devices list to opens a Device View for the device in a separate tab.
Terminal
To open a terminal session to a device, select the Menu icon () or right-click in the Devices list and select Terminal. The Extreme WebShell window opens a terminal session for the selected device.
You can copy and paste information to and from the terminal window. Additionally, you can also enable logging for device terminal sessions. To enable logging, access the Administration > Diagnostics tab and expand Server in the left-panel. Select Server Diagnostics and select the appropriate Diagnostic Level in the drop-down list for Extreme WebShell.
WebView
You can use the Network tab to access WebView web-based management, which lets you configure and manage certain Extreme Networks and Enterasys devices.
To open WebView, select a device in the Device list, select the Menu icon () or right-click in the Devices list to select WebView from the menu.
The web-based management opens in a new browser window. If your authorization group has been assigned the capability for Suite > Device Local Management WebView, you can take advantage of the auto login feature for web local management of ExtremeControlengines and wireless controllers.
WebView is only available with certain Extreme Networks and Enterasys devices.
FlexViews
You can use the Network tab to access web-based FlexViews that provide a convenient way for Operations people to view FlexView data.
To launch a FlexView, you must be a member of an authorization group that has been assigned the OneView > FlexView > OneView FlexView Read Access capability. To launch and edit a web-based FlexView, you must be a member of an authorization group that has been assigned the OneView > FlexView > OneView FlexView Read/Write Access capability.
To launch a FlexView, select a device in the Device list, select the Menu icon () or right-click in the Devices list and select FlexView from the menu. You can also right-click on a device and select FlexView from the menu.
The Select FlexView window opens.
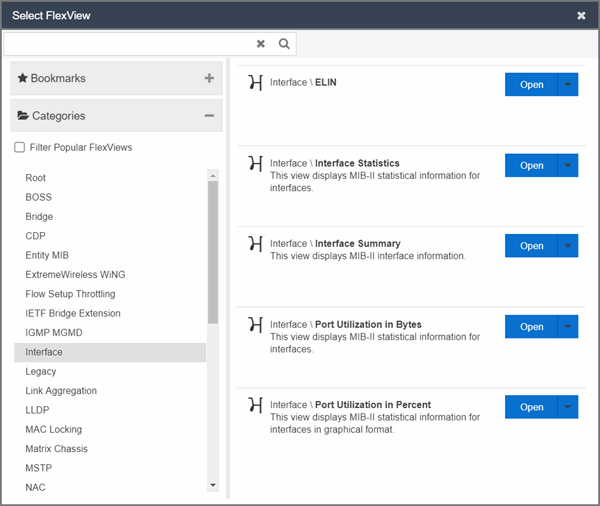
Select a FlexView category from the left-panel and select the Open drop-down list. Select whether you want to open the FlexView in a new tab or window. The Select FlexView window displays only those FlexViews applicable to the device type selected.
For additional information about launching and using FlexViews from the Network tab, see Web-Based FlexViews.
More Views
Port Tree
The Port Tree displays interface information for a device.
To open the Port Tree:
- Select a device in the Devices list.
- Select the Menu icon () or right-click in the Devices list.
- Select More Views > Port Tree. The Port Tree opens in a new tab.
-
Expand the components to see the device's interfaces. Right-click on an interface to:
- access PortView for that interface
- view interface history including interface utilization, availability, and bandwidth/packets/flows statistics (Flow stats display only for S/K series and PF-FC-180 devices)
- run scripts on the selected port
- enable interface statistic collection
- create policy profiles, called roles, that are assigned to the ports in your network.
In the Port Tree table, the Stats column displays whether statistics collection is enabled or disabled on the port. A black check indicates that historical collection is enabled, and a blue check indicates that threshold alarms collection (formerly monitor collection) is enabled. The Neighbor column displays neighbor details from CDP/EDP/LLDP. Hover your mouse over the column to see the protocol type.
Interfaces
Selecting Interfaces opens the Interface Summary, from which you can right-click on an interface to access PortView, view interface history, view current alarms and alarm history, enable interface statistic collection, and edit certain values for an interface.
To open the Interface Summary:
- Select a device in the Device list.
- Select the Menu icon () or right-click in the Devices list.
- Select More Views > Interfaces.
An Interface Summary FlexView opens for the device in a new tab.
User Sessions
Select User Sessions to view user sessions associated with the selected device.
To launch the user session, you must be a member of an authorization group that has been assigned the OneView > User Session > OneView User Session Read Access capability. To launch and edit a User Session , you must be a member of an authorization group that has been assigned the OneView > User Session > OneView User Session Read/Write Access capability.
To open a user session for a device:
- Select a device in the Device list.
- Select the Menu icon () or right-click in the Devices list.
- Select More Views > User Session.
In the User Sessions window, you can view all users accessing the device selected.
For additional information about the User Sessions window, see User Sessions.
Fabric L2VSNs
Selecting Fabric L2VSNs opens the I-SID L2VSN and I-SID L2VSN interfaces with details about Fabric Connect L2 Services known to the device.
To open the Fabric L2VSNs:
- Select a device in the Device list.
- Select the Menu icon () or right-click in the Devices list.
- Select More Views > Fabric L2VSNs.
An Interface Fabric L2VSNs opens for the device in a new tab.
SDWAN Appliance360
Selecting SDWAN Appliance360 opens the SDWAN Appliance360 in ExtremeCloud application. Additional authentication is required for the first time. This option is available only if there is an Extreme Networks SDWAN appliance connected to the selected Fabric Engine device.
To open the SDWAN Appliance360:
- Select the Fabric Engine device with the Extreme SDWAN appliance connected in the device list.
- Select the Menu icon () or right-click in the Devices list.
- Select More Views > SDWAN Appliance360.
- If there are multiple Extreme SDWAN appliances connected, select the SDWAN appliance you want to manage.
An SDWAN Appliance360 opens in a new tab.
Configure
To configure device information for an existing device:
- Select the Menu icon () or right-click in the Devices list.
- Select Configure.
The Configure Device window opens, which allows you to configure the device properties.
Compass Search
To open the Search window with Search with Compass selected for the selected devices:
- Select the Menu icon () or right-click in the Devices list.
- Select Device > Compass Search.
The Search window opens displaying the devices you selected with Search with Compass selected. Selecting a device group or site opens the Search window opens displaying the devices in the device group or site you selected with Search with Compass selected.
Rediscover
To refresh a device or multiple devices to update the information presented on the Devices tab:
- Select the device or devices in the Devices list.
- Select the Menu icon () or right-click in the Devices list.
- Select Rediscover Device.
ExtremeCloud IQ Site Engine rediscovers the device and information about the device is refreshed.
Clear Alarms
To clear the alarms for a device or multiple devices in the Devices list:
- Select the device or devices in the Devices list.
-
Select the Menu icon () or right-click in the Devices list.
- Select Clear Alarms.
- Select Yes.
The alarms on the selected devices clear.
A dialog box appears.
Upgrade Firmware
To update devices in the ExtremeCloud IQ Site Engine database with the latest firmware releases:
- Select the device or devices in the Devices list
- Select the Menu icon () or right-click in the Devices list.
- Select Upgrade Firmware.
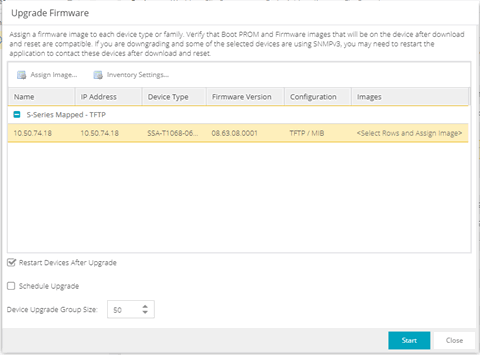
The results display in the Upgrade Firmware window with displaying information about the device and the available firmware versions. For additional information about upgrading device firmware, see How to Upgrade Firmware. Restart devices when the firmware is upgraded via the Restart Devices window by selecting More Actions > Restart Device.
Add to Device Group
The Add to Device Group menu option enables you to add devices or ports to a device group.
To add a device or multiple devices to a device group:
- Select the device or devices in the Devices list.
- Select the Menu icon () or right-click in the Devices list.
- Select Add to Device Group.
- Select OK to add the devices to the group.
The Select Destination Group window displays, which allows you to select the device group to which the device or devices are added.
To add a port or multiple ports to a device group:
- Select the port or port in the Devices list.
- Select the Menu icon () or right-click in the Devices list.
- Select Add to Device Group.
- Select OK to add the ports to the group.
The Select Destination Group window displays, which allows you to select the device group to which the port or ports are added.
More Actions
Restart Device
To restart a device:
- Select the device or devices in the Devices list.
- Select the Menu icon () or right-click in the Devices list.
- Select More Actions > Restart Device.
The Restart Devices window opens. - Select Start.
The devices are restarted.
Set Device Group's Profile
To change the profile settings for a device or multiple devices from the Devices list:
- Select the device or devices in the Devices list.
-
Select the Menu icon () or right-click in the Devices list.
- Select More Actions > Set Device Group's Profile.
- Select a profile from the drop-down list to change the profile for the selected device or devices.
- Select OK.
A message appears confirming the device profile change.
The Set Device Group's Profile window appears.
| NOTE: | The access profile is changed for the user's group. To verify, check the Device Mapping. |
|---|
Set/Clear Frozen Ports
To set or clear frozen ports on a device or multiple devices in the Devices list:
- Select the device or devices in the Devices list.
-
Select the Menu icon () or right-click in the Devices list.
- Select More Actions Set/Clear Frozen Ports.
- Select whether you want to freeze all ports, freeze the interswitch ports, or clear all frozen ports.
- Select Yes. All ports are frozen, the interswitch ports are frozen, or all frozen ports are cleared, depending on what you select.
Import to Site
To import VLAN data from a device and save it to the site with which it is associated:
- Select the device in the Devices list.
-
Select the Menu icon () or right-click in the Devices list.
- Select More Actions > Import to Site.
- Select the Overwrite VLAN Data checkbox to remove all VLAN data from the site and copy the VLAN data from the device to the site.
When this checkbox is not selected, the VLAN data from the device is added to the existing VLAN data on the device and only matching VLAN data is overwritten. - Select Import to import the VLAN data.
Import to Service Definition
To import data from a device and save it to a service definition:
- Select the device in the Devices list.
-
Select the Menu icon () or right-click in the Devices list.
- Select More Actions > Import to Service Definition.
View Available Firmware Releases
To view all firmware releases available for a device:
- Select the device in the Devices list.
-
Select the Menu icon () or right-click in the Devices list.
- Select More Actions > View Available Firmware Releases.
Run Site's Add Actions
Select Run Site's Add Actions to run the actions configured for the site in which the device is contained:
- Select the device in the Devices list.
- Select the Menu icon () or right-click in the Devices list.
- Select More Actions > Run Site's Add Actions.
Contact Device Using Group's Profile
Select Contact Device Using Group's Profile to attempt to contact the selected devices via SNMP using the Administration Profile for a device, or the device's override profile configured on the Administration > Profiles > Device Mapping subtab.
- Select the device in the Devices list.
- Select the Menu icon () or right-click in the Devices list.
- Select More Actions > Contact Device Using Group's Profile.
Ping Device (ICMP / TCP Echo)
Select Ping Device (ICMP / TCP Echo) to determine if a device is having connectivity issues.
- Select the device in the Devices list.
- Select the Menu icon () or right-click in the Devices list.
- Select More Actions > Ping Device (ICMP / TCP Echo).
NOTES: If ExtremeCloud IQ Site Engine is installed to run as root, an ICMP Request is sent.
If ExtremeCloud IQ Site Engine is installed to run as non-root user, a TCP Echo Request is sent.
After ExtremeCloud IQ Site Engine sends either request type, it waits the specified amount of time configured on the Administration > Options> Status Polling tab to determine if the device is reachable or not reachable.
- If contact with the device is successful, the message "Device with IP XX.XX.XX.XX is reachable" displays.
- If contact with the device is not successful, the message "Device with IP XX.XX.XX.XX is not reachable" displays.
Authentication Configuration
Select Authentication Configuration to open the Authentication Configuration wizard, which allows you to configure the authentication used on a device or on the individual ports of a device.
- Select the device or devices in the Devices list.
- Select the Menu icon () or right-click in the Devices list.
- Select More Actions > Authentication Configuration.
RADIUS Configuration
RADIUS Authentication
Opens the RADIUS Authentication tab, which allows you to configure the RADIUS authorization servers and client settings used on a device.
- Select the device or devices in the Devices list.
- Select the Menu icon () or right-click in the Devices list.
- Select More Actions > RADIUS Authentication.
RADIUS Accounting
Opens the RADIUS Accounting tab, which allows you to configure the RADIUS accounting servers and client settings used on a device.
- Select the device or devices in the Devices list.
- Select the Menu icon () or right-click in the Devices list.
- Select More Actions > RADIUS Accounting.
Delete Device
To delete a device or multiple devices from the Devices list:
- Select the device or devices in the Devices list.
-
Select the Menu icon () or right-click in the Devices list.
- Select More Actions > Delete Device. A Delete Confirmation window opens.
- Select Yes to remove the device from ExtremeCloud IQ and any databases, maps, and ZTP+ configurations to which the device is added.
Overwrite Local Changes
Use this feature to modify the configuration of a device to replace any manual changes that were made directly (via the CLI) to the device with the values from the Device, VLAN and ports tabs of ExtremeCloud IQ Site Engine.
| IMPORTANT: |
Local configuration changes that you make on ZTP+ managed switches may not be saved into the ExtremeCloud IQ Site Engine database. Any changes made locally that you can configure using ZTP+ will be removed the next time ExtremeCloud IQ Site Engine polls the ZTP+ device. To alert you when ExtremeCloud IQ Site Engine detects that a ZTP+ managed device has Device, VLAN, or Port settings that are different from the configuration in ExtremeCloud IQ Site Engine, you can use the Alarm on Local Change option. |
|---|
To overwrite local changes made to the device via the CLI and save the site configuration on a device or devices:
- Select the device or devices in the Devices list.
- Select the Menu icon () or right-click in the Devices list.
- Select More Actions > Overwrite Local Changes.
Register Trap Receiver
To receive trap information from the devices on your network, Select the Menu icon () or right-click in the Devices list and select More Actions > Register Trap Receiver from the menu. Additionally, devices added to sites for which Add Trap Receiver is selected on the Discovered Device Actions tab automatically receive trap information. You can define the trap configuration details on the Options > Trap tab. Depending on the device, ExtremeCloud IQ Site Engine creates the trap configuration via SNMP or a script.
Unregister Trap Receiver
To stop receiving trap information from the devices on your network, Select the Menu icon () or right-click in the Devices list and select More Actions > Unregister Trap Receiver from the menu.
Register SysLog Receiver
To receive syslog information from the devices on your network, select the Menu icon () or right-click in the Devices list and select More Actions > Register SysLog Receiver from the menu. Additionally, devices added to sites for which Add Syslog Receiver is selected on the Discovered Device Actions tab automatically receive syslog information. You can define the syslog configuration details on the Options > Syslog tab. Depending on the device, ExtremeCloud IQ Site Engine creates the syslog configuration via SNMP or a script.
Unregister SysLog Receiver
To stop receiving syslog information from the devices on your network, select the Menu icon () or right-click in the Devices list and select More Actions > Unregister SysLog Receiver from the menu.
Collect Device Statistics
The Devices tab provides the ability to start and stop device statistics collections for Extreme Networks and Enterasys devices, which allows the collection of data used in reports.
To collect device statistics:
- Select one or more devices or wireless controllers in the Device list.
- Select the Menu icon () or right-click in the Devices list.
- Select More Actions > Collect Device Statistics.
A window opens from which you can select your statistics collection criteria.
- In Historical mode, device statistics are saved to the database and aggregated over time, for use in reports. The device statistics are also used for threshold alarms configured in the Console Alarms Manager. In the Active Threshold Alarm Summary box, you can see all active threshold alarms configured in the Console Alarms Manager that use these statistics.
- In Threshold Alarms (formerly Monitor) mode, device statistics are saved for one hour and then dropped. You can use these statistics for threshold alarms, but not for ExtremeCloud IQ Site Engine reporting. In the Active Threshold Alarm Summary box, you can see all active threshold alarms configured in the Alarms and Events tab that use these statistics. (Note that you do not see the Threshold Alarms mode option if you have disabled threshold alarms collection in the OneView Collector Advanced Settings in Administration > Options.)
- Disable — Select this check box to disable statistic collection mode.
NOTE: Enabling Historical Device Statistics Collection may use substantial disk space. - In Historical mode, device statistics are saved to the database and aggregated over time, for use in reports. The device statistics are also used for threshold alarms configured in the Console Alarms Manager. In the Active Threshold Alarm Summary box, you can see all active threshold alarms configured in the Console Alarms Manager that use these statistics.
If you are enabling statistics collection on an ExtremeControl engine, ExtremeAnalytics engine, or ExtremeWireless Controller, read through the following notes:
- ExtremeControl Engine — When collecting statistics on an ExtremeControl engine, the active engine must be added to ExtremeCloud IQ Site Engine to collect all appliance statistics. In addition, Threshold Alarms mode is not supported on ExtremeControl engines.
- ExtremeAnalytics Engine — When collecting statistics on an ExtremeAnalytics engine, the engine must be added to the Analytics > Configuration > ExtremeAnalytics Engines table in order for ExtremeCloud IQ Site Engine to collect all Application Detection statistics. In addition, Threshold Alarms mode is not supported on ExtremeAnalytics engines.
- ExtremeWireless Controller — Wireless Controller statistics collection is configured separately from other devices. When you enable Wireless Controller statistics collection, it includes Wireless Controller, WLAN, Topology, and AP wired and wireless statistics, and you also have the option to collect wireless client statistics.
For additional information about collecting statistics, see Enable Report Data Collection.
Export Serial Numbers
To register or export serial numbers for your devices:
- Select one or more devices in the Device list.
- Select the Menu icon () or right-click in the Devices list.
- Select More Actions > Export Serial Numbers.
The Export Serial Numbers window opens.
-
Select Export to File
Export to File collects all the serial numbers for the selected devices and downloads them to the browser in comma separated value (CSV) format. This function allows you to view the serial numbers before registering.
Change Management Status
When using ExtremeCloud IQ Site Engine in Air Gap mode, the Change Management Status sub-menu displays, enabling you to manually determine whether a device listed on the Devices tab is managed by ExtremeCloud IQ Site Engine. Unmanaged devices do not count against the license total in your license file.
To change the management status of a device:
- Select one or more devices or wireless controllers in the Device list.
- Select the Menu icon () or right-click in the Devices list.
- Hover over More Actions > Change Management Status.
- Select Manage Device(s) to manage the devices you selected in the Device list using ExtremeCloud IQ Site Engine. The number of available licenses is reduced based on the number and size of devices you selected.
- Select Unmanage Device(s) if you no longer need to manage the selected devices in ExtremeCloud IQ Site Engine. All licenses consumed by the selected devices are returned to the available pool.
Archives
Backup Configuration
To back up (archive) your device configurations via the Devices tab:
- Select one or more devices in the Device list.
- Select the Menu icon () or right-click in the Devices list.
- Select Archives > Backup Configuration.
Restore Configuration
To restore device configurations via the Devices tab:
- Select one or more devices in the Device list.
- Select the Menu icon () or right-click in the Devices list.
- Select Archives > Restore Configuration.
Compare Last Configurations
To compare two configuration files using the Devices tab:
- Select one or more devices in the Device list.
- Select the Menu icon () or right-click in the Devices list.
- Select Archives > Compare Last Configurations.
Inventory Settings
To configure the firmware, MIB, and script settings for a device:
- Select one or more devices in the Device list.
- Select the Menu icon () or right-click in the Devices list.
- Select Archives > Inventory Settings.
The Inventory Settings window opens, from which you can select the file transfer mode, firrmware download server, and MIB download settings.
Tasks
If you configure tasks or workflows to appear on devices, ports, or groups, you can use the Devices tab to run a task or workflow on a device, port, or group.
To run a task:
- Select one or more devices or a device group in the Device list.
- Select the Menu icon () or right-click in the Devices list.
- Select Tasks from the drop-down list.
- Select Config to select the workflow you are running on the selected devices from within the Tasks menu.
NOTE: For Fabric Engine devices, you can also select Config to disable or enable DvR (Direct Virtual Routing) leaf boot config flag.
- Select System to select the script you are running on the selected devices from within the Tasks menu.
- If the item in the left-panel is a device or contains devices, a Device Tasks submenu displays, containing those tasks specific to devices. To define a task as specific to devices, select Device on the Menus subtab for the script or workflow from which task is created.
- If the item in the left-panel is a port or contains ports, a Port Tasks submenu displays, containing those tasks specific to ports. To define a task as specific to ports, select Port on the Menus subtab for the script or workflow from which task is created.
- Select CLI Commands to display CLI commands for the script or workflow you are running from within the Tasks menu.
| NOTE: |
You can also access the Tasks menu from the left-panel menu by right-clicking an item. The items displayed in the left-panel depends on the criteria you select in the drop-down list. |
CLI Commands
To run commands against multiple devices, use the Tasks > CLI Commands option:
- Select the Menu icon () or right-click in the Devices list.
- Select Tasks > CLI Commands.
The Execute CLI Commands window opens, from which you can enter the commands and execute on the devices you select. Select the Launch link at the top of the window in the Terminal Window column to test the credentials and view the results in the Results tab at the bottom of the window.
| NOTE: | Commands you define are run on all of the devices displayed at the
table at the top of the window. |
|---|
Device Groups
Selecting the User Device Groups in the left-panel tree of the Devices tab enables you to create, delete, and rename device groups in your network, as well as remove a device from a device group, and remove a port from a device group.
Creating a Device Group
To create a device group:
- Select User Device Groups in the left-panel tree on the Devices tab, or expand the User Device Groups list and select a device group.
- Select the Menu icon () or right-click on the device group you selected in the list.
- Select Device Groups > Create Device Group.
- The Create Device Group window opens. Enter a name for the new device group.
NOTE: Device Group names must be unique within the parent group.
Device Group names are case insensitive.
- Select OK.
Deleting a Device Group
To delete a device group:
- Select User Device Groups in the left-panel tree on the Devices tab.
- Expand the User Device Group list and select a device group.
- Select the Menu icon () or right-click on the device group you selected.
- Select Device Groups > Delete Device Group.
- The Confirm Delete window opens. Select Yes to delete the device group.
Renaming a Device Group
To rename a device group:
- Select User Device Groups in the left-panel tree on the Devices tab.
- Expand the User Device Group list and select a device group.
- Select the Menu icon () or right-click on the device group you selected.
- Select Device Groups > Rename Device Group.
- The Rename Device Group window opens. Enter a new name for the device group.
- Select OK.
Removing a Device from a Device Group
To remove a device from a device group:
- Select User Device Groups in the left-panel tree on the Devices tab.
- Expand the User Device Groups list and select a device.
- Select the Menu icon () or right-click on the device group you selected in the list.
- Select Remove from Device Group.
| NOTE: |
Devices contained in multiple nested device groups (for example, a device contained in a device group and also in a second device group nested in the "parent" device group) can be removed in multiple ways:
|
Removing a Port from a Device Group
To remove a port from a device group:
- Select User Device Groups in the left-panel tree on the Devices tab.
- In the left-panel tree, expand the User Device Groups list and select a port.
- Select the Menu icon ().
- Select Device Groups > Remove from Group.
The port is removed from the currently selected device group.
Maps
Add to Map
To add a device to an existing map:
- Select one or more devices in the Device list.
- Select the Menu icon () or right-click in the Devices list.
- Select Maps > Add to Map.
For additional information, see Create and Edit Maps.
To add devices or APs to new maps:
- Select one or more devices in the Device list.
- Select the Menu icon () or right-click in the Devices list.
- Select Maps > Create Maps For Locations.
For additional information, see Create and Edit Maps.
Create Map
Maps visually organize the devices on your network, based on their geographic location or based on the other devices to which they connect.
You can create a new map by either selecting the Menu icon () or right-click in the World map navigation tree and selecting Maps > Create Map.
You can also create a map for a specific device or device group by selecting the device or device group in the Device Groups navigation tree in the Devices section of the window or in the Devices list and selecting Maps > Create New Map. For additional information, see Create and Edit Maps.
Create Map for Locations
You can create a new map based on the endpoint locations of the selected devices by either selecting the Menu icon () or right-click in the World map navigation tree and selecting Maps > Create Map for Locations.
| NOTE: | The map is not created if the endpoint location matches a site that currently exists in ExtremeCloud IQ Site Engine. |
For additional information, see Create and Edit Maps.
Search Maps
To search your existing maps to find a wired or wireless client or device:
- Select one or more devices in the Device list.
- Select the Menu icon () or right-click in the Devices list.
- Select Maps > Search Maps.
If the search item is found, the map opens on a separate tab. For more information, see Maps Overview.
Network
The Network sub-menu allows you to view information about all of your network connections.
To open the Network sub-menu:
- Select the Menu icon () or right-click in the Devices list.
- Select Network.
- Select from EAPS Summary, Link Summary, MLAG Summary, VLAN Summary, or VPLS Summary to display a table with summary details for each network connection.
| NOTE: | Network connection summaries are active only if the device supports the view. If the device does not support MLAG, for example, the MLAG Summary option will appear grey and inactive on this list. |
The tabs at the bottom of the window populate with information about the connection you select. All connections managed by ExtremeCloud IQ Site Engine are available. You can also view the Network Details for connections included in a specific Map by opening the Map and selecting one of the tabs in the Network Details section of the window. Selecting a connection listed on the tab highlights the connection on the map.
Policy
Use the Policy sub-menu to view and set policy for a device or port.
To view or set policy for a device:
- Select one or more devices in the Devices table.
- Select the Menu icon () or right-click in the Devices list.
- Open the Policy sub-menu to view the currently assigned domain, change domain assignment, set or clear the default role for all ports, or Enforce or Verify the domain.
To view or set policy for a port:
- Select the Menu icon () or right-click in the Devices list.
- Select More Views > Port Tree.
- Select one or more ports.
- Right-click and use the Policy menu to view the currently assigned domain, set or clear the port default role, and see role details for the default role.
If the device doesn’t support policy or isn’t assigned to a domain, the Port Tree Policy menu options are grayed out and you see either "Policy Unsupported" or "Current Domain: Unassigned". If the domain is unassigned, you must first assign the device to a domain before you can access Policy menu options in the Port Tree.
Fabric
The Fabric Topology selection on the Network tab displays your the fabric topologies you create for your devices.
To open the Fabric Connect tab for a site:
- Open the Network > Devices tab.
- Select Sites from the left-panel drop-down list.
- Right-click a site or select the Menu icon () in the left panel.
- Select Maps/Sites > Fabric Topology.
The Fabric Connect tab opens.
| NOTE: |
If a "503 Service Unavailable" error message displays when selecting Maps/Sites > Fabric Topology, open the Administration > Certificate tab, select the Update Fabric Manager button to open the Add Fabric Manager Certificate window, and select the Generate Certificate button.
|
Working in the Devices List
You can manipulate the Devices list data in several ways to customize the view for your own needs:
- Select the column headings to perform an ascending or descending sort on the column data.
- Hide or display different columns by selecting a column heading drop-down arrow and selecting the column options from the menu.
- Filter, export and search the data in each column in the table.
Devices List Column Definitions
- Device View
 — Place the cursor over the first column and select the icon to open a Device View that provides analysis and troubleshooting information for the selected device, including device summary, FlexView, and ExtremeCloud IQ Site Engine historical data. You must have historical statistic collection enabled for the device to see data for the full range of available reports. For more information, see Collect Device Statistics.
 - Device Status — This column, hidden by default, indicates whether there is contact with the device. The color of the circle indicates the degree to which the device is communicating. A green icon indicates there is contact with the device. A yellow icon indicates there are issues with contact to the device. A red icon indicates there is no contact with the device. Hover over the Device Status icon to view additional details about the status for that device.
- Status — Indicates the alarm/device status for the device.
-
 (Green) Up — Up with no alarms.
 -
 (Red) Critical — Down or having alarms with significant implications.
 -
 (Orange) Error — A problem with limited implications.
 -
 (Yellow) Warning — Up, but with an alarm that might lead to a problem.
 -
 (Blue) Info — Information only; not a problem. Place the cursor over the status icon to view the number of alarms. Select the alarm/device status icon to open a new page with detailed information about the alarms for that device.
- Device ID — This column, hidden by default, displays a number that serves as a database identifier automatically created for the device. This number increments as you add additional devices.
- Name — The device name or nickname, or IP address. Select the link to open an Interface Summary FlexView for the device.
- Site — The site where the device is located.
- Poll Type — This column, hidden by default, indicates the poll type ExtremeCloud IQ Site Engine uses to discover devices: SNMP, Ping or Not Polled.
- Poll Group Name — This column, hidden by default, indicates the name of the Poll Group you define in the Poll Groups section of the Status Polling options.
- Admin Profile — This column, hidden by default, indicates the access Profile that gives ExtremeCloud IQ Site Engine administrative access to the device.
- Client Profile — This column, hidden by default, indicates the access Profile that gives ExtremeCloud IQ Site Engine client access to the device.
- IP Address — The device IP address. This column is hidden by default.
- Context — The Context column, hidden by default, displays a string that indicates how the device behaves, depending on whether the device is a router or a switch.
- IP Context — The IP Context column, hidden by default, displays a device's IP address with the context appended to the end of the address following a colon.
- Trap Status — Indicates whether a trap receiver is configured, not configured, or not supported for the device.
- Syslog Status — Indicates whether the device is configured to send information to the syslog or if it is not supported for the device.
- Display Name — The IP address of the device. This column is hidden by default.
- Device Type — The type of device.
- Family — The device product family.
- Firmware — The revision for the firmware running in the device.
- Running Reference Firmware — Indicates if the device's thresholds have been configured for Reference Firmware.
- Updates — The firmware release status for the device according to the results from the
latest Check for Firmware Updates operation.
Place your cursor on the column to see a tooltip describing the status.
Firmware Up To Date — The device is running the latest release of firmware.
- New Firmware Release Available — There is a new release of firmware available for
this device. Select the Menu icon () or right-click the icon and select More Actions > View Available Firmware Releases to open
a window listing the current firmware releases available with links to download
the firmware.
- Device does not support Firmware Updates feature — This device does not support the Check for Firmware Updates feature.
- Archived — Indicates if the device has been archived in the last 30 days.
- Config Changed — Indicates if the archived configuration for the device has changed in the last 30 days.
- Connector — Displays the connector version running on the ZTP+ device.
- XIQ Onboarded — Displays whether the device is onboarded to ExtremeCloud IQ to be locally managed by ExtremeCloud IQ Site Engine:
- Black check mark - Indicates that the device is onboarded to ExtremeCloud IQ..
NOTES: Devices with IPv6 addresses in ExtremeCloud IQ Site Engine will not be onboarded as locally-managed devices in ExtremeCloud IQ. Only devices with IPv4 addresses qualify.
Red X - Indicates the device is onboarded but Unmanaged, which means it is not using a license, it has read-only device-level support, and available features in ExtremeCloud IQ Site Engine are limited. Other functionality, including Status Polling, Historical Device + Port Statistics Collection, Existing Scheduled Tasks, and Archives, are supported for devices with Unmanaged status, but these devices cannot be configured for new tasks or new archives.
NOTES: In ExtremeCloud IQ Site Engine version 26.02.13, only use ExtremeCloud IQ to set an ExtremeCloud IQ Site Engine onboarded device to Unmanaged as a temporary measure while you obtain more licenses.
If you mark a device as Unmanaged so it does not trigger a license limit violation, you can then access ExtremeCloud IQ Site Engine and delete the device before the license violation occurs.
You can perform an enforce for an ExtremeControl engine with an Unmanaged status; however, if the device has an Unmanaged status, then the enforce does not reconfigure the device and changes are not written to the device.
When devices are marked as Unmanaged in ExtremeCloud IQ, they are also Unmanaged in ExtremeCloud IQ Site Engine.
In addition, existing ExtremeAnalytics functionality for devices with an Unmanaged status is still supported, but only with existing configuration.
- Blank - Indicates the device is not successfully onboarded to ExtremeCloud IQ from the ExtremeCloud IQ Site Engine because either it is already onboarded to ExtremeCloud IQ (either from another ExtremeCloud IQ Site Engine or by using the IQ Agent to connect directly), or because ExtremeCloud IQ Site Engine lost its connection to ExtremeCloud IQ.
NOTE: If a device's status is Blank, it has limited features available in ExtremeCloud IQ Site Engine because management of the device is owned by ExtremeCloud IQ. N/A - Indicates the device is not eligible to be onboarded to ExtremeCloud IQ because it does not have a valid serial number or MAC address, or Extreme does not yet offer onboarding support for the device.
NOTE: If ExtremeCloud IQ Site Engine does not recognize a device’s serial number or MAC address, right-click on the device and select Rediscover to attempt to discover the device’s serial number or MAC address. After the device's serial number or MAC address is discovered, it can be onboarded to ExtremeCloud IQ during the next onboarding cycle.
- Black check mark - Indicates that the device is onboarded to ExtremeCloud IQ..
- License — Reflects the license of the device.
- In Air Gap mode, this is the license type that ExtremeCloud IQ Site Engine is currently using for the device.
- In Connected mode, this is the license type that ExtremeCloud IQ Site Engine requested from ExtremeCloud IQ, not the license type that ExtremeCloud IQ could activate. For example, when ExtremeCloud IQ Site Engine onboards a device that requires a Navigator license, but ExtremeCloud IQ has no more Navigator licenses available, ExtremeCloud IQ activates a Pilot license for the device. However, ExtremeCloud IQ Site Engine will still show the required license type as Navigator.
- Values:
- Not Licensed - The device was unmanaged by the system due to lack of licenses
- Do Not Onboard - The device can't be onboarded to ExtremeCloud IQ
- Navigator - See licensing
- No Access - The device does not have an access profile assigned
- Pending - The device is waiting for the license agreement
- Pilot - See licensing
- Ping Only - The device was added to the database with a Ping Only profile
- Status Only - The device was added to the database as Monitor Status Only
- Unmanaged - The device is unmanaged
- Advanced - stack Advanced level - See licensing
- Advanced Tier A - See licensing
- Advanced Tier B - See licensing
- Advanced Tier C - See licensing
- Advanced Tier D - See licensing
- Standard - stack Standard level - See licensing
- Standard Tier A - See licensing
- Standard Tier B - See licensing
- Standard Tier C - See licensing
- Standard Tier D - See licensing
- Policy Domain — The policy domain assigned to the device.
- BootPROM — The revision for the BootPROM installed on the device.
- Base MAC — The base MAC address for the device.
- Serial Number — The serial number for the device.
- Stats — Displays whether statistics collection is enabled or disabled on the device. A black check mark indicates that historical collection is enabled, a blue check mark indicates that threshold alarms collection (formerly monitor collection) is enabled.
- Location — The physical location of the device.
- Contact — The name of the responsible contact person.
- System Name — An administratively-assigned hostname for the device taken from the sysName MIB object.
- Uptime — The amount of time, in a days hh:mm:ss format, that the device has been running since the last start-up.
- Nickname — The user-defined nickname for the selected device. This is the name for this device that appears in the device tree in the left panel when the Nickname option is selected in the Name Format drop-down list in the ExtremeCloud IQ Site Engine tab options.
- Description — A description of the device.
- SDWAN Neighbors — The comma-separated list of SDWAN appliances neighboring the SNMP-managed Fabric Engine device. The list entry contains both IP address and S/N. The SDWAN appliance must be from Extreme Networks. This column is hidden by default.
- User Data 1-4, Notes — These columns can provide additional information about the device.
- Asset Tag — An asset tag is a unique asset number assigned to a device for inventory tracking purposes. This value is configured on the Device Annotation of the Configure Device window.
- Network OS — The Network Operating System installed on the device. This allows ExtremeCloud IQ Site Engine to display the appropriate scripts and workflows on a device's Tasks submenu when the device's Network OS matches one of the Network Operating Systems defined for the script or workflow.
Buttons, Search Field, and Paging Toolbar
-

- Use the Filter function to view, modify, apply, or remove filters you add to a table column. You can filter multiple columns in a table. The filtered data is specific to the type of data presented in the column.
- Search

- The search tool enables you to search for full or partial matches
on fields in the table.
- Paging Toolbar

- The paging
toolbar provides four buttons that let you easily page through the table: first, previous, next, and last page.
- Refresh

- Use the refresh button to update the data in the table.
- Reset

- The reset button clears the search field and search results, clears all filters, and refreshes the table.
-

- Use the bookmark button to save the search, sort, and filtering options you have currently set.
Local Settings
Selecting the Settings link in the top right of the Network tab opens the Local Settings window, shown below, from which you can select how the Device navigation tree displays the name of your devices using the Device Tree Name Format drop-down list.
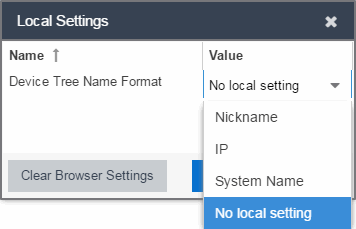
- Nickname — Displays device names in the Device navigation tree using the Nickname entered when you added the device.
- IP — Displays device names in the Device navigation tree using the IP address of the device.
- System Name — Displays device names in the Device navigation tree using the system name of the device.
Additionally, selecting the Clear Browser Settings button changes the ExtremeCloud IQ Site Engine settings back to the system default.
For information on related help topics:
- Network Tab
- Sites
- How to Upgrade Firmware
- Create and Edit Maps
- Tasks
- Compare Device Configurations in ExtremeCloud IQ Site Engine
![]()