Use ExtremeCloud IQ Site Engine to upgrade device firmware for your Extreme Networks devices.
| NOTE: | Prior to upgrading firmware, you must access the Extreme Networks website to obtain information about the latest Extreme Networks firmware releases available for download. |
|---|
You can upgrade firmware in one of three ways:
You must be a member of an authorization group that includes Inventory Manager > Firmware/Boot PROM Management > Firmware/Boot PROM Upgrade Wizard capability to see this menu option.
Upgrading for a Device
To upgrade firmware for a particular device:
- Open the Network tab.
- Select the Devices tab.
- Select All Devices from the left-panel drop-down list, or select a Map or Site, depending on the location of the device you are upgrading.
- Select the Devices tab in the right-panel.
- Select the devices for which you are upgrading firmware in the Devices table in the right-hand panel.
-
Select the Menu icon (
 ) or right-click in the Devices list.
 - Select Upgrade Firmware.
NOTE: You can also right-click a single device in the left-panel and select Upgrade Firmware. - Select one or more devices and select Assign Image.
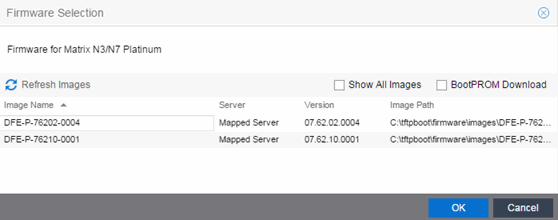
- Select the Show All Images checkbox to show all available firmware images.
- Select the firmware image to download to the device.
- After the upgrade operation completes, verify the boot PROM and firmware images on the device are compatible. Refer to the boot PROM and firmware release notes for more information. To upgrade the boot PROM, select the BootPROM Download checkbox in the Firmware Selection window. This clears any images already assigned and only displays boot PROM images for selection.
- Select OK.
- Repeat the process for all of the devices in the Upgrade Firmware window.
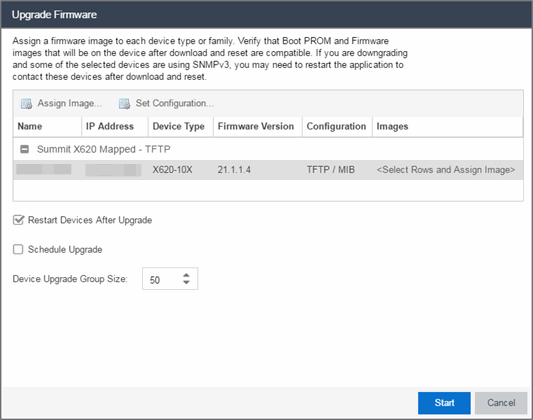
- Select the Restart Devices After Upgrade checkbox to automatically restart devices that support restarting immediately after upgrading the firmware image.
- Select the Schedule Upgrade checkbox to run the firmware image upgrade at a future date. Selecting this checkbox displays additional fields where you can configure the scheduled upgrade.
- Name — The name for the scheduled upgrade. The default name automatically populates with the creation date and time of the firmware upgrade.
- Select Date — The date and time the upgrade automatically runs. Enter a date in the mm-dd-yyyy format or select the Calendar icon
 to open a monthly calendar from which you can select the date of the upgrade. Enter the time for the scheduled upgrade or select the drop-down arrow to select the time from a drop-down list.
 - Abort on Failure — Selecting this checkbox causes the upgrade to terminate in the event it is not successful.
- Enter the number of downloads upgraded simultaneously in the Device Upgrade Group Size field. Enter a value of 1 to have the downloads performed serially (one device at a time).
- Select Start if you are upgrading the firmware immediately or Schedule if the upgrade is scheduled for a future date.
Note: To view or cancel a scheduled firmware upgrade, select Tasks > Scheduled Tasks. - If upgrading the firmware image immediately, a progress column appears on the Upgrade Firmware window. When the upgrade is complete, a Status section appears, displaying whether the upgrade occurred successfully.
- Select Close.
The Upgrade Firmware window opens, displaying the devices you selected grouped by device family.
The Firmware Selection window opens, displaying the firmware versions compatible with the device type.
| NOTE: | Right-click the device in the Upgrade Firmware window to configure how the firmware is downloaded and installed on the device (e.g. to change the server from which the firmware image is downloaded, the file transfer method, or the MIB or script used to download the firmware image). |
| NOTES: | Selecting the Restart Devices After Upgrade checkbox displays the Supports Restart column in the Upgrade Firmware window. A check mark indicates devices that support this functionality. You can also restart a device manually in the Restart Devices window, accessible from the Network tab in ExtremeCloud IQ Site Engine by right-clicking the device and selecting More Actions > Restart Device option. |
Upgrading for a Device Type
To upgrade the firmware for all devices of a particular device type:
- Open the Network tab.
- Select the Firmware tab.
- Select the device type from the Firmware tree in the left panel.
- Upload the firmware or boot PROM image, if necessary.
- Select the Upload button to open the Upload Firmware to Server window from which you can save image files to the ExtremeCloud IQ Site Engine server.
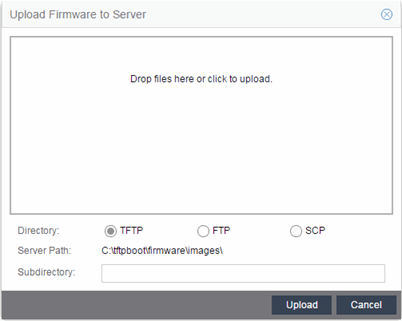
- Drag the file or files into the box in the main part of the window or select the box to open a window from which you can navigate to the appropriate directory.
- Select TFTP, FTP, or SCP to indicate whether you are upgrading the firmware or boot PROM image using a TFTP, FTP, or SCP server, respectively.
- Type the Subdirectory within the Server Path where the firmware or boot PROM images are uploaded.
- Select the Upload button.
A status bar displays over the file icon and a check mark indicates when the upload is complete. Anyone with access to ExtremeCloud IQ Site Engine is now able to download the image file to a device.
- Select the Upload button to open the Upload Firmware to Server window from which you can save image files to the ExtremeCloud IQ Site Engine server.
- Right-click the firmware or boot PROM image from the Device Type Images section of the window and select Assign Firmware from the menu.
The Assign Firmware to One or More Device Types window appears.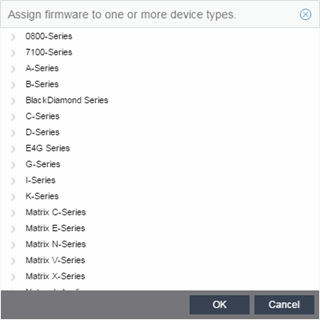
- Select the device type on which you are assigning the firmware or boot PROM image.
- Select OK.
If you did not select Restart Devices After Upgrade, restart your devices.
Upgrading for Fabric Manager
To upgrade the firmware image for Fabric Manager, follow the instructions in Upgrading Fabric Manager.