The ExtremeAnalytics Virtual Sensor is a virtual machine that monitors application flows across virtual environments. The Virtual Sensor sends network traffic information to your ExtremeAnalytics engine for processing. The ExtremeAnalytics engine then sends the processed information to ExtremeCloud IQ Site Engine, where it is displayed on the Analytics tab.
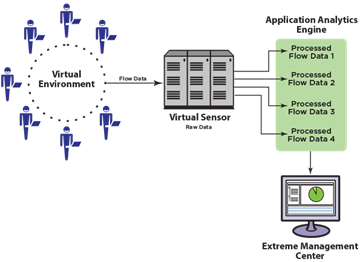
In a typical environment, one Virtual Sensor is deployed on each physical ESX host. Each Virtual Sensor is counted as 1/10 of a device towards your ExtremeCloud IQ Site Engine device count license.
Use these instructions to add one or more Virtual Sensors to ExtremeCloud IQ Site Engine. While it is possible to add the Virtual Sensor without using the VMware vSphere ExtremeConnect module in ExtremeCloud IQ Site Engine, the first method outlined in this topic is highly recommended. Refer to Virtual Sensor Installation Guide for more information about using the Virtual Sensor.
| IMPORTANT: | Configuration of the virtual environment via ExtremeCloud IQ Site Engine is limited to distributed virtual switches only. |
Configuring a Virtual Sensor includes the following steps:
- Prerequisites
- Installing the Virtual Sensor using the ExtremeCloud IQ Site Engine Server
- Adding the Virtual Sensor in ExtremeAnalytics
- Configuring vCenter Settings for the Virtual Sensor
Prerequisites
Before attempting to add Virtual Sensors to ExtremeCloud IQ Site Engine, ensure the following:
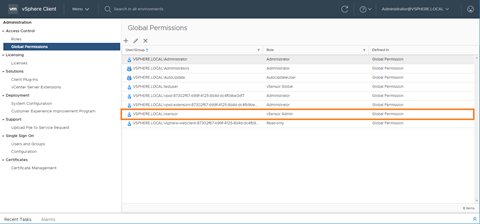
- Your vCenter vSphere login is configured with an administrative role in at least the following Global Permissions:
- Distributed Switch — VSPAN operation
- Datastore — Allocate space
- Datastore — Browse datastore
- Host — Local operations — Create virtual machine
- Host — Local operations — Delete virtual machine
- Host — Local operations — Reconfigure virtual machine
- Network — Assign network
- vApp — Import
- vApp — View OVF environment
- Your vCenter vSphere login is configured with an administrative role in at least the following permissions in the cluster the Virtual Sensor is monitoring:
- Distributed Switch — VSPAN operation
- Datastore — Allocate space
- Datastore — Browse datastore
- Datastore — Remove file
- Host — Local operations — Create virtual machine
- Host — Local operations — Delete virtual machine
- Host — Local operations — Reconfigure virtual machine
- Network — Assign network
- Tasks — Create task
- Tasks — Update task
- vApp — Import
- vApp — View OVF environment
- Virtual machine — Change Configuration — Add new disk
- Virtual machine — Change Configuration — Advanced configuration
- Virtual machine — Edit Inventory — Create new
- Virtual machine — Edit Inventory — Remove
- Virtual machine — Interaction — Power off
- Virtual machine — Interaction — Power on

- The VMware Open Virtualization Format Tool (OVFTool) is installed on the ExtremeCloud IQ Site Engine server.
| NOTE: | Instructions for this prerequesite are not included. You must be a VMware customer to download the OVF Tool. Consult the VMware site for download and installation instructions. |
Installing the Virtual Sensor Using the ExtremeCloud IQ Site Engine Server
The Virtual Sensor is installed as an .OVA file using your ExtremeCloud IQ Site Engine server.
You can install the Virtual Sensor in two different ways:
- Install Using ExtremeCloud IQ Site Engine — To install using ExtremeConnect functionality in ExtremeCloud IQ Site Engine, use the instructions in this topic.
- Install Using the vSphere Web Client — To install using the vSphere web client, refer to the section "Installing Virtual Sensor using vSphere Web Client" in the ExtremeAnalytics Virtual Sensor 1.0.0 Software Installation Guide.
We recommend installing the Virtual Sensor using ExtremeCloud IQ Site Engine unless you do not have the required permissions from your VMware Administrator. When installing the Virtual Sensor using the vSphere client, some information does not populate on the Analytics > Configuration > Virtual Sensors tab in ExtremeCloud IQ Site Engine, including the Physical Host, Monitored Switch, Port Group, and VMs Monitored fields in the Virtual Sensors table at the top of the tab and the Virtual Machines table at the bottom of the tab.
Install Using ExtremeCloud IQ Site Engine
Installing the Virtual Sensor using ExtremeCloud IQ Site Engine includes two steps:
- Configuring the VMware vSphere Module in ExtremeConnect
- Adding the Virtual Sensor to ExtremeCloud IQ Site Engine
Configuring the VMware vSphere Module in ExtremeConnect
Use the following steps to configure your vCenter server:
- Open the Connect > Configuration > Administration tab in ExtremeCloud IQ Site Engine.
- Select VMware vSphere in the Modules list in the left-panel.
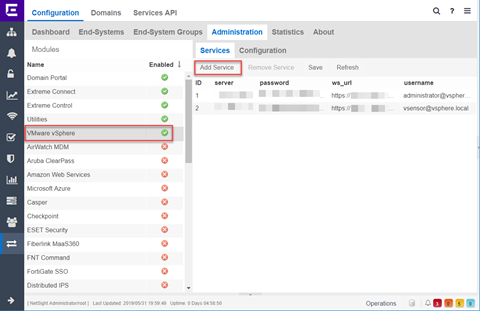
- Open the Services tab in the right-panel.
- Select Add Service.
A new row displays. - Enter the information for your vCenter server in the new row:
- username — Username used to access the vCenter server.
- password — Password used to access the vCenter server.
- server — vCenter server IP address.
- ws_url — vCenter server web service URL in the following format: https://<IP Address of vCenter Server>:<Non-Standard Port of vCenter Server>/sdk. For example, https://10.20.30.40:8008/sdk.
- Select Save.
- Open the Configuration tab.
- Select true in the Value column of the Module enabled row.
- Configure the other settings according to your preferences for your vCenter server.
- Select Save.
The vCenter server is configured in ExtremeConnect.
Adding the Virtual Sensor to ExtremeCloud IQ Site Engine
After configuring the vCenter server in ExtremeConnect, download and add the Virtual Sensor .OVA file in ExtremeCloud IQ Site Engine.
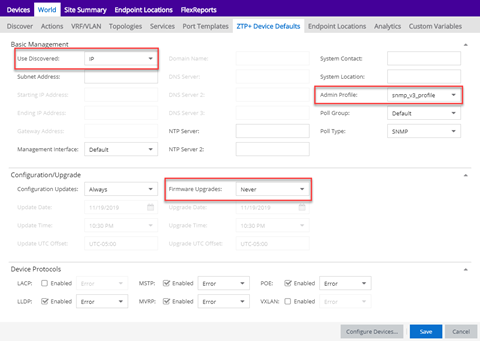
- Access the Network > Devices > Sites > World site.
- Open the ZTP+ Device Defaults tab in the right panel.
- Select IP in the Use Discovered drop-down list.
- Select an Admin Profile from the drop-down list that uses SNMPv3 and has a CLI credential password that is not empty.
- Select Never in the Firmware Upgrades drop-down list.
- Download the Virtual Sensor .OVA file from the Extreme Portal to your local client machine.
You need to access this location in Step 10. - Navigate back to ExtremeCloud IQ Site Engine.
- Open the Network > Firmware tab.
- Select Upload.
The Upload Firmware to Server window displays. - Add the .OVA file to the Upload Firmware to Server window through one of the following methods:
- Access the location on the local client machine into which you saved the .OVA file in Step 6 and drag and drop the Virtual Sensor .OVA file into the box at the top of the window.
- Select the box at the top of the window and browse to the location into which you saved the .OVA file in Step 6.
- Use the default transfer type setting in Directory.
- Leave the Subdirectory field blank.
- Select Upload.
| NOTE: | Download the Small .OVA file if you are using a VS100 license or the Medium .OVA file if you are using a VS250 license. The web browser downloads the .OVA file as a .TAR file. Change the file extension back to .OVA when the download is complete. Using Google Chrome avoids this step and downloads the file as an .OVA file. |
ExtremeCloud IQ Site Engine uploads the .OVA file.
When the .OVA file is installed, proceed to Adding the Virtual Sensor in ExtremeAnalytics
Adding the Virtual Sensor in ExtremeAnalytics
After you add the Virtual Sensor .OVA file to ExtremeCloud IQ Site Engine, install the Virtual Sensor in ExtremeAnalytics.
- Open the Analytics > Configuration tab.
- Select Virtual Sensors in the left-panel.
The Virtual Sensors tab displays. All of the virtual machines configured in VMware vSphere are listed in the Virtual Machines section of the tab. - Select Install in the Virtual Sensors section of the tab.
The Install Virtual Sensor on Hypervisor Host window displays. - Select the ellipsis button (
 ) in the Hypervisor Host field and select the hypervisor host on which you are installing the Virtual Sensor.
 - Select the ellipsis button () in the Datastore field and select the datastore, if the field does not automatically populate.
- Select the License Type for your Virtual Sensor from the available license types listed:
- VS100 — One virtual CPU core with a capacity of 1Gbps. Select this license type when installing the Small .OVA file.
- VS250 — Two virtual CPU cores with a capacity of 2.5Gbps. Select this license type when installing the Medium .OVA file.
- Select the Analytics Engine to which the Virtual Sensor sends flow data.
- Select the ellipsis button () in the Management Interface Network field and select the network you use for management,
The Virtual Sensor must communicate with the ExtremeCloud IQ Site Engine server and the ExtremeAnalytics engine using this network. - Select the ellipsis button () in the Monitored Interface Port Group field and select the port group for the monitoring interface.
The port group must be on the distributed virtual switch you are monitoring.IMPORTANT: Select a port group that does not include an uplink port. - Change the Name of the Virtual Sensor, if desired.
NOTE: By default, the Virtual Sensor is named using the following format: <IP Address of host><PortGroupName>-VS. - Select Use DHCP, if using a DHCP server to dynamically assign an IP address for the Virtual Sensor.
- Enter an IP Address and Default Gateway for the Virtual Sensor if you are not using DHCP.
NOTE: If you enter an IP address included in a range defined in a site, the DNS Server and NTP Server are automatically populated from that site, if defined. - Enter the Root Password for the Virtual Sensor.
- Enter the Domain name (for example, extremenetworks.com).
- Enter the DNS Server IP address and NTP Server IP address, if applicable.
- Select Install.
NOTE: The installation can take several minutes. The Operations panel shows the progress of the installation. It is normal for the progress to pause at 89 or 90 percent for a short amount of time. During this time, the OVA is deployed and ExtremeCloud IQ Site Engine is waiting for the new Virtual Sensor to be discovered via ZTP+. If ExtremeCloud IQ Site Engine is not configured to on-board ZTP+ devices automatically, you need to access to the Network > Discovered tab, and configure the new Virtual Sensor for ExtremeCloud IQ Site Engine.
The Virtual Sensor is installed and displays in the Virtual Sensors table at the top of the Analytics > Configuration > Virtual Sensors tab.
| NOTE: | If the installation process takes longer than five minutes, the Operation panel in ExtremeCloud IQ Site Engine can incorrectly indicate the installation failed. If the Operations panel indicates a failure, open the Network > Discovered tab and look for the Virtual Sensor. Continue to add the Virtual Sensor via this tab. If the Virtual Sensor is NOT listed on the Discovered tab, the cause can be one of the following:
|
Open the Analytics > Application Flows tab to ensure the Virtual Sensor is collecting flow data. Any fragmented packets the Virtual Sensor receives out of order are re-ordered for processing and then forwarded in the correct order. After flows are collected by the Virtual Sensor, you can create packet captures for those flows.
| NOTES: | If the Virtual Sensor receives traffic as it is initializing, packet drops (reported as mbuf allocation failure) can be observed. |
Configuring vCenter Settings for the Virtual Sensor
To ensure the Virtual Sensor is performing optimally, configure the following vCenter settings for your Virtual Sensor:
- In vCenter, power off the Virtual Sensor virtual machine.
- Right-click the virtual machine and select Edit Settings.
- On the Virtual Hardware tab, expand CPU and allocate the CPU capacity according to the size of the OVA:
- Medium OVA — 4,594 MHz
- Small OVA — 2,297 MHz
The CPU capacity required (Reservation of CPU capacity) is calculated as the number of vCPUs (Small = 1, Medium = 2) * CPU speed of ESXi (2,297 MHz).
- Select OK.
- Right-click the virtual machine and select Compatibility > Upgrade VM Compatibility.
The virtual machine is upgraded to the latest supported version.NOTE: If the Virtual Sensor is already running the latest supported version, the Upgrade VM Compatibility option is not available.
For information on related help topics: