Authenticated web access provides a way to inform end users that they are connecting to your network and lets you display an Acceptable Use Policy. Authenticated registration provides a way for existing corporate end users to access the network on end-systems that don't run 802.1X (such as Linux systems) by requiring them to authenticate to the network using the registration web page.
| NOTE: | The Authentication and Redirection settings are shared by the Authenticated Web Access and Authenticated Registration access types. Changing them for one type also changes them for the other. |
|---|
Authenticated Web Access
End users are required to authenticate to the network using the Authenticated Web Access login page. However, end users are only granted one-time network access for a single session, and no permanent end user registration records are stored. Authentication is required each time a user logs into the network, which can be particularly useful for shared computers located in labs and libraries.
Implementing authenticated web access requires web redirection or DNS proxy.
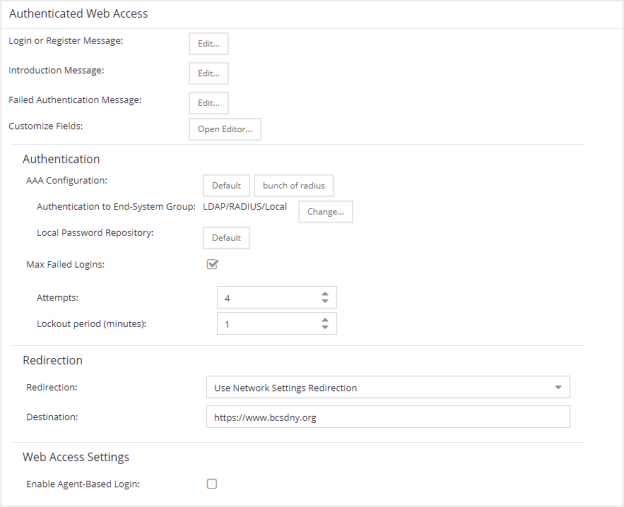
- Login or Register Message
- Select the Edit button to open a window where you can edit the message displayed to the end user when they are registering. By default, the message states that the end user is required to register before being allowed on the network.
- Introduction Message
- Select the Edit button to open a window where you can edit the introductory message displayed to the end user when they are registering. By default, the message states that the end user is agreeing to the terms and conditions in the Acceptable Use Policy.
- Failed Authentication Message
- Select the Edit button to open a window where you can edit the message displayed to the end user if the end user fails authentication. By default, this message advises the end user to contact their network administrator for assistance. Note that the default configuration of the message references the "HELPDESK_INFO" variable which represents the Helpdesk Information that is defined in the Look and Feel Settings.
- Customize Fields (Shared)
- Select the Open Editor button to open the Manage Custom Fields window where you can manage the fields displayed in the Registration web page.
Authentication
- AAA Configuration
- This section displays the name of the AAA configuration being used by the Access Control configuration and provides a link to open the AAA Configuration window where you can make changes to the AAA Configuration, if desired. If the portal configuration is shared between multiple ExtremeControl Configurations using different AAA configurations, the different AAA configurations are listed here (maximum of 3), allowing you to open the appropriate AAA configuration.
- The section also displays the method(s) utilized for validating the credentials entered during registration (LDAP, RADIUS, and/or a Local Password Repository) as specified in the AAA configuration(s).
-
- Authentication to End-System Group — Select the Change button to open the User Group to End-System Group Map window where you can map the LDAP/RADIUS/Local User Group to the appropriate end-system group to specify end user access levels. When an end-system group has been mapped to a user group, the icon for the end-system group changes to display a key indicating that it is no longer available for general use. You can use the Move Up/Move Down arrows to set the precedence order for the mappings, allowing you to change the authentication order that takes place during the user authenticated registration.
- Local Password Repository — If you are using a local repository, authenticated end users are assigned to the Web Authenticated Users group. Select the Default button to open a window where you can edit the Local Password Repository. Multiple links may be listed if there are different repositories associated with different AAA configurations.
- Max Failed Logins
- Select this checkbox to specify the maximum consecutive number of times an end user can attempt to authenticate on an end-system and fail. You can specify a lockout period that must elapse before the user can attempt to log in again on that end-system.
Redirection
- Redirection
- There are four Redirection options that specify where the end user is
redirected following successful registration, when the end user
is allowed on the network. The option selected here overrides the Redirection option specified on the Network Settings.
- Use Network Settings Redirection — Use the Redirection option specified on the Network Settings panel.
- Disabled — This option disables redirection. The end user stays on the same web page where they were accepted onto the network.
- To User's Requested URL — This option redirects the end user to the web page they originally requested when they connected to the network.
- To URL — This option lets you specify the URL of the web page to which the end user is redirected. This is typically the home page for the enterprise website, for example, "http://www.ExtremeNetworks.com."
Web Access Settings
- Enable Agent-Based Login
-
If this option is enabled, when the end user connects to the network with an agent installed,
the login dialog is displayed in an agent window instead forcing the user to go to the captive portal via a web browser. This allows you to provide authenticated web access
without having to set up the captive portal. Agent-based login is useful
for shared access end-systems running an agent because it prompts for a
login dialog and also provides a logout option. Login credentials are
limited to username/password and an Acceptable Use Policy is not
displayed.
You can customize the messages in the Agent Login window using the Message Strings Editor available in the Look and Feel Settings. Use the agentLoginMessage string to change the message. Any changes you make in the Message Strings Editor override the internationalized messages used in the Agent Login window.
Authenticated Registration
Authenticated registration provides a way for existing corporate end users to access the network on end-systems that don't run 802.1X (such as Linux systems) by requiring them to authenticate to the network using the registration web page. After successful registration, the end-system is permitted access until the registration expires or is administratively revoked.
It is recommended that the Force Captive Portal HTTPS option is enabled if authenticated registration is required for security reasons.
| NOTE: | If you configure both guest registration and authenticated registration for an area on your network, the end user is presented with a choice on the registration web page whether or not to authenticate. |
|---|
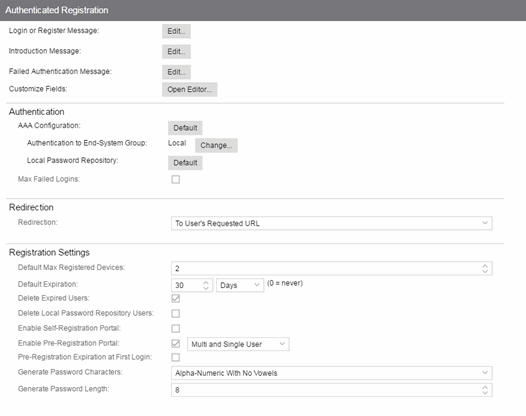
- Login or Register Message
- Select the Edit button to open a window where you can edit the message displayed to the end user when they are registering. By default, the message states that the end user is required to register before being allowed on the network.
- Introduction Message
- Select the Edit button to open a window where you can edit the introductory message displayed to the end user when they are registering. By default, the message states that the end user is agreeing to the terms and conditions in the Acceptable Use Policy.
- Failed Authentication Message
- Select the Edit button to open a window where you can edit the message displayed to the end user if the end user fails authentication. By default, this message advises the end user to contact their network administrator for assistance. Note that the default configuration of the message references the "HELPDESK_INFO" variable which represents the Helpdesk Information that is defined in the Look and Feel Settings.
- Customize Fields (Shared)
- Select the Open Editor button to open the Manage Custom Fields window where you can manage the fields displayed in the Registration web page.
Authentication
These settings are shared by the Authenticated Web Access and Authenticated Registration access types. Changing them for one type also changes them for the other.
- AAA Configuration
- This section displays the name of the AAA configuration being used by the Access Control configuration and provides a link to open the AAA Configuration window where you can make changes to the AAA Configuration, if desired. If the portal configuration is shared between multiple ExtremeControl Configurations using different AAA configurations, the different AAA configurations are listed here (maximum of 3), allowing you to open the appropriate AAA configuration.
- The section also displays the method(s) utilized for validating the credentials entered during registration (LDAP, RADIUS, and/or a Local Password Repository) as specified in the AAA configuration(s).
-
- Authentication to End-System Group — Select the Change button to open the User Group to End-System Group Map window where you can map the LDAP/RADIUS/Local User Group to the appropriate end-system group to specify end user access levels. When an end-system group has been mapped to a user group, the icon for the end-system group changes to display a key indicating that it is no longer available for general use. You can use the Move Up/Move Down arrows to set the precedence order for the mappings, allowing you to change the authentication order that takes place during the user authenticated registration.
- Local Password Repository — If you are using a local repository, authenticated end users are assigned to the Web Authenticated Users group. Select the Default button to open a window where you can edit the Local Password Repository. Multiple links may be listed if there are different repositories associated with different AAA configurations.
- Max Failed Logins
- Select this checkbox to specify the maximum consecutive number of times an end user can attempt to authenticate on an end-system and fail. You can specify a lockout period that must elapse before the user can attempt to log in again on that end-system.
Redirection
These settings are shared by the Authenticated Web Access and Authenticated Registration access types. Changing them for one type also changes them for the other.
- Redirection
- There are four Redirection options that specify where the end user is
redirected following successful registration, when the end user
is allowed on the network. The option selected here overrides the Redirection option specified on the Network Settings.
- Use Network Settings Redirection — Use the Redirection option specified on the Network Settings.
- Disabled — This option disables redirection. The end user stays on the same web page where they were accepted onto the network.
- To User's Requested URL — This option redirects the end user to the web page they originally requested when they connected to the network.
- To URL — This option lets you specify the URL of the web page to which the end user is redirected. This is typically the home page for the enterprise website, for example, "http://www.ExtremeNetworks.com."
Registration Settings
The Generate Password Character and Generate Password Length settings are shared by Authenticated Registration and Secure Guest Access.
- Default Maximum Registered Devices
- Specify the maximum number of MAC addresses each authenticated end user is allowed to register on the network. If a user attempts to register an additional MAC address that exceeds this count, an error message is displayed in the Registration web page stating that the maximum number of MAC addresses is registered to the network and to call the Helpdesk for further assistance. The default value for this field is 2.
- Default Expiration
- Enter a value and select a unit of time to configure the amount of time before an end user's registration automatically expires. When the registration expires, the end user is either suspended (registration must be manually approved by administrator/sponsor) or permanently deleted from the registration list. If a registration is deleted, the end-user must re-enter all their required personal information the next time they attempt to access the network. Individual registration expiration time can also be set by the administrator/sponsor through the Registration Administration web page.
- Delete Expired Users
- Select this checkbox to delete a user from the Registered users list in the Registration Administration web page when their registration expires. If a registration is deleted, the end-user must re-enter all their required personal information the next time they attempt to access the network.
- Check Session Validity in Entra ID
- Select this checkbox to enable Entra ID Registered User Status Monitor for this captive portal. This option only applies if OpenID Registration is used. This feature needs to be configured in Administration > Options > Access Control > Entra ID Registered User Status Monitor. For more information, see Entra ID Registered User Status Monitor
- Delete Local Password Repository Users
- If you select Delete Expired Users, then selecting this checkbox also deletes the expired user from the local password repository.
- Enable Self-Registration Portal
-
This checkbox allows an authenticated and registered user to be directed
to a URL (provided by an administrator) to self-register additional
devices that may not support authentication (such as Linux machines) or may not have a web browser
(such as game systems). For example, a student may register to the network
using their PC. Then, using a self-registration URL provided by the system
administrator, they can register their additional devices. When the additional
devices have been registered, the student can access the network using those
devices. The URL for the Self Registration web page is
https://<ExtremeControlEngineIP>/self_registration. You can change the instructions displayed on this web page using the Message Strings Editor on the Look and Feel Settings; select the selfRegIntro message string.
- Enable Pre-Registration Portal
- Select this checkbox to enable pre-registration functionality. With pre-registration, guest users can be registered in advance, allowing for a more streamlined and simple registration process when the guest user connects to the network. This is useful in scenarios where guest users are attending a company presentation, sales seminar, or a training session. From the drop-down list, select whether you want to pre-register a single user (when you want to pre-register one user at time) or multiple users (when you have a larger group of users to pre-register) or both. For more information, see How to Configure Pre-Registration.
- Pre-Registration Expiration at First Login
- Select this checkbox to set the Default Expiration of a pre-registered user to begin when the user first registers a device, instead of setting it the moment the pre-registered user is created (added via the pre-registration administration process). Select Enable Pre-Registration Portal to enable this option. For more information, see
How to Configure Pre-Registration.
NOTE: This option is only valid when importing a CSV file to pre-register multiple users in the Pre-Registration Portal and not when entering information for a single user.
- Generate Password Characters
- This option is available if you select Enable Pre-Registration Portal. During the pre-registration process, ExtremeCloud IQ Site Engine can automatically generate the password that the guest user uses when connecting to the network. The password is generated according to the specification selected here. This setting is shared by Authenticated Registration and Secure Guest Access. Changing it for one access type also changes it for the other.
- Generate Password Length
- This option is available if you select Enable Pre-Registration Portal. During the pre-registration process, ExtremeCloud IQ Site Engine can automatically generate the password that the guest user uses when connecting to the network. The password length is generated according to the number of characters specified here.
For information on related help topics: