Guest registration forces any new end-system connecting on the network to provide the user's identity in the registration web page before being allowed access to the network. Guests are initially redirected to a web page for registering their end-system when it is first connected to the network. After successful registration, the end-system is permitted access until the registration expires or is administratively revoked.
The end user's level of network access is determined by the settings specified here, and whether they are required to have a sponsor. With sponsored registration, end users are only allowed to register to the network when approved by a "sponsor," an internal trusted user to the organization. Sponsorship can provide the end user with a higher level of access than just guest registration and allows the sponsor to fine-tune the level of access for individual end users. The end user registers and declares a sponsor's email address. The sponsor is notified and approves the registration, and can assign an elevated level of access, if desired.
| NOTES: |
If you configure both Guest Registration and Authenticated Registration for an area on your network, the end user is presented with a choice on the registration web page whether or not to authenticate. The Network Settings and Look and Feel panels provide you access to common settings that are shared by the
Registration portal web page.
|
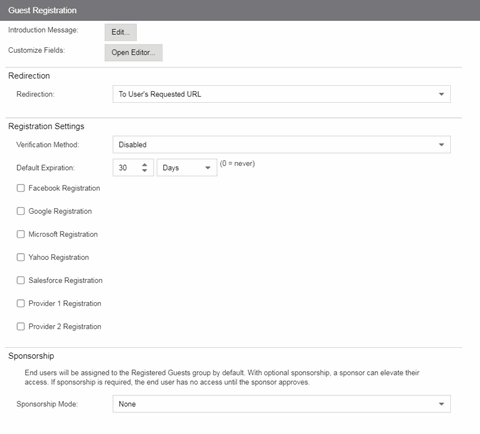
- Introduction Message
- Select the Edit button to open a window where you can edit the introductory message displayed to end users when registering as guests. It may include an introduction to the network and information stating that the end user is agreeing to the Acceptable Use Policy (AUP) for the network upon registering their device. A link to the URL that contains the full terms and conditions of the network's AUP can be provided from this introductory message. Note that the URL for this link must be added as an Allowed URL in the Allowed Web Sites window accessed from the Network Settings. By configuring the introductory message with this information, end users can be held accountable for their actions on the network in accordance with the terms and conditions set forth by the network's AUP. This message is shared by Guest Web Access and Guest Registration. Changing it for one access type also changes it for the other.
- Customize Fields
- Select the Open Editor button to open the Manage Custom Fields window, where you can manage the fields displayed in the Registration web page. These settings are shared by Guest Web Access, Guest Registration, and Secure Guest Access. Changing them for one access type also changes them for the others.
- Redirection
- There are four Redirection options that specify where the end user is
redirected following successful registration, when the end user
is allowed on the network. The option selected here overrides the Redirection option specified on the Network Settings. This setting is shared by Guest Web Access, Guest Registration, and Secure Guest Access.
Changing it for one access type also changes it for the others.
- Use Network Settings Redirection — Use the Redirection option specified on the Network Settings.
- Disabled — This option disables redirection. The end user stays on the same web page where they were accepted onto the network.
- To User's Requested URL — This option redirects the end user to the web page they originally requested when they connected to the network.
- To URL — This option lets you specify the URL for the web page where the end user is redirected. This would most likely be the home page for the enterprise website, for example, "http://www.ExtremeNetworks.com."
Registration Settings
- Verification Method
- User Verification requires that guest end users registering to the network enter a verification code sent to their email address or mobile phone (via SMS text) before gaining network access. This ensures that network administrators have at least one way to contact the end user.
-
Select from the following verification methods: -
- Email — The end user must enter an email address in the Registration web page. The Email Address field must be set to Required in the Manage Custom Fields window.
- SMS Gateway — The end user must enter a mobile phone number in the Registration web page. The Phone Number field must be set to Required in the Manage Custom Fields window.
- SMS Gateway or Email — The end user must enter a mobile phone number or email address in the Registration web page. The Phone Number and Email Address fields must be set to Visible in the Manage Custom Fields window.
- SMS Text Message — The end user must enter a mobile phone number in the Registration web page. The Phone Number field must be set to Required in the Manage Custom Fields window.
- SMS Text or Email — The end user must enter either a mobile phone number or email address in the Registration web page. The Phone Number and Email Address fields must be set to Visible in the Manage Custom Fields window.
- If you have selected the "SMS Text Message" or the "SMS Text or Email" Verification method: select the Service Providers link (below the verification method) to configure the list of mobile service providers from which end users can select the Registration web page. This setting allows ExtremeCloud IQ Site Engine to correctly format the email address to which to send an email. This email is then received by the service provider and converted to an SMS text which is sent the user. The default configuration provides lists of the major US cellular service providers. NOTE: Not all cellular service providers provide a way to send SMS text messages via email.
If you have selected the "SMS Gateway" or "SMS Gateway or Email" method: enter the SMS Gateway Email address provided by the SMS Gateway provider.
For all methods: use the Message Strings link (below the verification method) to open the Message Strings Editor and modify the registration verification messages displayed to the user during the verification process. For example, if you have selected Email, you need to modify the "registrationVerificationEmailSentFromAddress" message string to be the appropriate email address for your company.
For all methods: set the Verify Pin Characters and Verify Pin Length options to define the characteristics and length of the verification code sent to the guest end user. This setting is shared by Guest Registration and Guest Web Access. Changing it for one access type also changes it for the other.
- Default Expiration
- Enter a value and select a unit of time to configure the amount of time before an end user's registration automatically expires. When the registration expires, the end user is either suspended (registration must be manually approved by administrator/sponsor) or permanently deleted from the guest registration list. If a registration is deleted, the end-user must re-enter all their personal information the next time they attempt to access the network. Individual expiration time can also be set by a sponsor.
- Registration
- The Registration checkboxes indicate the providers from which ExtremeControl can gather registration information: Facebook, Google, Microsoft, Yahoo, and Salesforce. You can configure these providers or configure additional OpenID Connect providers using the Provider Registration fields.
Sponsorship
Use this section to configure sponsorship for Guest Registration. Select the Sponsorship Mode required. Additional settings display if you select optional or required sponsorship.
With sponsored registration, end users are only allowed to register to the network when approved by a "sponsor," an internal trusted user to the organization. Sponsorship can provide the end user with a higher level of access than just guest registration and allows the sponsor to fine-tune the level of access for individual end users. The end user registers and declares a sponsor's email address. The sponsor is notified and approves the registration, and can assign an elevated level of access, if desired.
Portal Web Page URLs
The following table provides a list of URLs for accessing commonly used portal web pages. You can also access these web pages using the Engine Portal Pages button at the bottom of the Portal Configuration window.
| Web Page | URL |
|---|---|
| Preview Web Page
Allows you to preview the web pages that may be accessed by the end user during the assessment/remediation and registration process. |
https://ExtremeControlengineIP/screen_preview |
| Registration Administration Page
Lets administrators view registered devices and users, and manually add, delete, and modify users. |
https://ExtremeControlengineIP/administration |
| Registration Sponsor Page
Lets sponsors view registered devices and users, and manually add, delete, and modify users. |
https://ExtremeControlengineIP/sponsor |
| Pre-Registration Page
The pre-registration web page lets selected personnel easily register guest users in advance of an event, and print out a registration voucher that provides the guest user with their appropriate registration credentials. |
https://ExtremeControlengineIP/pre_registration |
| Self-Registration Page
Allows an authenticated and registered user to self-register additional devices that may not have a web browser (for example, game systems). |
https://ExtremeControlengineIP/self_registration |
For information on related help topics: