You can save device configuration data and/or capacity planning data by creating an archive.
Archiving device configuration data lets you create archives (backup copies) of your network devices' configurations you can restore to the devices at a later date. Archiving capacity planning data lets you store port and FRU information. You can create an archive that saves both configuration data and capacity planning data, or you can create an archive that targets one type of data or the other.
You can perform archives on a single device, multiple devices, or on an entire device group. Because it is useful to archive data on a regular basis, ExtremeCloud IQ Site Engine lets you schedule archives to be performed at a future time, and/or on a routine basis. After you configure an archive's parameters, you can use that archive on a repeated basis to save new versions of the desired data. For example, you can create an archive that saves your device configurations on a weekly basis, and also create an archive that saves only capacity planning information on a daily basis to monitor what is changing on the network.
After you create an archive operation, it is listed by name in the
left-panel Archives tab under the
Archives folder. Below the archive name are the archive versions, displayed by the date
and time the version was performed. Under the versions are the individual
configurations, listed by
IP address of the device whose data is saved. Each configuration displays an
icon that identifies the type of data being saved:
device configuration data ( ), capacity planning
data (
), capacity planning
data ( ), or both device configuration and capacity planning
data (
), or both device configuration and capacity planning
data ( ).
).
| NOTE: | If the device is an X-Pedition router, be aware that when archiving
device configuration data, the router's Startup configuration
file is saved. |
|---|
Instructions on:
- Creating an Archive
- Saving a New Archive Version
- Editing an Archive
- Renaming an Archive
- Deleting an Archive
Creating an Archive
Use the Create Archive window to archive network configuration data and/or capacity planning data. You can perform archives on a single device, multiple devices, or on an entire device group. You need a running TFTP or FTP server to save a configuration.
- Select the Create button in the left-panel. The Create Archive window displays.
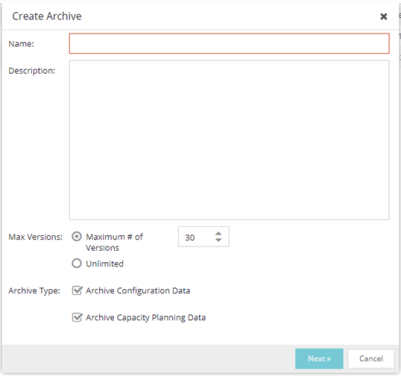
- Enter a name and description (optional) of the archive operation.
- Configure the archive setup:
- Specify either the maximum number of versions to be saved for this archive in the Max Versions field or select Unlimited to retain all archives. Entering a value in the Max Versions field allows you to limit the number of versions saved for each archive and when the limit is reached, older versions are automatically deleted.
- Select the appropriate checkbox for the type of data you wish to
archive:
- Archive Configuration Data — Create archives (backup copies) of your devices' configurations you can restore to the devices at a later date, if needed.
- Archive Capacity Planning Data — Create archives of port and FRU information used to generate reports.
- Select Next.
The next Select Devices list displays.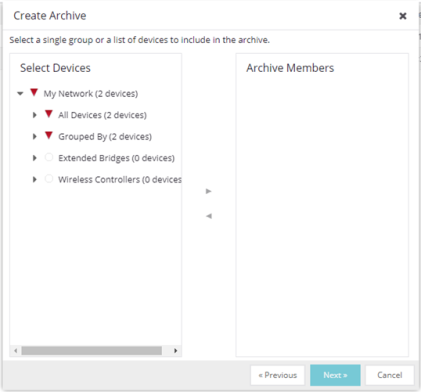
- Select the Archive Members:
- Expand the folders in the Select Devices
list and select the single device, devices, or a device group and select the right arrow button > to move the devices to the Archive Members list.
NOTE: If you select multiple tree nodes representing the same device, but with varying SNMP contexts, an archive save is performed for each context. However, the context must provide access to the MIBs required for the archive save operation or the archive for that context fails. It is recommended you perform the archive operation on the device with the default context (switch mode.) - If you want to remove a member from the Archive Members list, select the member and select the left arrow button <.
- Select Next.
TIP: If you open the Create Archive window from a selected device or device group in the left-panel Network Elements tab, the selected items are automatically displayed under Archive Members. The Configure Scheduling window displays.
- Expand the folders in the Select Devices
list and select the single device, devices, or a device group and select the right arrow button > to move the devices to the Archive Members list.
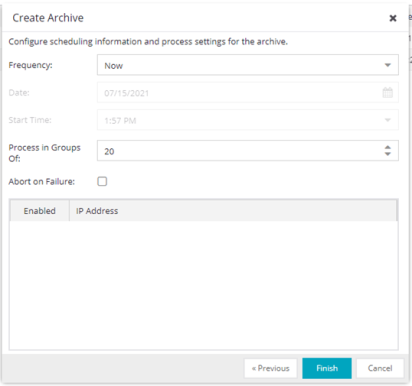
- Select the Frequency with which the archive process occurs.
Note: Scheduled archive tasks can be viewed on the Tasks > Scheduled Tasks tab. If you set the frequency for an archive task to On Startup, Now, or Never, the action is not considered scheduled, so the archive cannot be canceled from the Scheduled Tasks tab. It can only be set to Never in the Archives tab. - Select the Date to run the archive process and Start Time for the archive process.
- Configure Process settings for the archive:
- The archive is performed in parallel (simultaneously) on the number of devices specified in the Process in Groups Of field. Set the value to 1 to perform the operation serially, one device after another.
- Select the Abort on Failure checkbox to stop the archive operation after a failure. This is useful if you are performing an archive operation on multiple devices and you want the operation to stop after a failure on a single device.
- Use the Enabled checkboxes to select or deselect devices you are archiving. For example, if you selected a device group in the previous window, you can use these checkboxes to deselect individual devices in that group.
- Select Finish to create the archive. The archive is listed by name in the left-panel of the Archives tab under the Archives folder and performed according to its scheduled parameters. Archive information saved on this tab is shared with ExtremeCloud IQ. You can change the archive's parameters; see Editing an Archive for instructions.
| TIP: | You can set up an email notification based on the event log message that is
generated when a configuration change is detected. When the
current archive differs from the previously saved archive, ExtremeCloud IQ Site Engine
generates an event log message. |
|---|
Saving a New Archive Version
After you create an archive, use that archive on a repeated basis to save (stamp) new versions of the desired configurations.
- With an archive folder selected in the left-panel Archives tab, right-click and select Stamp New Version from the menu.
- A new archive version, displayed by the date and time the version is performed, is listed under the archive folder. Under the version are the individual configurations, listed by the IP address of the saved device.
Editing an Archive
After you create an archive, you can edit the archive parameters, including changing the devices on which the archive is performed.
- Select an archive name in the left-panel of the Archives tab.
- Navigate to the Details panel at the far right, which includes the General, Setup and Schedule tabs.
- On the General tab, edit the archive Description and use the Enabled checkboxes in the Devices table to select or deselect devices to be archived, if desired.
- Select the Setup tab.
- Select the number of devices to archive in parallel (simultaneously) in the Process in Groups Of field. Set the value to 1 to perform the operation serially, one device after another.
- Select the Abort on Failure checkbox to stop the archive operation after a failure. This is useful if you are performing an archive operation on multiple devices and you want the operation to stop after a failure on a single device.
-
Specify either the maximum number of versions to be saved for this archive in the Max Versions field or select Unlimited to retain all archives. Entering a value in the Max Versions field allows you to limit the number of versions saved for each archive and when the limit is reached, older versions are automatically deleted.
- Select the appropriate checkbox for the type of data you wish to
archive:
- Archive Configuration Data — Create archives (backup copies) of your devices' configurations you can restore to the devices at a later date, if needed.
- Archive Capacity Planning Data — Create archives of port and FRU information.
- Select the Run Compliance checkbox and select a Regime to run on the device archive, if necessary.
- Select the Schedule tab.
- Select the Frequency with which the archive process occurs.
- Select the Date to run the archive process and Start Time for the archive process.
- Select Save.
The next time the archive is performed, these new parameters are used.
Renaming an Archive
You can rename an archive.
- With an archive name selected in the left-panel of the Archives tab, right-click and select Rename from the menu. The Rename Archive window opens.
- Enter the new name, and select OK.
- The name of the archive changes in the left-panel tree. All previous versions saved under the old name are available under the new name. The next time the archive is performed, the new name is used.
Deleting an Archive
You can delete an archive, an archive version, or a saved configuration from the Archives tab left-panel navigation tree.
- With an archive name folder, archive version, or archive file selected in the left-panel of the Archives tab, right-click and select Delete from the menu.
- A Delete confirmation window opens. Select Yes to perform the delete.
For information on related help topics: