VLAN Concepts
Information on:
- Egress Rules (Transmitting Frames)
- Enforcing
- Frame Types
- IGMP
- Ingress Filtering
- Priority Classification
- Verifying
- VLAN Identification
- VLAN Model
- VLAN Learning
Egress Rules (Transmitting Frames)
A device determines which frames can be transmitted out a port based on the Egress List of the VLAN associated with it. Each VLAN has an Egress List that specifies the ports out of which frames can be forwarded, and specifies whether the frames will be transmitted as tagged or untagged frames. You can add or remove ports to or from a VLAN's Egress List, thereby controlling which VLAN's frames can be forwarded out which ports.
When a frame is transmitted out a port, the device first checks the Egress List. If the port is listed on the Egress List of the VLAN associated with it, the frame is then transmitted according to the priority assigned to the frame. The frame is transmitted as tagged or untagged according to the specification in the Egress List. If the port is not on the Egress List, or if the port is not operational, the frame is discarded.
Dynamic Egress
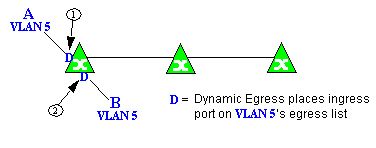
In ExtremeCloud IQ Site Engine, you can control whether or not Dynamic Egress is enabled for a VLAN in the VLAN Definitions table. When Dynamic Egress is enabled for a VLAN, any time a device tags a packet with that VLAN ID, the ingress port is automatically added to the VLAN's egress list, enabling the reply packet to be forwarded back to the source. This means that you do not need to add the ingress port to the VLAN's egress list manually. (See Example 1, below.)
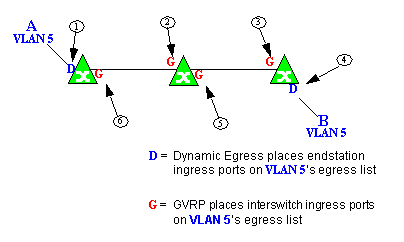
Dynamic Egress affects only the egress lists for the source and destination ingress ports. You can enable GVRP (GARP VLAN Registration Protocol), which automatically adds the interswitch ingress ports to the egress lists of VLANs. (See Example 2, below.)
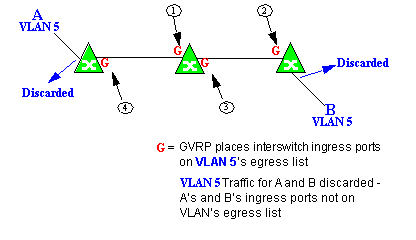
When you disable Dynamic Egress for a VLAN, the VLAN effectively becomes a discard VLAN. Since the destination port is not added to the egress list of the VLAN, the device discards the traffic. If you want a VLAN to act as a discard VLAN, disable Dynamic Egress for that VLAN. (See Example 3, below.)
If an endstation is talking to a "silent" endstation which does send responses, like a printer, you will need to add the silent endstation's ingress port to the VLAN's egress list manually with a tool like ExtremeCloud IQ Site Engine Device Manager, or local management. Dynamic Egress and GVRP take care of adding the other ingress ports to the VLAN's egress list. (See Example 4, below.)
| CAUTION: | If no packets are tagged with the applicable VLAN on a port within five minutes, Dynamic Egress list entries will time out. The result is that an endstation will appear "silent" if the VLAN has not been used within that time period. For example, if there is a "telnet" rule and two users (A & B) are on ports whose role includes a service containing the "telnet" rule, if User B has not utilized the "telnet" rule within the five minute time frame, User A will not be able to telnet to User B. For this reason, the best application of Dynamic Egress is for containing undirected traffic on "chatty" clients which utilize, for example, IPX, NetBIOS, AppleTalk, and/or broadcast/multicast protocols such as routing protocols.
|
|---|
Example 1: Dynamic Egress Enabled
In this example, Dynamic Egress is enabled for VLAN 5. When source endstation A is tagged with VLAN 5, Dynamic Egress places A's ingress port (1) on VLAN 5's egress list. When destination endstation B's traffic is tagged with VLAN 5, Dynamic Egress places B's ingress port (2) on VLAN 5's egress list. The device can then forward traffic to both endstations.
Example 2: Dynamic Egress + GVRP
In this example, Dynamic Egress is enabled for VLAN 5, and the destination endstation, B, is on a different device from the source endstation, A. When A is tagged with VLAN 5, Dynamic Egress places A's ingress port (1) on VLAN 5's egress list. GVRP then places interswitch ingress ports (2) and (3) on VLAN 5's egress list. When B's traffic is tagged with VLAN 5, Dynamic Egress places B's ingress port (4) on VLAN 5's egress list. GVRP then places interswitch ingress ports (5) and (6) on VLAN 5's egress list. The devices can then forward traffic to both endstations.
Example 3: Dynamic Egress Disabled
In this example, Dynamic Egress is disabled. When source endstation A is tagged with VLAN 5, A's ingress port is not placed on VLAN 5's egress list. GVRP places interswitch ingress ports (1) and (2) on VLAN 5's egress list. When B's traffic is tagged with VLAN 5, B's ingress port is not placed on VLAN5's egress list. GVRP places interswitch ingress ports (3) and (4) on VLAN 5's egress list. But VLAN 5 traffic for both A and B is discarded, because VLAN 5 is not aware of the ingress ports for A and B.
In this example, Dynamic Egress is enabled for VLAN 5, but the destination endstation, B, is a "silent" endpoint, like a printer. Endstation B does not send responses, so the Administrator must place B's ingress port on VLAN 5's egress list manually (1). When A is tagged with VLAN 5, Dynamic Egress places A's ingress port (2) on VLAN 5's egress list. GVRP then places interswitch ingress ports (3) and (4), then (5) and (6) on VLAN 5's egress list. Endstation A is then able to communicate with the printer.
GVRP
GVRP (GARP VLAN Registration Protocol) dynamically adds interswitch ingress ports to the egress lists of VLANs across a domain.
| NOTE: | If you do not want GVRP enabled on your network, you can disable it, then manually configure the interswitch ports to do what GVRP does automatically, using
MIB Tools or local management to set up your interswitch links as Q trunks. The trunk ports will be automatically added to the egress lists of all the VLANs at the time of trunk configuration.
|
|---|
GARP Timers
Set GARP timers on the device to control the timing of dynamic VLAN membership updates to connected devices. The timer values must be identical on all connected devices in order for GVRP to operate successfully.
- Join Time - Frequency of messages issued when a new port has been added to the VLAN. Possible values are 1 through 1488800 milliseconds.
- Leave Time - Frequency of messages issued when a single port no longer belongs to the VLAN. This value must be at least three times greater than the Join Time. Possible values are 1 through 1488800 milliseconds.
- Leave All Time - Frequency of messages issued when all ports no longer belong to the VLAN and the VLAN should be deleted. This value must be greater than the value for Leave Time. Possible values are 1 through 1488800 milliseconds.
Enforcing
When working with VLANs in ExtremeCloud IQ Site Engine, write the definitions in the VLAN model to selected devices or ports by selecting the Enforce button in the Configure Device window.
| NOTE: | On the X-Pedition router, enforcing will not overwrite the "System Static" VLAN (SYS_L3_Interface Name). |
|---|
Frame Types
Incoming frames are processed according to ingress rules which determine the VLAN membership and transmission priority of a frame received on a port by checking for the presence of a VLAN tag. A VLAN tag is a field within a frame that identifies the frame's VLAN membership and priority.
Frames can be tagged or untagged. A tagged frame is a frame that contains a VLAN tag. An untagged frame does not have a VLAN tag, but will be tagged when it is received on a port. A tagged frame may have already been processed by an 802.1Q switch or originated at an endpoint capable of inserting a VLAN tag into a frame. A VLAN tag may or may not contain a VLAN ID (VID), but it will always contain priority information. End systems are allowed to transmit frames with only a priority in the VLAN tag. When switches transmit a tagged frame, the VLAN tag will always include a VID along with the priority.
Tagged and untagged frames are assigned VLAN membership and transmission priority differently:
- Untagged Frame - VLAN Membership
- When an untagged frame is received on a port, if a VLAN Classification rule exists for the frame's classification type, the frame will gain membership in the associated VLAN. If not, the frame will be assigned to the VLAN identified as the port's VLAN ID (PVID).
- Untagged Frame - Priority Assignment
- When an untagged frame is received on a port, if a Priority Classification rule exists for the frame's classification type, the frame will be assigned the associated priority. If not, the frame will be assigned the port's default priority.
- Tagged Frame - VLAN Membership
- If a tagged frame includes a VID (VLAN ID), it will gain membership in the VLAN indicated by the VID. If not, and a VLAN Classification rule exists for the frame's classification type, the frame will be put into the associated VLAN. If there is no VID or classification rule, the frame will be put in the VLAN associated with the port's VLAN ID (PVID).
- Tagged Frame - Priority Assignment
- When a tagged frame is received on a port, it is assigned the priority contained in the VLAN tag.
You can set the acceptable frame type for a port in Ports.
IGMP
IGMP (Internet Group Management Protocol) is a protocol used by IP hosts and their immediate neighbor multicast agents to support the allocation of temporary group addresses and the addition and deletion of members of a VLAN. You can enable and disable IGMP in VLAN Definitions.
IGMP Intervals
You can control the following IGMP query settings in VLAN Definitions:
- Query Interval - Interval (in seconds) between general IGMP queries sent by the device to solicit VLAN membership information from other devices. By setting this interval, you can control the number of IGMP messages on a subnet. Larger values cause queries to be sent less often. The Query Interval must be greater than the Query Response interval. Valid values: 1 through 300 seconds.
- Query Response - Maximum amount of time allowed for responses to general IGMP queries. By setting this value, you can control the burstiness of IGMP messages on a subnet. Larger values result in less bursty traffic, because host responses are spread over a larger interval. This value must be less than the Query Interval. Valid values: 1 through 300.
- Interface Robustness (Robustness Variable) - Indicates the susceptibility of the subnet to lost packets. If a subnet is particularly susceptible to losses, you may wish to increase this value. IGMP is robust to (Robustness Variable-1) packet losses. The Interface Robustness value is used in the calculation of IGMP message intervals. Valid values are 2 thru 32767.
- Last Member Query Interval - Maximum amount of time (in seconds) between group-specific query messages, including those sent in response to leave-group messages. By setting this value, you can control the "leave latency" of the network. You might lower this interval to reduce the amount of time it takes the device to detect the loss of the last member of a group. Valid values: 10 through 32767 seconds.
Ingress Filtering
Ingress Filtering is a means of filtering out undesired traffic on a port. When Ingress Filtering is enabled, a port determines if a frame can be processed based on whether the port is on the Egress List of the VLAN associated with the frame. For example, if a tagged frame with membership in the Sales VLAN is received on a Port 1, and Ingress Filtering is enabled, the switch will determine if the port is on the Sales VLAN's Egress List. If it is, the frame can be processed. If it is not, the frame is dropped. You can set ingress filtering for a VLAN in Ports.
Priority Classification
Priority Classification is used to assign frames transmission priority over other frames. Priority is a value between 0 and 7 assigned to each frame as it is received on a port, with 7 being the highest priority. Frames assigned a higher priority will be transmitted before frames with a lower priority.
Each of the priorities is mapped into a specific transmit queue by the switch or router. The insertion of the priority value (0-7) allows all 802.1Q devices in the network to make intelligent forwarding decisions based on its own level of support for prioritization.
Frames can be assigned a transmission priority ;based on the default priority of the receiving switch port, regardless of the frame's classification type. However, with the addition of classification rules, frames can be assigned a priority based on the frame's classification type. Using priority classification rules, network administrators can classify a frame based on Layer 2/3/4 information to have higher or lower priority than other frames on a per port basis, allowing for better defined Class of Service configurations.
You can set the default priority for incoming frames in Ports.
Weighted Priority
Weighted priority, available on certain devices, is a way to further refine priority classification. You can control this setting in Ports.
Some devices support four transmit queues (0-3) per port. These queues can be serviced based on a strict method, meaning that all frames in Queue 3 will be transmitted before the frames in Queue 0, or based on a fair weighted method. The weighted method allows the network administrator to give a certain percentage or weight to each queue, preventing a lower priority queue from being starved.
Forwarding priority can be tuned to allocate a percentage of a port's transmit resources to the each traffic queue. This lets you adjust a strict priority scheme to guarantee that some percentage of frames from lower priority queues will always be sent. Weighted priority settings divide each port's transmit resources into 16 equal parts, which can be allocated to traffic queues in increments of 6.25% (1/16th). The total resource allocation for a port must always add up to 100%.
To understand the effect of weighted priorities, consider a device port with strict priority settings. In this case, all of the frames from the highest priority traffic queue are sent before frames are sent from any of the lower priority queues. Now, assuming four traffic queues, assign weighted priorities for the port giving 50% of the transmit resources to Queue 3, 25% to Queue 2, and 25% to Queue 1 and 0% to Queue 0. With these settings, at least 50% of the frames will be transmitted from Queue 3, at least 25% from Queue 2, at least 25% from Queue 1 and frames will only be transmitted from Queue 0 when Queue 1, 2, and 3 are empty.
Verifying
Verifying retrieves the VLAN settings on the selected devices and compares them with the settings in the selected VLAN Definitions or Ports.
Differences are indicated by a red not-equals symbol ![]() . A green exclamation point
. A green exclamation point ![]() is displayed when you select a
is displayed when you select a ![]() line in the table to the model setting that will be written to the device when you enforce. You can review the differences and make modifications to your model as needed, including updating the definitions in your model using the definitions from the selected devices.
line in the table to the model setting that will be written to the device when you enforce. You can review the differences and make modifications to your model as needed, including updating the definitions in your model using the definitions from the selected devices.
VLAN Identification
VLAN identifiers include VLAN ID's and Port VLAN ID's.
VLAN ID (VID)
802.1Q VLANs are defined by VLAN IDs (VIDs) and VLAN names.
- VID
- A unique number between 1 and 4094 that identifies a particular VLAN. VID 1 is reserved for the Default VLAN.
PVID (Port VLAN ID)
You can change a port's VLAN membership to reflect the specific needs of your network by assigning new VLAN membership to the port. When you assign VLAN membership to a port, that VLAN's ID (VID) becomes the Port VLAN ID (PVID) for the port and the port is added to the VLAN's Egress List.
- PVID
- The PVID (Port VLAN ID) represents a port's VLAN assignment. Possible values are 0 through 4094.
| NOTE: | The PVID value 0 means incoming untagged traffic is not assigned to any VLAN. |
|---|
- Egress List
- The Egress List specifies which ports can transmit the frames associated with the VLAN.
| NOTE: | On the X-Pedition Router, you cannot assign a PVID to a port that has an interface assigned to it. |
|---|
VLAN Model
In ExtremeCloud IQ Site Engine, you can create VLAN models and enforce them across multiple network devices. A VLAN model consists of at least one VLAN Definition and one VLAN Port Template.
ExtremeCloud IQ Site Engine provides you with one VLAN model (the Primary VLAN Model) which is pre-populated with a Default VLAN (VID 1). You can further define this VLAN model, and/or you can create other VLAN models. (The Default VLAN for a model cannot be deleted.)
Once a VLAN model has been created, you can utilize it in the following ways:
- Enforce the properties of a port template on selected devices. You can also make custom edits for selected ports.
- Perform a more detailed analysis of the differences between the definitions in the VLAN model and the VLAN settings on selected devices and their ports. Using these views in the Network > Device tab, you can review the differences and make modifications to your VLAN model and/or device or port VLAN configuration as required, including updating any or all of the definitions in the model with the settings on selected devices and their ports, and writing (enforcing) a model's VLAN definitions and/or VLAN port templates to selected devices or ports.
See Create and Edit a VLAN on a Device for more information.
VLAN Learning
VLAN learning allows the creation of groups of VLANs that will share Filtered Database information (MAC address, port, and VLAN ID) according to 802.1Q Shared Learning Constraints (IEEE Std 802.1Q-1998). This helps to speed MAC to port lookups and reduce flooding, because MAC addresses will be in the same Filtering Database.
Create and Edit a VLAN on a Device
This section outlines how to create and edit a VLAN. From the Network tab, you can:
- Create a new VLAN
- Edit the ports of an existing VLAN
- Edit the name of an existing VLAN
- Remove devices from an existing VLAN
To create a new VLAN:
- Launch ExtremeCloud IQ Site Engine.
- Open the Network > Devices tab.
- Select the device from the devices list. Right-click the device and select Device > Configure Device.
The Configure Device window opens.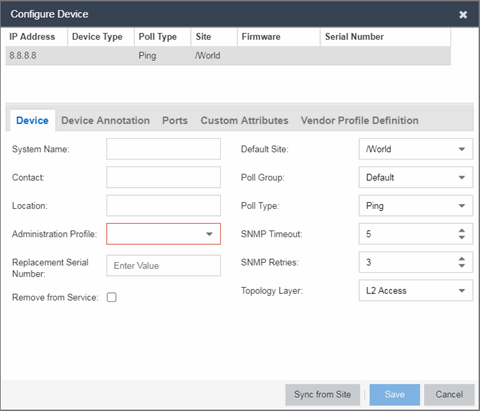
- Select the VLAN Definition tab.
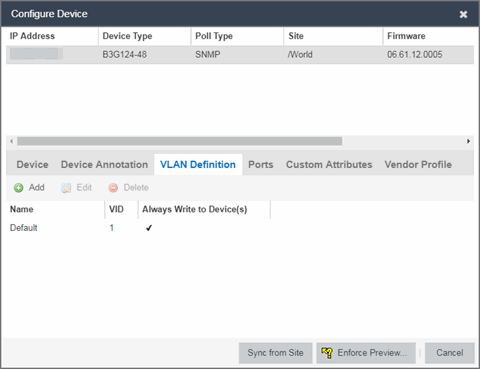
- Select the Add button.
- Enter the Name and the VID for the new VLAN.
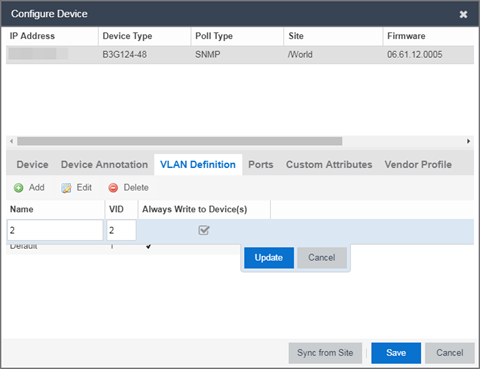
- Select Update.
The new VLAN is added to the list. - Select Enforce Preview.
- Under the Enforce Options, select the VLAN Definition checkbox and select Enforce.
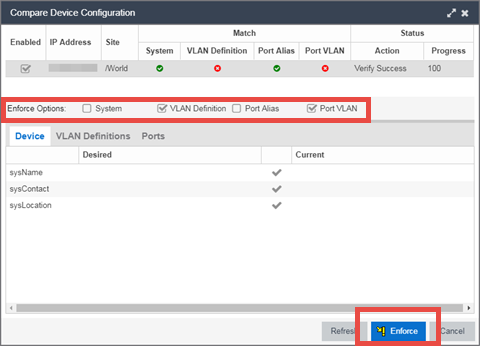
site.enforceOption.autoEnable.system=falsesite.enforceOption.autoEnable.vlanDefinition=falsesite.enforceOption.autoEnable.portAlias=falsesite.enforceOption.autoEnable.portVlan=false
| NOTE: |
By default, the checkboxes in the Enforce Options section of the window are not selected. To configure ExtremeCloud IQ Site Engine to select the checkboxes by default, open the |
The VLAN is now created and assigned to the device.
To configure the VLAN(s) on the ports
- Launch ExtremeCloud IQ Site Engine.
- Open the Network > Devices tab.
- Select the device from the devices list.
- Right-click the device and select Device > Configure Device.
The Configure Device window opens. - Select the Ports tab.
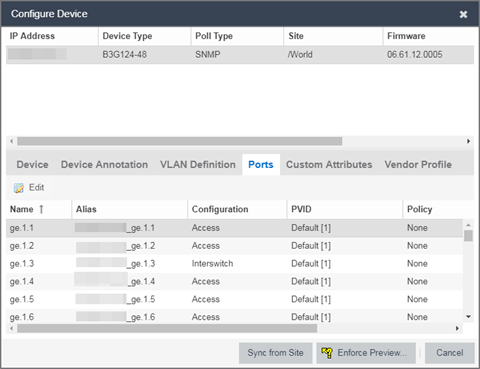
- Select the Port on which you are configuring the VLAN.
- Select Edit.
The Port is now configurable. - Change the PVID, Tagged, and Untagged options to configure the VLAN onto the port.
- Select Enforce Preview.
- Under the Enforce Options, select the Port VLAN checkbox and select Enforce.
site.enforceOption.autoEnable.system=falsesite.enforceOption.autoEnable.vlanDefinition=falsesite.enforceOption.autoEnable.portAlias=falsesite.enforceOption.autoEnable.portVlan=false
| NOTE: |
By default, the checkboxes in the Enforce Options section of the window are not selected. To configure ExtremeCloud IQ Site Engine to select the checkboxes by default, open the |
The VLAN is now configured to the Ports.
To edit the name of a VLAN:
- Launch ExtremeCloud IQ Site Engine.
- Open the Network > Devices tab.
- Select the device from the devices list.
- Right-click the device and select Device > Configure Device.
The Configure Device window opens.
- Select the VLAN Definition tab.
- Select the VLAN to edit and then select the Edit button.
- Enter the new name for the VLAN.
- Select Update.
The Edit pane closes. - Select Save to exit the VLAN Definition window. The VLAN is updated.

To remove devices from a VLAN:
- Launch ExtremeCloud IQ Site Engine.
- Open the Network > Devices tab.
- Select the device from the devices list. Right-click the device and select Device > Configure Device.
The Configure Device window opens. - Select the VLAN Definition tab.
The VLAN Definition pane opens.
- Select the VLAN and select Delete.