The Scheduled Task tab allows you to configure ExtremeCloud IQ Site Engine to automatically perform the following tasks:
- Generate a subset of available reports in PDF format
- Run a script or workflow
- Set SMTP Email Server Options to use when the scheduled task sends an email notification.
- Discover newly added devices
Create a New Scheduled Task
- Launch ExtremeCloud IQ Site Engine.
- Select Tasks and select the Scheduled Tasks tab.
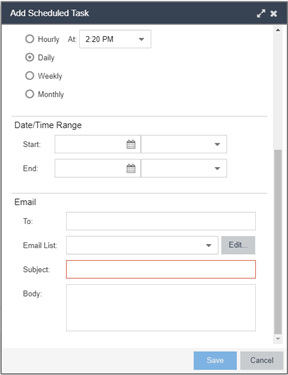
- Select the Add button. The Add Scheduled Task window opens.
If no SMTP email settings are configured, the SMTP Email Server window also opens, where you can define the SMTP email settings. You can also configure the SMTP email settings in SMTP Email Options .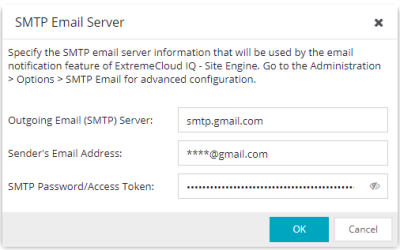
- Enter the outgoing SMTP email settings, if necessary, and select OK.
- Select the type of task from the Type drop-down list in the Add Scheduled Task window:
- Device Export — Exports the list of devices on your network from the Network > Devices tab.
- Disable Alarms — Disables enabled alarms for the amount of time you define on a scheduled basis. Use this task to avoid alarms during times you reserve for network maintenance activity. You can manually ignore enabled alarms in Alarm Configuration .
- FlexReports — Creates a FlexReport for the devices you select on a scheduled basis.
- FlexViews — Creates a FlexView for the devices you select on a scheduled basis.
- Compliance — Emails the most recently run ExtremeCompliance report on a scheduled basis in PDF format.
- Port Usage — Creates a Port Usage report for the devices you select on a scheduled basis.
- Port Usage Details — Creates a Port Usage Details report for the devices you select on a scheduled basis.
- Reporting — Emails a report you select (see Report Designer) on a scheduled basis.
- Scripting Task — Runs a script saved on the Saved Tasks on a scheduled basis.
- Support — Emails debugging data on a scheduled basis that provides information to Extreme Networks Support in the event of an issue with your network. Only select this option if instructed to do so by Extreme Networks Support.
- Site — Runs a device discover for a site (created on the Site) on a scheduled basis.
- Workflow Task — Runs a workflow saved on the Saved Tasks on a scheduled basis.
- Select the report, saved task, support task, or site you want to schedule in the Report Name, Saved Task Name, Support Task Name, or Site to Discover drop-down list, respectively. Depending on what you select, you may need to make other selections such as specifying the source engine or controller.
- Edit the task name and description, if desired.
- Select or deselect the Enabled checkbox to enable or disable the task, respectively. A disabled task is not performed.
- Select whether you want the task to occur on an hourly, daily, weekly, or monthly basis.
- Hourly — specify the minute each hour you want the task performed.
- Daily — specify the time each day you want the task performed.
- Weekly — specify the day or days of the week and the time you want the task performed.
- Monthly — specify the day of the month and the time you want the task performed.
- Specify a start and end date and time for the task, if desired.
- Enter an email address or list of email addresses (separated by semicolons) to which generated PDF reports are sent in the To field, if desired.
- Select a list of email addresses to which PDF reports are sent in the Email List field, if desired.
Select the Edit button to create a new email list or edit an existing email list. - Enter the subject line and body text for the email, if desired.
- Select Save.
The task appears in the Scheduled Tasks table.
Additionally, use the toolbar buttons to edit, copy, or delete the task. The Refresh button updates the Scheduled Tasks table to display any recent changes. Selecting the Disable button causes a task not to run without deleting it from the Scheduled Tasks table.
Select the Run button to run the scheduled task immediately, if desired.
Select the SMTP button to open the SMTP Email Server window to edit your outgoing email options.
![]()