The Policy tab, contained in the Control tab of ExtremeCloud IQ Site Engine is a configuration tool that simplifies the creation and enforcement of policies on networks, enabling network engineers, information technology administrators, and business managers to work together to create the appropriate network experience for each user in their organization.
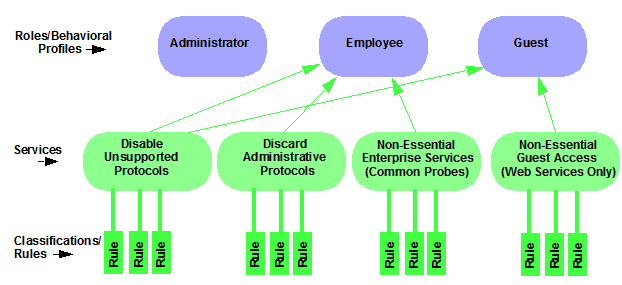
The Policy tab enables you to create policy profiles, called roles, which are assigned to the ports in your network. These roles are based on the existing business functions in your company and consist of services that you create, made up of traffic classification rules. Roles provide four key policy features: traffic containment, traffic filtering, traffic security, and traffic prioritization.
Use the following summary to guide you through the basic steps for using the Policy tab.
- Create your Policy Domains (see How to Create and Use Domains.)
- Add your devices to the ExtremeCloud IQ Site Engine Database and assign them to the appropriate domain.
- If desired, group your ports into port groups (see How to Create a Port Group).
- Create services (see How to Create a Service).
- If desired, group services into service groups (see How to Create a Service Group).
- Create roles (see How to Create a Role).
- Write your configuration to your devices (see Enforcing).
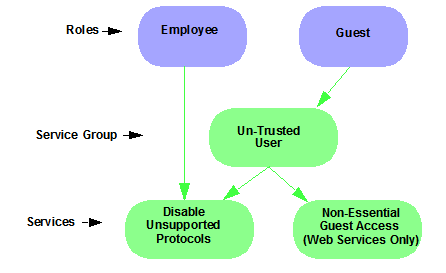
The illustration below shows the Policy tab relationship hierarchy, with Rules at the base to define specific packet handling behaviors, Roles at the top to identify specific job functions in the organization, and Services in the middle, providing the interface between the two layers.
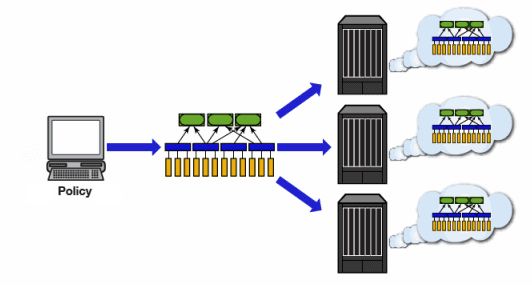
Using policy configuration tools, you can create multiple roles
tailored to your specific needs and set a default policy for some or all of your
network devices and ports. These policies can be deployed on multiple
devices throughout your switch fabric.
The topic covers the following features:
- Understanding Policy Domains
- Understanding Roles
- Understanding Services
- Working with Service Groups
- Understanding Traffic Classification Rules
- Adding Devices
- Viewing Port Configuration Information
- Working with Port Groups
- Working with VLANs
- Viewing Classes of Service
- Saving the Domain
- Enforcing
- Verifying
- AP Aware
Understanding Policy Domains
The Policy tab provides the ability to create multiple policy configurations by enabling you to group your roles and devices into Policy Domains. A Policy Domain contains any number of roles and a set of devices that are uniquely assigned to that particular domain. Policy Domains are centrally managed in the database and shared between Policy tab clients.
The first time you launch the Policy tab, you are in the Default Policy Domain. You can manage your entire network in the Default Policy Domain, or you can create multiple domains each with a different policy configuration, and assign your network devices to the appropriate domain. The Default Policy Domain is pre-configured with roles and rules. The roles, services, rules, VLAN membership, and class of service in this initial configuration define a suggested implementation of how network traffic can be handled. This is a starting point for a new policy deployment and often needs customization to fully leverage the power of a policy-enabled network.
For more information about domains, see Policy Domains in the Concepts Help topic.
In the Quick Tour, we'll use the Default Policy Domain as a way to explore the basic features and functionality of the Policy tab. Later, the Default Policy Domain can be useful as you create your own Policy Domains.
If you have just launched the Policy tab for the first time, you are in the Default Policy Domain and you can proceed to the next step, Understanding Roles. If someone else has been using the Policy tab before you, use the following steps to create a demonstration domain you can use for the Quick Tour.
| NOTE: | If someone uses the Policy tab before you, ExtremeCloud IQ Site Engine can prompt to save the previous domain's configuration when you create the new domain. Save the previous domain's configuration if you are going to use that configuration in the future. |
To create a policy domain:
-
Select Open/Manage Domains > Create Domain. Enter the domain name
Demonstration Domainfor the new domain and select OK. The new Demonstration Domain opens. -
Select Open/Manage Domains > Assign Devices to Domain. Select the devices to add to the Domain and select OK. The device is added to the left-panel Devices tab.
-
Select the left-panel Roles/Services tab. Right-click Roles, Services, or Service Groups and select Create Role, Create Services, or Create Service Groups, respectively to create a role, service, or service group for the domain. For additional information on creating a role, service group, or service, see How to Create a Role, How to Create a Service, or How to Create a Service Group.
- Select the left-panel Class of Service tab. Right-click Class of Service and select Create COS to create a class of service for the domain. For more information on creating a class of service, see How to Create a Class of Service.
- Select the left-panel VLANs tab. Right-click Global VLANs and select Create VLAN for the domain. For more information on creating VLANs, see How to Create a VLAN.
- Select the left-panel Network Resources tab. Right-click Network Resources or Global Network Resources (All Domains) and select Create Network Resource to create a network resource for the domain. You can also right-click Network Resource Topologies and select Create Network Resource Topology to create a network resource topology for the domain. For more information on creating a network resource or network resource topology, see How to Create a Network Resource.
- Select Open/Manage Domains > Save Domain. The data elements are saved to the new Demonstration Domain.
For more information:
Now that you've created the demonstration domain, we can explore the Policy tab in a little more depth.
Understanding Roles
Roles are usually designed to reflect different users in your organization and to provide customized access capabilities based on the role users have in your organization. For example, accounting and engineering personnel have different network access and priority needs and therefore can have different roles.
To view information about existing roles:
-
Select the left-panel Roles/Services tab in the Policy tab main window.
-
Select the left-panel Roles sub-tab in the Roles/Services tab.
-
Select a role name to see a description of the role.
-
Select the various roles listed in the left panel, and in the right panel you'll see tabs that display specific information for each role. Select the right-panel tabs to see the information they contain.
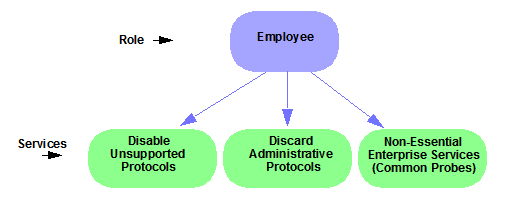
A role can be made up of one or more network access services defined in the Policy tab. These services determine how network traffic is handled at any network access point configured to use that role. A role can also contain default access control (VLAN) and/or class of service designations applied to traffic not handled specifically by the services contained in the role. A role can contain any number of services or service groups.
To filter through roles easily, select the Show Editable Columns drop down and select iif you wannt to hide or show editable information.
Roles are assigned to users during the authentication process. When a user successfully authenticates, the port is opened, and if a role is assigned to the user, that role is applied to the port. A role can also be directly assigned to a port as a default role for instances when authenticated users are not assigned a role. If an end user on a port is not assigned a role when logging in (authenticating), or if authentication is inactive on a port, then the port uses its default role. However, if a user is assigned a role upon login, then that role overrides any default role on the port.
To create and define a role, right-click Roles and select Create Role.
To create a role:
-
In the Policy tab left panel, select the Roles/Services tab.
- Select the Roles sub-tab.
-
Right-click the Roles folder, and select Create Role.
-
Enter the role name
Office
 Assistant
in the highlighted box and press Ok.
For more information:
Role Summary Column
The Summary column shows the data for the row iin a condensed form. Hovering over the cell displays the summary data in an expanded, easy too read format. This includes the rule and service usage information, traffic description, action details, automated service relevant network resources, and toplogy information.
Understanding Services
Roles can be made up of one or more network access services. These services determine how network traffic is handled at any network access point configured to use that role. The Policy tab enables you to create Local Services (services unique to the current domain) and Global Services (services common to all domains).
Services can be one of two types:
- Manual Service — Contain customized classification rules you create.
- Automated Service — Associated with a particular set of network resources.
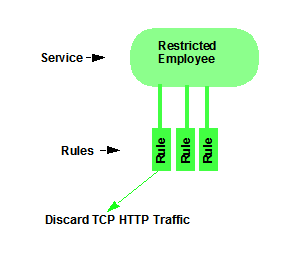
Manual services contain one or more traffic classification rules that define how a network access point handles traffic for a particular network service or application. For example, you might create a Manual service called "Restricted Employee" that contains a classification rule that discards TCP HTTP traffic.
We are creating a Manual service and then adding it to a role. Right now, lets take a look at the services in the domain.
To view information about existing services:
-
Select the left-panel Roles/Services tab in the Policy tab main window.
-
Expand the Service Repository folder and then the Local Services folder.
-
Expand the Services folder to view a list of services.
-
Expand a service or two to see the individual classification rules that make up the service.
-
Select a service or two in the left-panel to see the right-panel tabs that display specific information for each service. Select the right-panel tabs to see the information they contain.
For more information:
Working with Service Groups
Services can be grouped together into Service Groups. This enables you to add a set of services to one or more roles.
To view information about existing service groups:
-
Select the left-panel Service Repository tab in the Policy tab main window.
-
Expand the Service Repository folder and then the Local Services folder. Expand the Service Groups folder.
-
Expand the Acceptable Use Policy service group to see its services. These services are also listed under the Services folder.
After you have defined and created your services, you can easily create a Service Group and then add your services to the group.
To create a service group:
-
Select the left-panel Roles/Services tab in the Policy tab main window.
-
Expand the Service Repository folder and then the Local Services folder.
-
Right-click the Service Groups folder and select Create Service Group.
-
Enter the service group name
Trusted Userin the highlighted box and press Enter. -
Right-click Service Group, select Add/Remove Services and add one or two of the existing Acceptable Use Policy service groups into the Trusted User service group.
For more information:
Understanding Traffic Classification Rules
Traffic classification rules enable you to assign access control (VLAN membership) and/or class of service to your network traffic based on the traffic's classification type. Classification types are derived from Layers 2, 3, and 4 of the OSI model and all network traffic can be classified according to specific layer 2/3/4 information contained in each frame.
A traffic classification rule has two main parts:
- Traffic Description — Identifies the traffic classification type for the rule.
- Actions — Apply access control, class of service, security, and/or accounting behavior to packets matching the rule.
To view existing rules:
-
In the left-panel, navigate to the Service Groups tab (Roles/Services > Service Repository > Local Services > Service Groups) and expand the Acceptable Use Policy service group.
-
Expand the Deny Unsupported Protocol Access service and select the Discard AppleTalk rule.
-
Use the Edit button to add a description to the service, for example: AppleTalk not supported on this network.
For more information:
Adding Devices
The first step in adding network devices to Policy tab, is to add the devices to theExtremeCloud IQ Site Engine database. You do this initially, by using the Discovered tab on the Network tab. This section assumes you have already done this. If you need more information, refer to the Network tab Help page.
When you add devices to the ExtremeCloud IQ Site Engine database, you must assign the devices to a Policy Domain using the Policy tab. As soon as the devices are assigned to a domain, they are automatically displayed in the Policy tab device tree. Only devices assigned to the domain you are currently viewing are displayed.
To assign devices to a domain:
-
In the Policy tab main window, right-click Devices and select Assign Devices to Domain. The Assign Devices to Domain window opens.
In the left panel, the Unassigned device tree contains all the devices in the database not assigned to a domain. The right panel displays the devices in the current domain.
-
For the Quick Tour, select a couple of devices to add to the domain and select Add. Select OK to add the devices.
You can also use this window to remove a device from the current domain. This removes the device from the current domain and places it in the Unassigned folder. It does not delete the device from the ExtremeCloud IQ Site Engine database.
For more information:
Viewing Port Configuration Information
After importing devices into the Policy tab, you can view and configure their ports by selecting a device and displaying its ports in the right-panel Details View tab or Ports tab.
To view port configuration information:
-
Select the left-panel Devices tab in the Policy tab main window.
-
Expand the Devices folder and select a device.
-
In the right-panel Ports tab, expand a Ports or Slot folder to display ports on the device.
-
Right-click a port and select Current Domain > Show Role Details.
-
Set Default Role, if necessary.
Working with Port Groups
The Policy tab enables you to group ports into User-Defined Port Groups, similar to the way you can group services into service groups. Port groups enable you to configure multiple ports on the same device or on different devices, at the same time. The Policy tab also provides you with Pre-Defined Port Groups. Every time one of the Pre-Defined Port Groups is accessed, the Policy tab goes to the devices in the current domain and retrieves the ports which fit the pre-defined characteristics of the port group.
To view pre-defined port groups:
-
Select the left-panel Port Groups tab in the Policy tab main window.
-
Highlight a port group to display information for that port group.
For more information:
Working with VLANS
All traffic in a Policy tab network is assigned membership in a VLAN. Roles are used to assign VLAN membership to traffic either through the role's default access control or through the role's services which can include traffic classification rules that assign VLAN membership (access control).
When you open a new domain, the Global VLANs folder is prepopulated with the Default VLAN (not to be confused with a default VLAN assigned to a role, although the Default VLAN could be a default VLAN for a role). You can then create additional VLANs and assign them as default access control for a role and/or use them to define traffic classification rules. You can view the roles and services associated with a VLAN by selecting the VLAN in the left-panel. You can also make role and service changes from this window.
Island VLANs are used in Policy VLAN Islands, which enable you to deploy a policy across your network, while restricting user access to only selected local devices. The Policy tab enables you to view currently configured Island VLAN information.
To view VLANs:
-
From the VLANs tab, expand the Global VLANs folder to see individual VLANs.
-
Select the Default VLAN listed and view the VLAN information in the right panel.
For more information:
Viewing Classes of Service
The Policy tab lets you create a class of service (CoS) that includes one or more of the following components: an 802.1p priority, an IP type of service (ToS) value, rate limits, and transmit queue configuration. You can then assign the class of service as a classification rule action, as part of the definition of an automated service, or as a role default.
To view Classes of Service:
-
From the Policy tab, select the Class of Service tab from the left-hand panel. The Class of Service section expands.
Notice that the window is pre-populated with eight static classes of service, each associated with one of the 802.1p priorities (0-7). You can use these classes of service as is, or configure them to include ToS/DSCP, drop precedence, rate limit, and/or transmit queue values. You can also rename them, if desired. In addition, you can also create your own classes of service (user-defined CoS).
-
Select the Class of Service and all information related to the Class of Service selected is displayed in the right-panel.
For more information:
- Getting Started with Class of Service
- How to Define Rate Limits
- How to Configure Transmit Queues
- How to Create a Class of Service
Saving the Domain
After changing a policy domain, save the domain. This notifies all clients viewing the domain there is a change, which prevents them from saving a domain with an incorrect configuration. The system automatically updates their view with the new configuration.
To save a domain, select Open/Manage Domains > Save Domain.
The domain is saved and automatically updates for all clients viewing the domain. To discard unsaved changes you made to a domain, open the Open/Manage Domains > Open Domain menu and select the domain in which you are currently working.
For more information:
Enforcing
Any time you add, make a change to, or delete a role or any part of it (any of its services and/or rules), the devices in your current domain need to be informed of the change so that your revised policy configuration can take effect. This is accomplished by enforcing — writing your policy configuration to a device or devices. Enforce operations are performed only on the current domain.
To enforce to all devices in the current domain, select Open/Manage Domains > Enforce Domain. To enforce to a single device, right-click the device and select Enforce.
Enforce Preview
The Enforce preview tool has a very similar setup to the Enforcing Domain tool. To view the enforce preview, select Open/Manage Domains > Enforce Preview and select the device to preview from the left dropdown.
Note: If the device has a red exclamation type next to it in the left panel, then it is incompatible with the domain configuration and should be corrected.
Enforcing preview shows you a summary of the stats and info, roles, rules, and services on device. The three preview tabs include:
Device Stats & Info: Shows information on supported role/rule counts, etc.
Roles & Rules: Shows a grid panel with roles and rules that will enforce the device. If supported, it will show a green circle. A yellow circle indicates a rule not being supported, and a red circle denotes a role not being supported. Right-click and select View/Edit which will close enforce preview and bring you to the item you wish to make changes to.
Classes of Service: Shows details of the Class of Service and the related rate limit configuration.
Rule Counts Reported by Devices
Every device has a maximum number of rules that it can follow. Going over the max number of rules on a device will create enforce failures. The max supported rules by rule type are mainly a concern for Switch Engine device, which now report the max a type supports via the value returned for etsysPolicyRuleAttributeMaxCreatable for any rule type in that group. For example, reading either instance 1 (macSource(1)) or 2 (macDestination(2)) will return the supported number of layer 2 (MAC) rules. The 4 rule “types” and the rule types () that these include are:
- MAC
- macSource(1)
- macDestination(2)
- IPv4
- ip4Source(12)
- ip4Destination(13)
- ipFragment(14)
- udpSourcePort(15)
- udpDestinationPort(16)
- tcpSourcePort(17)
- tcpDestinationPort(18)
- ipTtl(20)
- ipTos(21)
- ipType(22),
- IPv6
- ip6Destination(10)
- L2
- etherType(25)
The total max supported number of rules for Switch Engine devices is the sum of these 4 types, NOT the value returned by etsysPolicyRulesMaxEntries (due to that including other things by the FW).
The devices supported number of rules is only read when the device is added to the domain, the firmware is upgraded, or the device is manually refreshed.
For more information:
Verifying
To determine if the roles currently in effect on your domain devices match the set of roles defined in your current Policy Domain configuration, use the Verify feature.
AP Aware
An AP is assigned "AP Aware," all traffic through this port will not need authentication. This new Role default action is configurable via a new AP Aware setting in the role configurations view. To enable AP Aware:
-
Select the left-panel Roles/Services tab in the Policy tab main window.
-
Select the left-panel Roles sub-tab in the Roles/Services tab.
-
Select a role name to see a description of the role.
- Using the scroll bar, scroll to find the AP Aware column.
- Double-click Disabled, and in the drop-down, select Enabled.
When enforce or verify occurs, the secondary logic runs which inspects all AP Aware enabled roles, and for each role finds all in-use VLANs (rule actions, role default action) and automatically adds them to that role’s tagged VLAN egress list if they are not already present. This is then used for the enforce/verify logic, and returned to the client so the domain is updated accordingly.
The domain data can change from doing an enforce/verify, and needs to be saved.
For more information:
For information on related help topics:
![]()