Use this window to configure a newly discovered device before you add it to the ExtremeCloud IQ Site Engine database. From this window you can configure basic information about the device, the device annotation, configure actions for the device, and add or remove ports for the device.
| NOTE: |
When adding an ExtremeXOS/Switch Engine device in ExtremeCloud IQ Site Engine, enter the following commands in the device CLI:configure snmpv3 add community "private" name "private" user "v1v2c_rw" configure snmpv3 add community "public" name "public" user "v1v2c_rw" enable snmp access enable snmp access snmp-v1v2c disable snmp access snmpv3 |
This window is accessible by selecting the Add Devices button or by right-clicking an existing device and selecting Add Devices on the Network > Discovered tab.
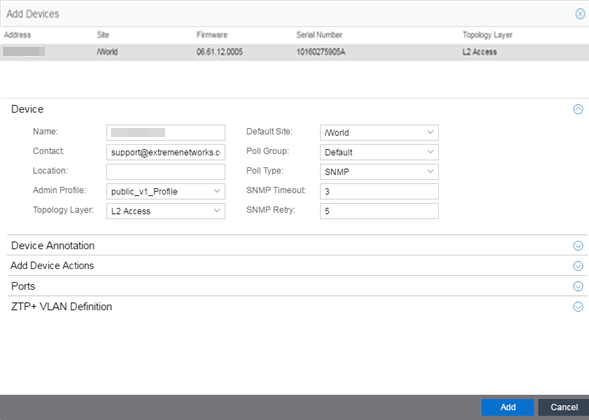
If you selected multiple devices to add, they are listed at the top of the window by IP address.
When you first open the window, only the Device section is expanded. Select a section heading to expand that section.
The Add Device window contains the following sections:
Device
The Device section displays basic information about the device.
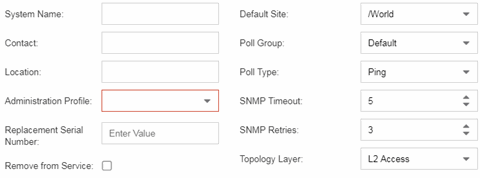
- Admin Profile
- Use the drop-down list to select the access Profile that gives the Discover tool administrative access to the devices you wish to discover. To create or edit a profile, open the Administration > Profiles tab.
- Default Site
- Use the drop-down list to select the map to which the device is associated.
- Poll Group
- Use the drop-down list to select a Poll Group for the discovered
devices. ExtremeCloud IQ Site Engine provides three distinct poll groups (defined in the
Options > Status Polling tab) that each specify a unique poll frequency. When you save
newly discovered devices to the database, they are polled with the
poll group specified here. If you save discovered devices that already
exist in the database, the poll group specified here overwrites the
poll group currently being used in the database.
NOTE: Poll Group is not used if you set the Poll Type to Not Polled. To use Poll Group, select a Poll Type other than Not Polled.
- Poll Type
- Use the drop-down list to select the Poll Type used to discover
devices: SNMP, Ping or Not Polled. When SNMP is specified, the SNMP
version (SNMPv1 or SNMPv3) is determined by the Profile
specified for the IP Range. If the Profile is set to Ping Only, the Poll Type must be set to Ping.
NOTE: On a Windows platform, device operational status cannot be determined for devices with their Poll Type set to Ping unless you are logged on and running ExtremeCloud IQ Site Engine as a user with Administrative privileges.
- SNMP Timeout
- The amount of time (in seconds) that ExtremeCloud IQ Site Engine waits before re-trying to
contact the device. The value for this setting must be between 3 and 60 seconds.
The value entered in this field overrides the default entered in the SNMP Advanced view in the Administration > Options tab.NOTE: When SNMP requests are redirected through the server, all SNMP timeouts are extended by a factor of four (timeout X 4) to allow for the delays incurred by redirecting requests through the server.
- SNMP Retry
- The number of attempts ExtremeCloud IQ Site Engine makes to contact a device after an attempt at contact fails. The value for this setting must be between 1 and 60 tries.
The value entered in this field overrides the default entered in the SNMP Advanced view in the Administration > Options tab.
Device Annotation
The Device Annotation section allows you to add user-defined information about the device.

- Nickname
- The user-defined nickname for the selected device. This is the name for this device that appears in the device tree in the left panel when nickname is selected in the How to Display Devices in Tree menu option in the OneView options menu in the Administration > Options tab.
Add Device Actions
The Add Device Actions section indicates the actions taken by the device upon being discovered.
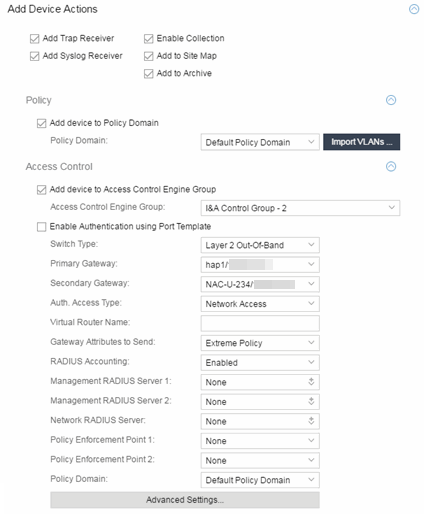
- Add Trap Receiver
- Select this checkbox if you want the devices being discovered to receive trap information it sends to ExtremeCloud IQ Site Engine.
- Add Syslog Receiver
- Select this checkbox to configure the devices being discovered to receive information it sends to the syslog.
- Enable Collection
- Select this checkbox to collect device statistics on the device being discovered you can use in ExtremeCloud IQ Site Engine reports.
- Add to Site Map
- Select this checkbox to add the devices being discovered to the map, as well as its parent site, that is associated with the currently accessed site. Selecting the check box also adds the devices to the map specified on the site's Add Action tab.
- Add to Archive
- Select this checkbox to create an archive, which saves the configurations of the devices being discovered in the Network > Archives tab.
Policy
- Add device to Policy Domain
- Select this checkbox to add the device to a policy domain you create on the Policy tab. When the checkbox is selected, use the Policy Domain drop-down list to select the policy domain to which the device is added.
Select the Import VLANs button to import the VLAN definitions from the policy selected in the Policy Domain drop-down list.
ExtremeControl
- Add device to ExtremeControlEngine Group
- Select this checkbox to add the device to an ExtremeControlEngine Group you create on the Access Control tab. When the checkbox is selected, use the Access ControlEngine Group drop-down list to select the engine group to which the device is added.
- Enable Authentication using Port Template
- Select this checkbox to allow users to authenticate using a port template, configured on the Site tab.
- Switch Type
- Use the drop-down list to select the type of switch you are adding:
- Layer 2 Out-Of-Band — A switch that authenticates on layer 2 traffic via RADIUS to an out-of-band ExtremeControl gateway.
- Layer 2 Out-Of-Band Data Center — A switch within a data center where virtualization and mobility are a factor. If an end-system changes location but does not move to a different ExtremeControl engine, ExtremeControl removes the end-system authentication from their prior port/switch. This allows VMs that quickly move from one server to another and then back again to still have their location updated in ExtremeCloud IQ Site Engine, because only one authenticated session is allowed per end-system in ExtremeCloud IQ Site Engine.
- Layer 2 RADIUS Only — In this mode, ExtremeCloud IQ Site Engine does not require any information from the switch other than the end-system MAC address (from Calling-Station-Id or User-Name). The NAS-Port does not need to be specified. If the switch supports RFC 3576, you can set the Reauthentication Behavior in the Advanced Switch Settings window. IP resolution and reauthentication may not work in this mode.
- VPN - A VPN concentrator being used in an ExtremeControl VPN deployment. In this case, you should specify one or more Policy Enforcement Points below. If you do not specify a Policy Enforcement Point, then ExtremeCloud IQ Site Engine is unable to apply policies to restrict access after the user is granted access.
- Primary Gateway
- Use the drop-down list to select the primary ExtremeControl Gateway for the selected switches. If load balancing has been configured for the engine group, the ExtremeCloud IQ Site Engine server determines the primary and secondary gateways at Enforce, and this field displays Determined by Load Balancer.
- Secondary Gateway
- Use the drop-down list to select the secondary ExtremeControl Gateway for the selected
switches. If load balancing has been configured for the engine group, the ExtremeCloud IQ Site Engine server determines the primary and secondary gateways at Enforce, and this field displays Determined by Load Balancer.
NOTE: To configure additional redundant ExtremeControl Gateways per switch (up to four), use the Display Counts option in the Display Options panel (Administration > Options > ExtremeControl).
- Auth. Access Type
- Use the drop-down list to select the type of authentication access allowed for these
switches. This feature allows you to have one set of switches for authenticating
management access requests and a different set for authenticating
network access requests.
WARNING: ExtremeControl uses CLI access to perform configuration operations on VOSS/Fabric Engine devices. ExtremeControl uses SNMP and CLI access to perform configuration operations on EXOS/Switch Engine devices based on the firmware version. - Enabling an Auth type of "Any Access" or "Management Access" can restrict access to the switch after an enforce is performed. Make sure that an appropriate administrative access configuration is in place by assigning a profile such as "Administrator ExtremeControl Profile" to grant proper access to users. Also, verify that the current switch CLI credentials for the admin user are defined in the database that ExtremeCloud IQ Site Engine authenticates management login attempts against.
- Switching from an Auth type of "Any Access" or "Management Access" back to "Network Access" can restrict access to the switch after an enforce is performed. Verify that the current switch CLI credentials for the admin user are defined locally on the switch.
- Any Access - the switch can authenticate users originating from any access type.
- Management Access - the switch can only authenticate users that have requested management access via the console, Telnet, SSH, or HTTP, etc.
- Network Access - the switch can only authenticate users that are accessing the network via the following authentication types: MAC, PAP, CHAP, and 802.1X. If RADIUS accounting is enabled, then the switch also monitors Auto Tracking, CEP (Convergence End Point), and Switch Quarantine sessions. If there are multiple sessions for a single end-system, the session with the highest precedence displays to provide the most accurate access control information for the user. The ExtremeControl authentication type precedence from highest to lowest is: Switch Quarantine, 802.1X, CHAP, PAP, Kerberos, MAC, CEP, RADIUS Snooping, Auto Tracking.
- Monitoring - RADIUS Accounting - the switch monitors Auto Tracking, CEP (Convergence End Point), and Switch Quarantine sessions. ExtremeCloud IQ Site Engine learns about these session via RADIUS accounting. This allows ExtremeCloud IQ Site Engine to be in a listen mode, and to display access control, location information, and identity information for end-systems without enabling authentication on the switch. If there are multiple sessions for a single end-system, the session with the highest precedence displays to provide the most accurate access control information for the user. The ExtremeControl authentication type precedence from highest to lowest is: Switch Quarantine, 802.1X, CHAP, PAP, Kerberos, MAC, CEP, RADIUS Snooping, Auto Tracking.
- Manual RADIUS Configuration - ExtremeCloud IQ Site Engine does not perform any RADIUS configurations on the switch. Select this option if you want to configure the switch manually using the Policy tab or CLI.
- Virtual Router Name
- Enter the name of the Virtual Router. The default value for this field is VR-Default.
WARNING: For ExtremeXOS/Switch Engine devices only. If ExtremeCloud IQ Site Engine has not detected and populated this field, enter the Virtual Router Name carefully. Incorrectly entering a value in this field causes the RADIUS configuration to fail, which is not reported when enforcing the configuration to the switch.
- Gateway RADIUS Attributes to Send
- Use the drop-down list to select the RADIUS attributes included as part of the RADIUS response from the ExtremeControl engine to the switch. You can also select Edit RADIUS Attribute Settings from the menu to open the RADIUS Attribute Settings window where you can define, edit, or delete the available attributes.
- RADIUS Accounting
- Use the drop-down list to enable RADIUS accounting on the switch. RADIUS accounting can be used to determine the connection state of the end-system sessions on the ExtremeControlengine, providing real-time connection status in ExtremeCloud IQ Site Engine.
- Management RADIUS Server 1 and 2
- Use the drop-down list to specify RADIUS servers used to authenticate requests for administrative access to the selected switches. Select from the RADIUS servers you have configured in ExtremeCloud IQ Site Engine, or select New or Manage RADIUS Servers to open the Add/Edit RADIUS Server or Manage RADIUS Servers windows.
- Network RADIUS Server
- This option lets you specify a backup RADIUS server to use for network authentication requests for the selected switches. This allows you to explicitly configure a network RADIUS server to use if there is only one ExtremeControlengine. (This option is only available if a Secondary Gateway is not specified.) Select from the RADIUS servers you have configured in ExtremeCloud IQ Site Engine, or select New or Manage RADIUS Servers to open the Add/Edit RADIUS Server or Manage RADIUS Servers windows.
- Policy Enforcement Point 1 and 2
- Select the Policy Enforcement Points used to provide
authorization for the end-systems connecting to the VPN device you are
adding. The list is populated from the N-Series, S-Series, and K-Series devices in your
Console device tree. If you do not specify a Policy Enforcement Point, then ExtremeControl
is unable to apply policies to restrict end user access after the user is
granted access.
- Policy Domain
- Use this option to assign the switch to a policy domain and enforce the domain configuration to
the switch. The switch must be an Extreme Networks switch.
- Advanced Settings
- Select the Advanced Settings button to open the Advanced Switch Settings window.
Ports
The Ports section of the Add Selected Device window allows you to enter information about the ports on a device. Select the Add button to add a new port to the list. Select the Delete button to remove a device from the list.
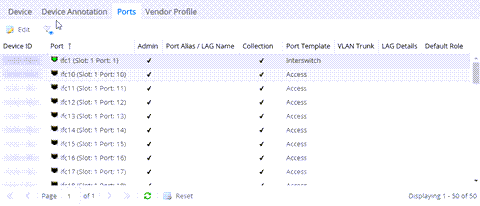
- Name
- Enter the name of the port, constructed of the name or IP address of the device and either the port index number or the port interface name.
- Configuration
- Use the drop-down list to determine the purpose of the port:
- Access — Select this option if the port connects to user end-systems.
- Interswitch — Select this option if the port is used to connect to other switches.
- Management — Select this option if the port is used to manage network traffic with ExtremeCloud IQ Site Engine.
- Add
- Select the Add button to add the device to the ExtremeCloud IQ Site Engine database with the current configuration.
- Cancel
- Select the Cancel button to close the window without adding the device to the ExtremeCloud IQ Site Engine database.
ZTP+ VLAN Definition
The ZTP+ VLAN Definition section allows you to configure VLANs on the device you are adding. To add a VLAN, select the Add button. You can remove a VLAN by selecting the Delete button.
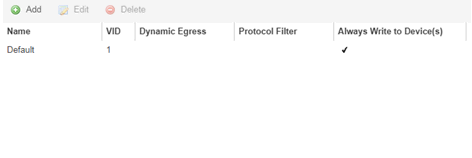
- VID
- Indicates the VLAN ID for the VLAN. A unique number between 1 and 4094 that identifies a particular VLAN. VID 1 is reserved for the Default VLAN.
- Dynamic Egress
- Indicates if the associated dynamic egress setting for the VLAN (Enable or Disable) is written to the device(s) when you enforce.
- Management
- Indicates which VLAN the ExtremeXOS/Switch Engine device uses for Management and assigns the device IP to that VLAN.
- Always Write to Device(s)
- Indicates if the VLAN is written to the device whether or not it is being used in a rule or role.
For information on related help topics: