When you have created and configured your fabric topology, service and service application services, you can apply them to sites within your network. When fabric topology and services have been assigned to a site, they cannot be deleted.
| NOTE: | Services not assigned to a service definition (where NONE has been selected) can be deleted from a site after they have been assigned to that site. |
Applying a Fabric Topology to a Site
- Open the Network > Devices tab.
- Select Sites from the left-panel tree drop-down list.
- Select a site in the left-panel tree.
- Select the site name tab in the Devices sub-tab.
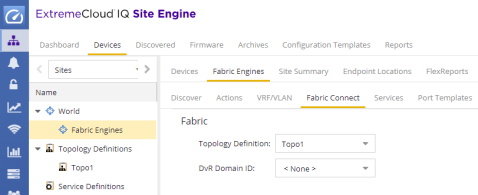
- Select the Fabric Connect tab.
- Select the topology you want to apply to the site from the Topology Definition drop-down list.
- Select the DVR Domain from the DVR Domain drop-down list.
- Select Save.
| NOTE: | Only one Fabric Topology and one DVR Domain can be assigned a site in ExtremeCloud IQ Site Engine. |
|---|
Applying a Service Application to a Site
- Open the Network > Devices tab.
- Select Sites from the left-panel tree drop-down list.
- Select a site in the left-panel tree.
- Select the site name tab in the Devices sub-tab.
- Select the Services tab.
- Select the service definition you want to apply to the site from the Service Definition drop-down list. The service application details that you configured to the service definition display in the L2 VPN and L3 VPN tables.
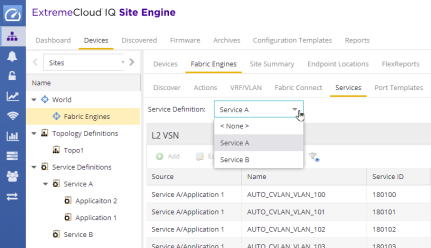
- Select Save to apply the services to the site.
Applying Fabric to Port Templates
The Port Templates Configuration window enables you to configure ports with a Fabric role. When complete, you can apply the Port Templates configuration to a device.
ExtremeCloud IQ Site Engine supports the following Fabric roles:
- None
- NNI
- Fabric Attach
- Switched UNI
- Transparent UNI
- Fabric Attach and Switched UNI
| NOTE: | The Fabric Attach (FA) and Switched UNI (S-UNI) option means that the port is configured for both features, but only one feature is active at any one time. The mode is determined by which mapping request the port receives first (FA or S-UNI). Ports receive mapping requests via LLDP TLVs. |
|---|
The following screen capture shows the Port Templates window, which you can access from either the World view or from a specific Site.
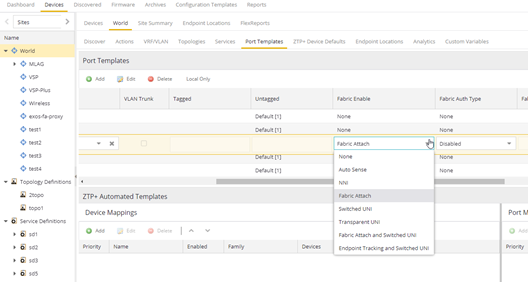
Use the following steps to configure fabric to a port template:
| NOTE: | Port templates for which you configure Fabric Enable values must be configured as Global port templates. To create a Global port template, select the World site and select Global from the Source drop-down list. |
|---|
- Open the Network > Devices tab.
- Select World or a specific Site, and then the Port Templates tab.
- Select a template, and then the Edit (
 ) button.
 - Under Fabric Enable, select a fabric mode.
- Under Fabric Auth Type, select an authentication type.
- Under Fabric Auth Key, select an authentication key if available.
- Select Save
Applying Fabric to Ports
The Port Configuration window enables you to edit the fabric information about the ports on a device.
ExtremeCloud IQ Site Engine supports the following Fabric roles:
- None
- NNI
- Fabric Attach
- Switched UNI
- Transparent UNI
- Fabric Attach and Switched UNI
| NOTE: | The Fabric Attach (FA) and Switched UNI (S-UNI) option means that the port is configured for both features, but only one feature is active at any one time. The mode is determined by which mapping request the port receives first (FA or S-UNI). Ports receive mapping requests via LLDP TLVs. |
|---|
Use the following steps to configure fabric to a port:
- Open the Network > Devices tab.
- Select Devices.
- Select the Menu icon (
 ) or right-click on a device.
 - Select Configure.
The Configure Device window opens. - Select Ports.
- Select a port, and then the Edit () button.
- Under Fabric Enable, select a fabric mode.
- Under Fabric Auth Type, select an authentication type.
- Under Fabric Auth Key, select an authentication key if available.
- Select Save.
Applying Fabric Services to a Device
After you have applied fabric topologies and services to a site, you can also apply the fabric services to devices assigned to that site.
Applying Fabric Topology to a Device
- Open the Network > Devices tab.
- Select Sites from the left-panel tree drop-down list.
- Right-click a site in the left-panel tree.
- Select Configure Device from the drop-down list. The Configure Device window opens.
- Select the Fabric Connect tab.
- Select the Sync from Site button to populate the tab with the fabric topology details you applied to the site. The topology details you applied to the site will be applied to the device, as long as the device you have selected is assigned to the same site.
- To populate the tab manually, select the Enable Fabric checkbox.
- Select a Fabric Role from the drop-down list.
- Enter a system ID number in the System ID field.
- Enter a nickname in the SPBM Nickname field.
- Check the Multicast checkbox, if needed.
- Check the IP Shortcuts checkbox, if needed.
- Enter the system name in the System Name field.
- Select the Enforce Preview button.
Applying Fabric Services to a Device
- Open the Network > Devices tab.
- Select Sites from the left-panel tree drop-down list.
- Right-click a site in the left-panel tree.
- Select Configure Device from the drop-down list. The Configure Device window opens.
- Select the Services tab. The service details that you configured to the site display in the L2 VPN and L3 VPN tables.
- Select the Sync from Site button to populate the tab with the fabric service details you applied to the site. The service details you applied to the site will be applied to the device, as long as the device you have selected is assigned to the same site.
- Select the Add (
 ) button to add an L2 VSN or L3 VSN service to the device.
 - Select the Edit () button to edit service details that were populated from the site.
- Select the Enforce Preview button.
| NOTE: | The L3VPN table is disabled when the device is set as a DVR Leaf node. |
|---|
Adding and Deleting VRF Definitions
- Open the Network > Devices tab.
- Select Sites from the left-panel tree drop-down list.
- Right-click a site in the left-panel tree.
- Select Configure Device from the drop-down list. The Configure Device window opens.
- Select the VRF/VLAN tab.
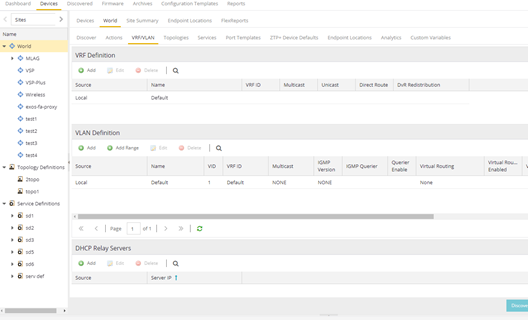
The top table on the VRF/VLAN tab in the Configure Device window displays read-only VRF details you applied to the site. You can add a new VRF to the device. - Select the Add () button.
- Enter the name of a VRF in the Name field.
- Enter the ID number in the VRF ID field.
- Select Update to add the VRF to the device.
- Select the Enforce Preview button.
- Select a VRF in the table.
- Select the Delete (
 ) button.
 - Select Yes to remove the VRF.
You can delete a VRF from the VRF/VLAN tab.
Adding and Deleting VLAN Definitions
- Open the Network > Devices tab.
- Select Sites from the left-panel tree drop-down list.
- Right-click a site in the left-panel tree.
- Select Configure Device from the drop-down list. The Configure Device window opens.
- Select the VRF/VLAN tab.
The middle table on the VRF/VLAN tab in the Configure Device window displays read-only VLAN details you applied to the site. You can add a new VLAN to the device. - Select the Add () button.
- Enter the name of a VLAN in the Name field.
- Enter the ID number in the VLAN ID field.
- Select Update to add the VLAN to the device.
- Select the Enforce Preview button.
- Select a VLAN in the table.
- Select the Delete () button.
- Select Yes to remove the VLAN.
You can delete a VLAN from the VRF/VLAN tab.
Enforcing the Fabric Configurations
After you enforce previews on the Fabric Connect, Services, and VRF/VLAN tabs, use the Compare Device Configuration window to enforce the configurations to the device. Additionally, the VLAN Definition tab allows you to enforce the VLAN and Ports fabric configurations.
Enforcing Fabric Connect
- Select Enforce Preview on the Fabric Connect tab in the Configure Device window.
- The Compare Device window opens.
- Select the Fabric Connect Enforce Option.
- Select Enforce.
Enforcing Fabric VRF
- Select Enforce Preview on the VRF/VLAN tab in the Configure Device window.
- The Compare Device window opens.
- Select the VRF/VLAN tab.
- Select Enforce.
Enforcing Fabric Services
- Select Enforce Preview on the Services tab in the Configure Device window.
- The Compare Device window opens.
- Select the Services Enforce Option.
- Select the L2 VPN tab.
- Select Enforce.
- Select the L3 VPN tab.
- Select Enforce.
Enforcing Fabric VLAN
- Select Enforce Preview on the VLAN tab in the Configure Device window.
- The Compare Device window opens.
- Select the VLAN Definition Enforce Option.
- Select Enforce.
Enforcing Fabric Port
- Select Enforce Preview on the Ports tab in the Configure Device window.
- The Compare Device window opens.
- Select the Ports Enforce Option.
- Select Enforce.
For information on related help topics: