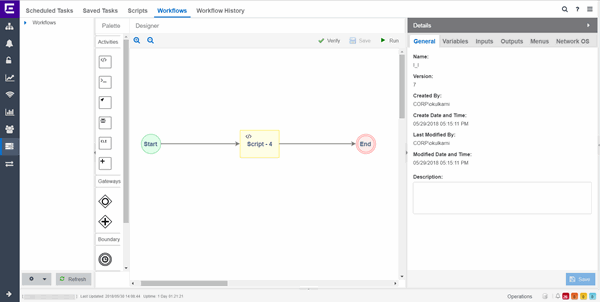
The Workflows tab allows you to view workflows you create modeled as diagrams, with each action linked in a chain. After you create a workflow, ExtremeCloud IQ Site Engine performs a single action or a complex series of steps with a single select. You can also define a set of actions in the event an action occurs successfully and another set of actions in the event an action does not occur successfully.
After you create a workflow, you can configure it as a task. You can then run the workflow task on specified devices or ports, either on a one-time or recurring basis via the Saved Tasks or Scheduled Tasks tab, respectively. Additionally, you can configure a workflow to automatically begin when an alarm occurs in ExtremeCloud IQ Site Engine on the Alarm & Events tab.
The Workflows tab contains four sections:
Workflows List
The Workflows list displays user- and system-defined workflows in the User Workflows panel and System Workflows panel, respectively.

- User Workflows
- The user-defined workflows, contained in the User Workflows panel, are workflows you create manually. You can also select a system-defined workflow, right-click and select Save As, then enter a new name for a workflow to use a system-defined workflow as a template when creating a new workflow. Additionally, you can import a saved workflow into ExtremeCloud IQ Site Engine by right-clicking Workflows or a Workflow Group in the User Workflows left-panel and selecting Import.
-
NOTE: Not all configuration information is imported when importing a workflow.
- System Workflows
- The system-defined workflows, contained in the System Workflows panel, provide you with sample workflows designed to perform tasks in ExtremeCloud IQ Site Engine. These workflows and workflow groups cannot be deleted or modified, but can be copied by right-clicking the workflow in the Workflows list and selecting Save As. Use the copies you create as templates to create additional workflows.
- Gear
- Select the Gear icon (
 ) to open a menu from which you can create a new workflow or workflow group, rename or delete the selected workflow or workflow group, or import or export a workflow as an encrypted file.
Palette
The Palette section contains the components available to create your workflow.
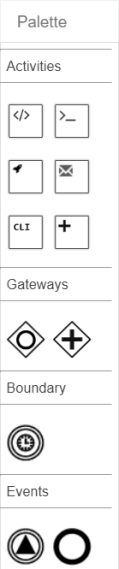
Drag and drop the icon from the Palette section into the Designer to add it to your workflow. Each icon represents a component you can use to create your workflow. Components are organized into subsections depending on their purpose.
| Type | Icon | Description |
|---|---|---|
| Activities |

Script Activity |
Use the Script Activity icon to add a script to your workflow. Drag the Script Activity icon into the Designer at the location in the workflow where you want the script to execute. Select the script and use the Details section to configure the script for the workflow. |

Shell Activity |
Use the Shell Activity icon to configure a shell command that is run locally on the server as part of your workflow. Drag the Shell Activity icon into the Designer at the location in the workflow where you want the shell command to execute. Select the shell command and use the Details section to configure the command for the workflow. | |

HTTP Activity |
Use the HTTP Activity icon to receive or distribute data. Drag the HTTP Activity icon into the Designer at the location in the workflow where you want the HTTP activity to occur. Select the HTTP Activity and use the Details section to configure the call for the workflow. | |

Mail Activity |
Use the Mail Activity icon to send an email if SMTP email options are configured. Drag the Mail Activity icon into the Designer at the location in the workflow where you want the email to occur. Select the Mail Activity and use the Details section to configure the email for that step of the workflow. | |

CLI Activity |
Use the CLI Activity icon to run a CLI command remotely on a device as part of your workflow. ExtremeCloud IQ Site Engine uses the CLI credentials specified in the profile of each device to run the CLI activity. Drag the CLI Activity icon into the Designer at the location in the workflow where you want the command to occur. Select the CLI Activity and use the Details section to configure the command for the workflow. | |

Activity Group |
Use the Activity Group icon to group multiple activities together, which allows you to use a common set of variables and receive a single output from the activities in the group. Drag the Activity Group icon into the Designer at the location in the workflow where you want to include the group. Drag the appropriate activities into the Designer and then drag them into the Activity Group box to add them to the group. The Activity Group box displays a dark blue border when activities are successfully added to the group. | |
| Gateways |
 Inclusive Parallel Inclusive Parallel |
Use the Inclusive Parallel gateway to create multiple paths for the workflow. The Inclusive Parallel gateway executes each path based on the output from the previous activity or activity group and then uses the conditions defined for each link. Using the Inclusive Parallel gateway, you can configure one path to execute if the previous activity completed successfully and another path to execute if the previous activity failed. You can also define conditions on each path, such that only the conditions that are TRUE are executed. For example, you can configure the gateway to execute a path based on the output of the previous activity (e.g. Firmware is less than version 10). Gateways execute all paths before moving on to the next activities. |
 Parallel Parallel |
Use the Parallel gateway to create multiple paths that execute simultaneously. This gateway executes all paths, regardless of the output of the previous activity. Unlike paths following an Inclusive Parallel gateway, paths following a Parallel gateway do not contain conditions. Gateways execute all paths before moving on to the next activities. | |
| Boundary |

Boundary Timer |
If an activity does not complete in the time specified in the Boundary Timer, the path of the timer is executed. For example, if the timer is set to 20 seconds (and the workflow engine performs a check every 10 seconds), then the boundary timer path may be executed between 20-30 seconds after the activity start time. Add the Boundary Timer by dragging and dropping the icon from the Palette section to the Designer section onto an activity or by right-clicking an activity and selecting Attach Boundary Timer. |
| Events |

Signal |
Add a Signal event to the workflow to generate an event when the workflow executes the path within the workflow. Use the Signal Type drop-down list on the Inputs tab to configure whether the event displays on the Events tab or if the event is sent as a Syslog message to the server you specify on the Inputs tab in the Details section. |

End |
Add an End event to indicate the completion of a path in the workflow. |
Designer
The Designer section of the tab allows you to organize the Activities, Gateways, Boundaries, and Events you select for your workflows. Drag the icons to reorder your workflow paths.
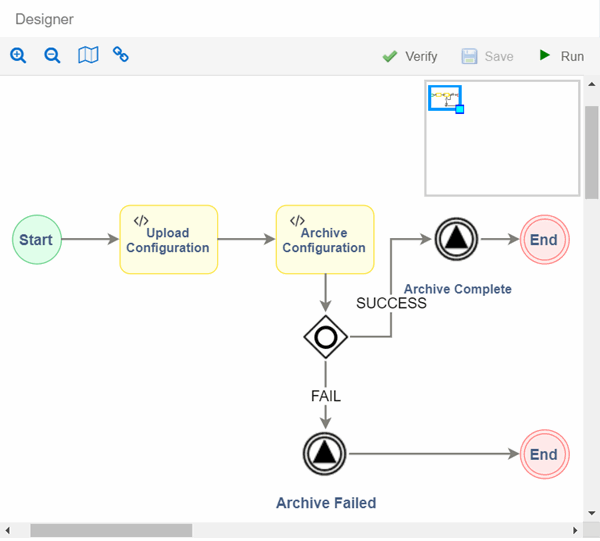
Double-click the center of an Activity, link, or Event in the Designer and a cursor appears allowing you to change its Name.
After organizing your workflow elements in the appropriate order, hover over each Activity and Gateway to link or delete each using the appropriate icon.
 Link — Select and drag the Arrow icon to link the item to the next item in the workflow. If the element's border around the next item is green, the link is valid. If the element's border is red, the link is not valid and the link is not created. A pop-up window appears describing the reason the link is not valid.
 Delete — Select the Delete icon to remove the item, along with the links to and from it, from the workflow.
The top of the section contains icons that allow you to manipulate and execute the workflow:
- Zoom — Zooms in and out of the workflow in the Designer.
- Toggle Mini Map (
 ) — Opens a small map displaying an overview of the entire workflow.
To move the area of focus for the Designer, move the cursor over the blue focus box in the mini map until the cursor changes to a Move icon ( ). Select the blue focus box and move it in the mini map to the area on which you want to focus the Designer.
Additionally, you can shrink or expand the blue focus box to automatically zoom in or out of the workflow, respectively. Select the light-blue box in the bottom-right corner of the blue focus box and resize the blue focus box as needed. - Link Edit Mode (
 ) — Select the Link Edit Mode icon to add a new activity, gateway, or event on a link. To add a new activity, gateway, or event in Link Edit Mode, drag and drop it into the Designer, then drag it to the link on which you are adding it.
 - Verify — Validates the workflow. Does not validate data in the Inputs tabs of the Activities included in your workflow.
- Save — Saves your changes to the selected workflow. If the workflow you are editing already has an assigned task, the new changes will be accepted and the related task is either updated (Task Status column remains blank) or the task will be marked as invalid (Task Status column contains Invalid).
- Adding an activity to the workflow.
- Removing an activity from the workflow.
- Adding new workflow input to the workflow.
- Removing existing input from the workflow.
- Run — Opens the Run Workflow window, from which you can configure the workflow you are executing. This window allows you to configure Activity Inputs included in the workflow that are undefined or require a prompt to run. Select the Previous and Next buttons to navigate through the items you need to configure. Select the Save Task button to open a menu from which you can save the workflow as a task in the Saved Tasks tab. Select the Run button to execute the workflow:
- If your workflow includes the devices variable, you are prompted to select the devices on which the workflow is run. You have the option of saving the devices if you save the workflow as a task.
- If your workflow includes the ports variable, you are prompted to select the ports on which the workflow is run. You have the option of saving the ports if you save the workflow as a task.
- If your workflow includes an Activity for which the Prompt User checkbox is selected on the Inputs tab, you are prompted to specify variable values prior to running the workflow. The Activity is included as part of the workflow.
- You are prompted to indicate whether the workflow is run on a scheduled basis in the Schedule Task window. To configure the workflow to run automatically on a scheduled basis, select the Enabled checkbox and select when the workflow runs. Selecting Enabled displays additional fields where you define the frequency ExtremeCloud IQ Site Engine runs the workflow, and the date and time range between which ExtremeCloud IQ Site Engine runs the workflow. Use the Email section to configure ExtremeCloud IQ Site Engine to send an email when the workflow is run, if desired.
Examples of changes that can change the status to invalid are:
Details
Use the Details section to configure the behavior of each item in the workflow, or the workflow itself. Select an Activity, Link, Gateway, Boundary, or Event in the Designer section to display the details for that item in the Details section. Use the Details section to configure the behavior of each item in the workflow.
The Details section contains tabs that vary depending on what you select in the Designer section of the tab:
General (Workflow)
The Workflow Details section includes a General tab that displays basic information about the workflow.
General (Element)
The General tab displays the basic information about the element you select in the Designer section of the tab.
- Name
- Name of the selected item. Double-click the center of an Activity, link, or Event in the Designer and a cursor appears allowing you to change its Name.
- Custom ID
- A user-defined alphanumeric ID for the selected item.
NOTE: The '-' and '_' characters are also valid.
Condition
The Condition tab displays when selecting a link following an Inclusive Parallel gateway.
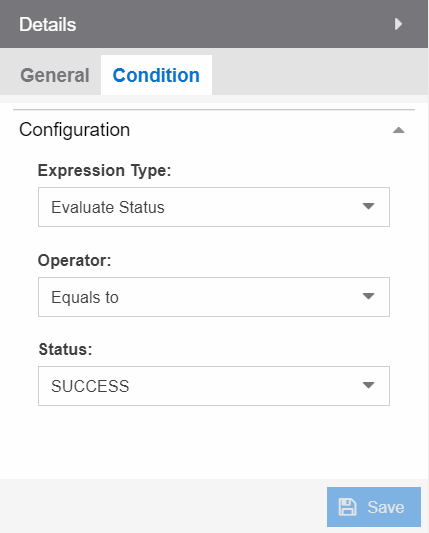
This tab allows you to select the conditions under which the workflow executes the path following the link. The link uses the output from the previous activity to determine whether the workflow continues executing the path.
- Expression Type
- The type of output used to determine the condition under which the workflow continues along the following path.
Valid options are:- Always True — The workflow continues down the path following the link, regardless of the output of the previous activity.
- Evaluate Status — The workflow continues down the path following the link based on the Status of the previous activity's output (e.g. SUCCESS, FAILED, and TIMEDOUT).
- Evaluate Variables — The workflow continues down the path of the link based on a comparative value of the variable's output (e.g. Firmware version is less than 8.2).
- Custom — The workflow continues down the path if the output matches the value in the Expression field.
Evaluate Status
- Operator
- Operator indicates the comparison between the output status of the previous activity and the Status you select (for example, Equals to).
- Status
- Status indicates the previous activity's output. ExtremeCloud IQ Site Engine compares this value using the relationship defined as the Operator against the output status of the previous activity to determine if the workflow continues the path of the link.
Evaluate Variables
- Variable
- Variable indicates the output variable ExtremeCloud IQ Site Engine uses to compare against the Value using the relationship defined as the Operator to determine if the workflow continues after the link.
- Operator
- Operator indicates the comparison between the Variable and the Value you enter (for example, Equals to or Not Equals to).
NOTE: When Operator is In, ExtremeCloud IQ Site Engine compares a variable against the values in a comma-separated list. If the variable contains a comma, the comparison fails. For example, if the variable is "abc,123" and the value is "abc,123", ExtremeCloud IQ Site Engine observes the variable as "abc,123" (one string), while ExtremeCloud IQ Site Engine observes the value as "abc" and "123” (two strings). The comparison fails because the string "abc,123" is not contained in either the "abc" or the "123" string.
- Value
- Value indicates the value against which ExtremeCloud IQ Site Engine compares the Variable using the relationship defined as the Operator to determine if the workflow continues after the link.
Expression
- Expression
- Expression indicates a custom expression ExtremeCloud IQ Site Engine uses to determine if the workflow continues after the link.
Variables
The Variables tab displays when selecting an activity or when nothing is selected for the entire workflow.
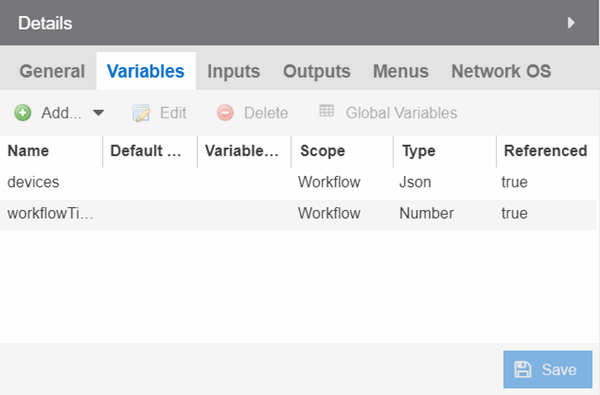
This tab allows you to add, edit, or delete variables used in your workflow. Variables you create serve as a placeholder for a specific value. After you create a variable, ExtremeCloud IQ Site Engine automatically substitutes the Value you define in the workflow or activity when the variable is selected. You can also configure the workflow to prompt you for a Value when the workflow is running.
ExtremeCloud IQ Site Engine comes with two system-defined variables, devices and ports.
The devices variable substitutes the device name in place of the variable, while the ports variable substitutes the port number in place of the variable. Devices and ports ExtremeCloud IQ Site Engine substitutes are specified when you run the workflow.
| NOTE: | If you delete the devices or ports variables, you need to add them back to the workflow. Use the Add > Pre-defined drop-down list in the Workflow Variables tab to add devices or ports variables back to a workflow. |
- Default Value
- Displays the value ExtremeCloud IQ Site Engine uses, if no other value has been specified, when substituting the variable. Enter a value associated with the variable type you define. This column is optional.
- Variable Reference
- Displays the variable on which the variable you are creating is dependent. For example, if you are creating a variable named Variable B, which uses the value of Variable A as its input, Variable A displays in this field. This field is only available when Scope is Activity.
- Scope
- Displays the extent to which the variable is used. Valid options are Workflow or Activity, depending on whether the variable is used throughout the entire workflow, or only for the currently selected activity, respectively.
- Type
- Defines the type of information the variable is substituting. Valid options are:
- String — Select to substitute a string. Additionally, select a Type of String when substituting a custom variable created on the Custom Variables tab with a Type of IP, MAC Address, Subnet.
- Boolean — Select to substitute the variable with a boolean operator.
- Number — Select to substitute the variable with a number.
- JSON — Select to substitute the variable with a JSON file.
- Referenced
- A value of True in this field indicates that the variable is used as the Variable Reference of another variable, or if the variable is used as the Input for an activity.
- Delete
- Select the Delete icon to remove a variable from the list.
NOTE: Variables for which Referenced is True cannot be deleted.
- Custom Variables
- Select the button to open a new window, where you can select custom variables to include in your activity. Custom variables include system-defined variables and those user-defined variables you create on the Site > Custom Variables tab.
Inputs
The Inputs tab displays inputs for the selected activity or inputs for the workflow when you select an activity or when nothing is selected for the entire workflow, respectively.
The fields on this tab change depending on the type of activity you select:
Enter the appropriate input configuration for your workflow.
Workflow
Selecting the Inputs tab when nothing is selected in the Designer section allows you to configure inputs for the entire workflow.
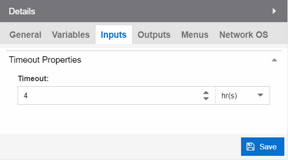
- Timeout
- Enter the amount of time the workflow will run before it times out. Because ExtremeCloud IQ Site Engine performs a check every 10 seconds to ensure all workflows are running within the specified duration, workflows may actually run up to 10 seconds longer than the timeout time you enter. For example, if you enter a timeout of 5 minutes for a workflow to execute, the workflow will cease execution within 10 seconds of the five-minute timeout designation.
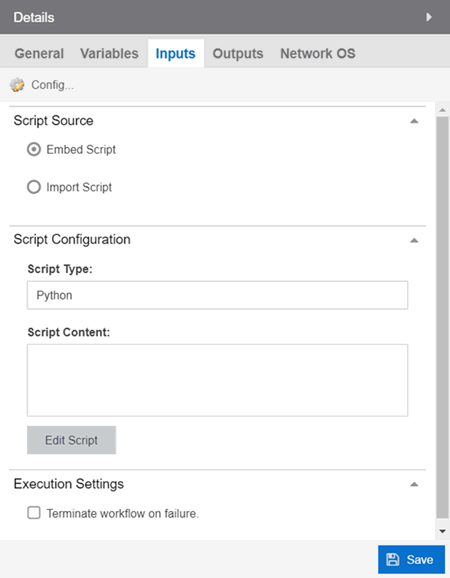
Script
Selecting the Inputs tab when a script is selected in the Designer section allows you to configure inputs specific to that script.
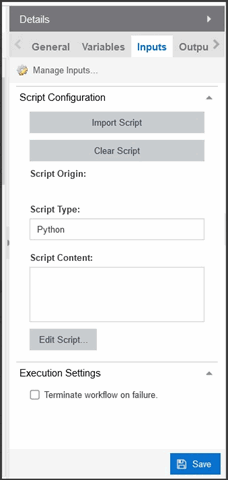
- Manage Inputs
- Select to open the Manage Inputs window to display a list of the variables the activity uses.
- Script Configuration
- Select a button to indicate the source of the script:
-
- Import Script — Select this option to import a script saved on the Scripts tab.
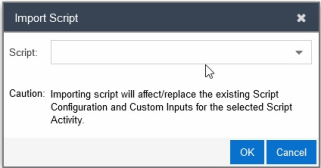
- Clear Script — Select this option to clear the contents of the script in the Script Content field.
NOTE: If you make changes to the script content in the activity, the changes are not saved to the script on the Scripts tab. If you make changes to the script on the Scripts tab, use the Import button to use the updated script in the Script Activity.
- Import Script — Select this option to import a script saved on the Scripts tab.
- Script Content
- The python scripts, CLI commands, control structures, and data manipulation being executed.
- Execution Settings
- Select the Terminate workflow on failure check box to stop the workflow if the workflow does not complete the activity successfully.
Shell
Selecting the Inputs tab when a shell activity is selected in the Designer section allows you to configure inputs specific to that shell activity.
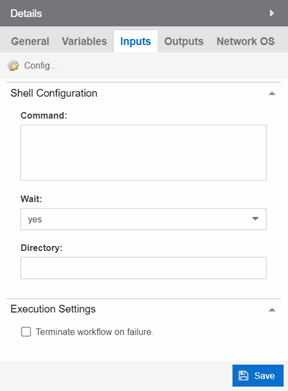
- Manage Inputs
- Select to open the Manage Inputs window to display a list of the variables the activity uses.
- Command
- Shell activity scripts must include a command, followed by one or more options or variables. Shell commands may also include subcommands, which would follow the options or variables in the script construction.
The Command field requires the absolute path to the script of the shell activity. Enter the shell commands to run this activity locally on the server as part of your workflow.
Following are examples of shell commands with options/variables and subcommands:/bin/sh -c "sudo /bin/cat /var/log/syslog | egrep -e "CLILOG|CLIAUDIT" | sed 's/</\n/g'"
Example 2: cat command from the system PATH for the user running ExtremeCloud IQ Site Engine (for example,root):/bin/sh -c "export PATH; sudo cat /var/log/syslog | egrep -e "CLILOG|CLIAUDIT" | sed 's/</\n/g'"
Example 3: cat command that uses workflow variable calledCAT_GREP_VAR:/bin/sh -c "export PATH; sudo cat /var/log/syslog | egrep -e "${CAT_GREP_VAR}" | sed 's/</\n/g'"
Example 4: Execute a custom command called 'foo' stored in an ExtremeCloud IQ Site Engine directory. /home/foo, which includes a single option stored in a variable. Set the "Working Directory" to/home/foo, so the variable starts in the correct directory to find foo:/bin/sh -c "export PATH; ./foo ${CUSTOM_VAR}" -
ThetimeoutandoutputMaxSizevariables limit the processing time and output used for the shell activity.
Thetimeoutvariable is the maximum time (displayed in seconds) that the shell activity will wait for the command to complete execution. The default timeout is 180.
TheoutputMaxSizevariable is the maximum number of bytes allowed for the output produced by the shell activity command. The default is 1MB.NOTE: If a shell activity script does not include the timeoutoroutputMaxSizevariables, the following default values will be used:timeout:180outputMaxSize: 1000000
| NOTE: | If a command includes subcommands, spaces, or uses quotes or special OS characters (for example, |), use quotes around the options/variables and subcommands. If the command uses spaces, use quotes around the entire command construction. |
|---|
- Wait
- Select yes or no from the drop-down list to indicate whether or not the workflow waits for the shell command to complete before continuing.
- Terminate workflow on failure
- Select the checkbox to stop the workflow if the workflow does not complete the activity successfully.
HTTP
Selecting the Inputs tab when an HTTP activity is selected in the Designer section allows you to configure the inputs specific to that HTTP activity.
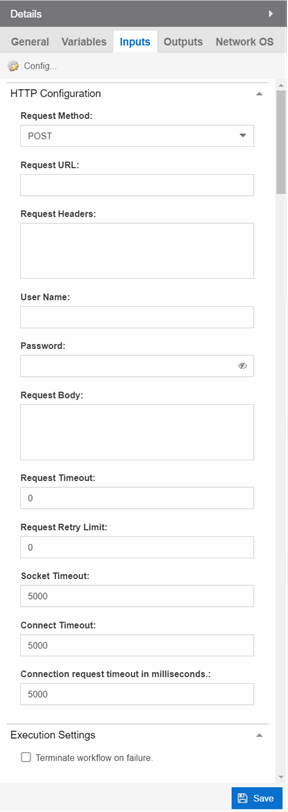
- Manage Inputs
- Select to open the Manage Inputs window to display a list of the variables the activity uses.
- Request Method
- The action the HTTP activity is performing:
- GET — Requests resource information from a specified URI.
- POST — Submits resource information to a specified URI.
- PUT — Overwrites resource information at the specified URI with the information contained in Request Body.
- DELETE — Deletes the resource at the specified URI.
- Request Header
- The HTTP header included with the request.
NOTE: Use the User Name and Password fields to include credential information without exposing it in the header.
- Request Retry Limit
- The number of times ExtremeCloud IQ Site Engine attempts the HTTP request before the request is canceled.
- Socket Timeout
- The amount of time (in milliseconds) ExtremeCloud IQ Site Engine waits for a packet before the HTTP request times out. ExtremeCloud IQ Site Engine performs a check every 10 seconds, so if the timeout is set to 10 seconds for an activity, then the boundary timer path may be executed between 10-20 seconds after the activity start time.
- Connect Timeout
- The amount of time (in milliseconds) ExtremeCloud IQ Site Engine waits until a connection is established. ExtremeCloud IQ Site Engine performs a check every 10 seconds, so if the timeout is set to 10 seconds for an activity, then the boundary timer path may be executed between 10-20 seconds after the activity start time.
- Connection request timeout in milliseconds
- The amount of time (in milliseconds) ExtremeCloud IQ Site Engine waits when requesting a connection from the connection manager. ExtremeCloud IQ Site Engine performs a check every 10 seconds, so if the timeout is set to 10 seconds for an activity, then the boundary timer path may be executed between 10-20 seconds after the activity start time.
- Terminate workflow on failure
- Select the checkbox to stop the workflow if the workflow does not complete the activity successfully.
Selecting the Inputs tab when a Mail activity is selected in the Designer section allows you to configure the inputs specific to that Mail activity.
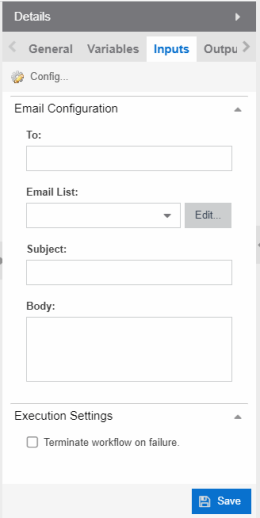
- Manage Inputs
- Select to open the Manage Inputs window to display a list of the variables the activity uses.
- To:
- Enter the email address or addresses to which ExtremeCloud IQ Site Engine sends an email when running the workflow. This field also supports the use of a variable in place of an email address. ExtremeCloud IQ Site Engine automatically sends the email when the progress of the workflow reaches the activity.
Use a semicolon to separate multiple email addresses. If you enter an email address in the To field and also select an email list from the Email List drop-down list, the email is sent to both the address and the address list. If you do not enter an email address in the To field or select an email address list from the Email List field, no emails are sent.
- Email List:
- Select the email address list from the drop-down list that includes the address or addresses to which ExtremeCloud IQ Site Engine sends an email when running the workflow. ExtremeCloud IQ Site Engine automatically sends the email when the progress of the workflow reaches the activity.
If you enter an email address in the To field and also select an email list from the Email List drop-down list, the email is sent to both the address and the address list. If you do not enter an email address in the To field or select an email address list from the Email List field, no emails are sent. Select the Edit button to open the Edit Email Lists window, from which you can configure your available email lists.
- Subject:
- The subject line of the email ExtremeCloud IQ Site Engine sends for the activity when running the workflow.
- Body:
- The body of the email ExtremeCloud IQ Site Engine sends for the activity when running the workflow.
- Terminate workflow on failure
- Select the checkbox to stop the workflow if the workflow does not complete the activity successfully.
CLI
Selecting the Inputs tab when a CLI activity is selected in the Designer section allows you to configure the inputs specific to that CLI activity. These
| NOTE: | Workflow CLI activities are run on devices using the CLI credentials specified in the ExtremeCloud IQ Site Engine Administration Profile. |
|---|
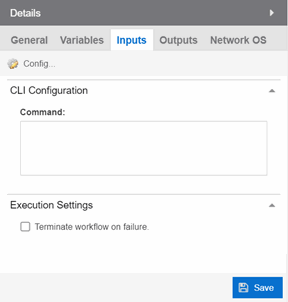
- Manage Inputs
- Select to open the Manage Inputs window to display and edit a list of the variables the activity uses.
- Terminate workflow on failure
- Select the checkbox to stop the workflow if the workflow does not complete the activity successfully.
Outputs
The Outputs tab displays when you select an activity or when nothing is selected for the entire workflow.
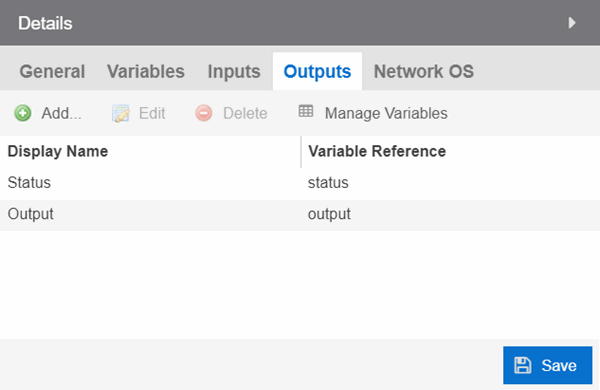
The Outputs tab allows you to specify the output variable you use to determine the result of the activity. You can then use this variable as the input variable for the next activity in the workflow, or as the final output in the workflow.
| NOTE: | Output variables configured via Output tab are only applicable to the Shell and HTTP activities. |
|---|
Select Save to save your changes to the workflow.
Menus
The Menus tab displays for the workflow level (for example, when nothing is selected in the Designer section). This tab allows you to select the users who can run the workflow by specifying the Authorization Group, the workflow's category, the menus in which you can access the workflow, and the device groups to which the workflow applies.
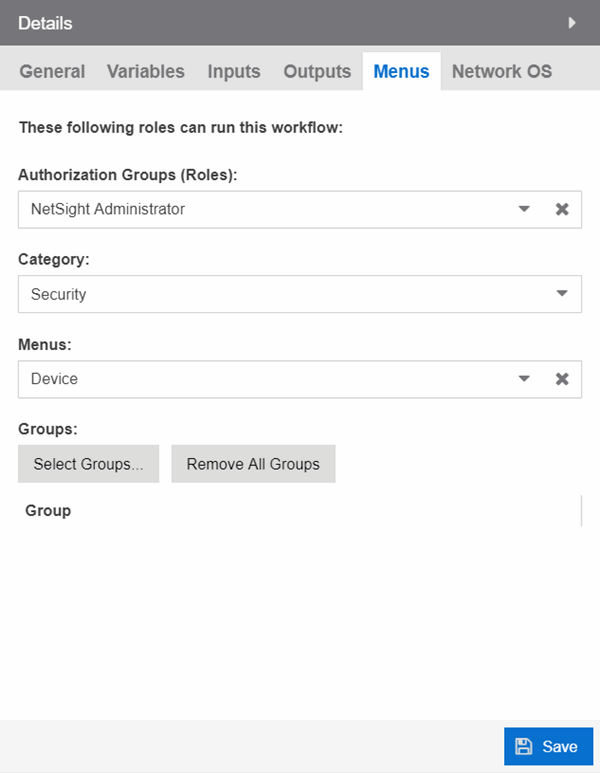
- Authorization Group (Roles)
- Select the Authorization Groups with the ability to execute the workflow from the drop-down list.
- Category
- Select the Category group from the drop-down list, which defines the Tasks submenu in which the workflow is grouped throughout ExtremeCloud IQ Site Engine. The locations in ExtremeCloud IQ Site Engine in which the workflow is available is determined based on what you select in the Menus drop-down list.
- Menus
- Select the locations in ExtremeCloud IQ Site Engine in which you want the workflow to display, depending on its purpose.
The following are the locations in ExtremeCloud IQ Site Engine where workflows are available:- Access Control Events — Includes the workflow in the list of Actions drop-down list available on the Access Control > Configuration > Notifications tab.
- Alarm — Includes the workflow in the list of task actions for custom criteria alarms. Selecting this location in the Menus drop-down list makes it available for a workflow to run from it, and it displays in the Source column on the Workflow Results table on the Workflow Dashboard.
- Device — Includes the workflow in the list of tasks available on the Network > Devices tab. Selecting this location in the Menus drop-down list makes it available for a workflow to run from it, and it displays in the Source column on the Workflow Results table on the Workflow Dashboard.
- Multi-Device — Includes the workflow in the list of tasks available when right-clicking a User Device Group on the Network > Devices tab.
- None — The workflow is only available via the Workflows tab.
- Port — Includes the workflow in the list of tasks on the Port Tree tab. Selecting this location in the Menus drop-down list makes it available for a workflow to run from it, and it displays in the Source column on the Workflow Results table on the Workflow Dashboard.
- Security — Includes the workflow in the list of tasks available on the Security tab. Selecting this location in the Menus drop-down list makes it available for a workflow to run from it, and it displays in the Source column on the Workflow Results table on the Workflow Dashboard.
- Groups
- Select the button to open the Select Device Groups window, from which you can select the device groups for which the workflow displays in the Tasks submenu.
Select Save to save your changes to the workflow.
Network OS
The Network OS tab displays when you select an activity or when nothing is selected for the entire workflow. This tab allows you to limit the workflow to run only on those devices with an operating system to which the workflow applies. The Network OS assigned to a device is included on the Vendor Profile tab.
| NOTE: | Select Unknown when creating scripts or workflows that include devices before their Network OS has been determined (for example, onboarding new devices). |
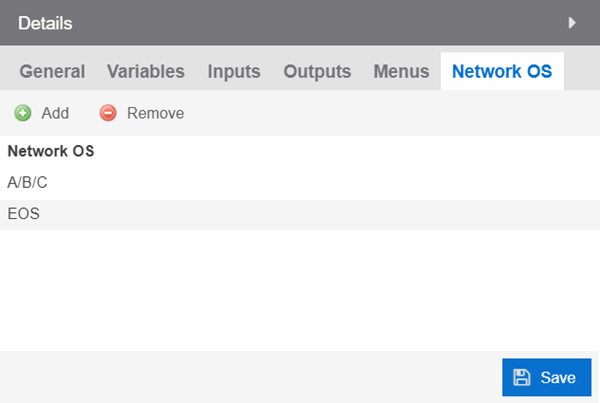
Running a workflow with no Network OS listed on the Network OS tab, the workflow runs on all selected devices, regardless of the Network OS configured for the device.
Running a workflow on a device whose Network OS is not listed on the Network OS tab for the workflow or activity, the Operations panel displays the message "No compatible devices found".
Select Save to save your changes to the workflow.
For information on related help topics:
![]()